House energy retrofit project 21

With roof completion on hold and no immediate scheduling for the remaining parts of the project, I had a little more downtime to usefully fill from my own to-do list. The hutch could wait until after one item with a slightly higher priority was handled. With the roofers no longer scrambling up and down the house I could get back to dealing with the splash issues at the front door, before anything bad started to happen around there.

    Water management revisited

[Click any image for a larger version.]
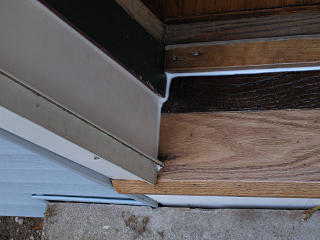
Caulking front door sill parts The first thing to do was make the whole sill assembly far more water-resistant. I sanded down the surfaces and gave the whole mess two generous coats of urethane, and a third coat on the outer half, and then went around the outer perimeter with a bead of caulk to try and prevent water landing on the sill from sneaking in under the trim.

I avoided caulking around the downhill sides of the storm-door frame and trim next to it, though, so any water inside could drain out to the front. Same principle as not sealing the lower flange of a window.


Bending flashing piece While poking through some of the siding and trim scraps, which clearly weren't going to get used, I found a piece of coil with a hem bent into it that was just the right size to apply over the gap behind the front stoop. Since the roofer's brake was still on site it was easy to unbend the hem and rework the piece a little to turn it into a drainage kicker.

This is how splash-guard will fit The concept was pretty clear, and this piece was the perfect shape to fit up under the sill nose and hang over the stoop edges a little bit. The only problem was how to flash it in with the siding around the door. To do that, I had to get some of the siding apart.

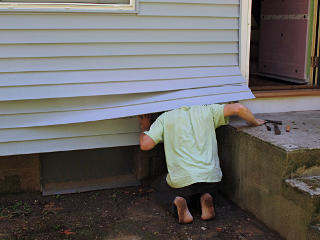
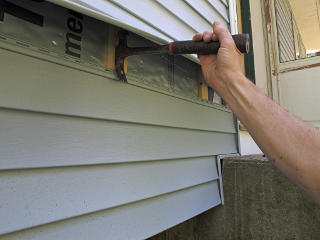
Accessing under siding I had already bought a "zip tool" and read various references on how to use it, as it's clearly something that every owner of vinyl siding needs to have. I ran across a great article on the topic that has far better pictures and explanation than I could have put together, and seems to even show the same siding color. The tool is really fun -- it's like a lockpick for siding. While not perfectly adapted to all types of interlock shapes it does pretty well; the key to success is to work it in at the *end* of a piece and then start running it along. Trying to grab and open a piece midway along just plain doesn't work.

So here the guys had worked so hard to rebuild my walls and get everything all neatly buttoned up, and here I was starting to rip it apart again.


It ate my head! The house got me back, though -- it ate my head.

How splash-guard flashes in With the lower flange of my flashing piece bent out just far enough, the top of the metal would poke up just past the wiggle between the halves of the siding course in question. Slitting along the middle bend was a relatively simple score-n-snap process, which I took along just far enough to accomodate the metal edge so it would flash perfectly into the siding piece itself and protect *everything* behind it. The J-channel got sliced off slightly farther down so it wouldn't look funny hanging way down over the metal but still retain the outer part of the siding. Small Azek blocks got added to space some of the metal's attachment points out to the furring plane.

Front door water barrier fixups The bottom lip of the metal got concrete-caulked down all the way along the stoop in the process, completing a seal to keep water 100% out of that vulnerable channel where the concrete was cut. The door itself still needed a bit more splash protection, as the nose of the sill still stuck out underneath it when closed and water could still back up under the storm door and then sit for a long time. A slightly redneck bit of aluminum tape was the quickest way to fix that short-term, with some notion of doing something more elegant later on. Overall the fix looked fine and visually continued the theme of the white storm door and trim onto the stoop, and the band of aluminum tape appeared fairly uniform from a distance and not particularly jarring.

Most importantly, no more water sitting on the oak sill trying to rot it.


Kitchen splash catcher Again, as long as the bending brake was still around I could take care of a few more little sheet-metal projects including this splash guard for the window buck behind the kitchen sink. This wood was at risk of being perpetually damp for fairly obvious reasons, and sat dead-flat behind the sink backsplash with nothing to send water to a safe place. I needed a sloped and water-impermeable surface here, and urethane and/or a coat of paint wasn't going to suffice. I had parts on hand -- a piece of thin flashing metal and a spare bit of the clapboard they'd used for window opening backdams.

Making a rounded bend on a brake is an interesting process of taking tiny little bites with the bender and backing the piece out a bit. I think I remember finishing it by pushing down by hand over a small piece of pipe or broomstick, just to round the whole surface a little more smoothly.


Kitchen window sill protected The metal piece and its support got designed to maintain a pitch inward toward the sink and flash *over* the sink ledge, protecting an area that often gets a lot of water damage in many homes. A bead of clear caulk was enough to seal the outer edge to the window frame, aesthetically passable even if the metal wasn't dead straight all the way across there. It met the frame so close to the opening I didn't want to add any kind of extra lip to the edge.

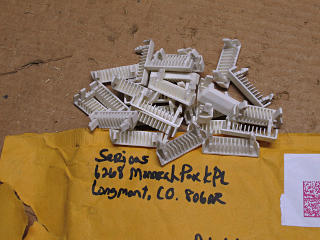
Weep tits from Serious In the meantime a generous batch of replacement weep-hole inserts for the windows had arrived from Serious, so I went around and filled in all the missing ones.

    Gimme shelter

Re-routing the HVAC electrics Now it was time to get the A/C hutch built. First step was to pull that lame vinyl fencepost and rework the electrics. The non-sheathed wires from the disconnect to the unit's power input also got pulled and re-run with a full piece of romex, routed farther away from that expansion-valve coil, and the plate with the mangled connection to the flex conduit got flattened back out.

[I learned later that the kid who originally screwed all this up still hadn't managed to straighten out and was eventually let go for real.]


It's a skinny but deep hole After figuring how far apart the posts needed to be I could place my centerlines for the holes and start digging. The holes would be right next to the base pad, and had to be narrow and deep. I don't have a post-hole digger but a combination of the crowbar, a small piece of wood and my hand is far more accurate anyway.

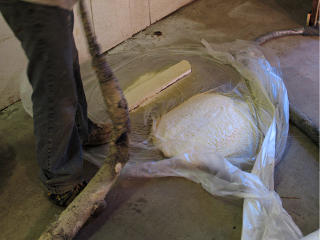
Once the hole reached about 2 feet down it got a bottom layer of smallish rocks to promote water drainage away from the end grain, the post set in and plumbed, and little bit of fill dirt a couple of inches up around it and tamped down hard with a 2x4. Next layer was a wad of concrete with its upper surface gently sloped up to around the post to encourage water to drain away from it and not be retained. Between the two rear posts I used up the rest of the quickcrete.


Aligning posts while concrete cures "Accurate", in the context of a hole in the ground?? Absolutely. The two posts had to be dead-nuts vertical in both axes and a precise distance apart to match the already-built hutch roof, and various temporary diagonal braces were needed on each one as its concrete cured. The first post was another piece of the old front-portico supports, pre-treated with a little wood plasticizer at the ends -- another little splash of that old hideous green that would stick around for a while. The other three were going to be ordinary pressure-treated 4x4 from the Despot.

With all the careful steps and waiting for the concrete to do a basic cure this took most of an afternoon, but was well worth the rock-solid results.


Pointy post retainers With two strong rear posts in place I wasn't intending to dig in the front legs, also anticipating some time way down the road where they might need to be moved out of the way to service the unit. So the two front posts would simply sit on the ground. To prevent them from shifting sideways I ran a couple of long Headloks into the ends and dremeled off the heads to form sharp points that would simply sink into the dirt and retain the end of the post in one spot. The coated screws would likely last quite a while before rusting away, and could always be replaced with galvanized or stainless later. Each post would sit on a pad of Azek with a hole through the middle for the pin, to put a water-impermeable barrier between the wood and the ground.

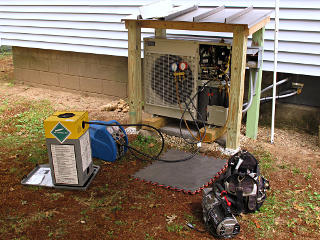
A/C hutch finished! Height for the two front posts was set via small mounds of fill dirt and a layer of the same small stone used for the wing-wall drip catchers, the top bolted on with a decent slant, and it was done! No interference with airflow at all, and very little with service access under the covers. The disconnect box tucked neatly onto a post, now mostly sheltered from rain and the wiring run in a much more sensible way.
While "hutch" isn't quite the right word for this structure, I haven't come up with anything better. Technically a hutch is a screened structure with a roof that rabbits and the like are kept in. I suppose if one stapled chicken-wire around all the posts, it would then qualify. But it's far too small to be a gazebo or a pavilion, and functions as a shade structure only in a possible tertiary way if that much, and I'm otherwise out of synonyms that might apply. Therefore, a hutch it shall remain.

Okay, so the old dormer-post is a little ugly but wtf, this is all grodey infrastructure stuff and it's hiding behind the house anyways. Maybe it'll all get some paint later on. I still think it's hilarious that the thing has a matching roof. The basic construction of this, anticipated in principle fairly far in advance, was one of many design-level driving reasons for wanting a slim-format heat pump unit with a horizontal air path in the first place -- it would be pretty much impossible to build an equivalent for a typical top-exit unit and get its drainage details right. That eliminated competing options such as Carrier iQ Greenspeed right up front.


    Refrigerant rework

With exterior issues on the HVAC unit taken care of, it was time to think about its internal issues as well. After the somewhat botched install and startup it had been working okay over the summer, but I still wanted a second opinion and possible rework. After a bit of delay and failure to communicate I finally managed to schedule an appointment with N.E.T.R., a local company that had been recommended by the Daikin application-engineering folks. They seemed understanding about my saga to date and not afraid of a homeowner with a clue, and said they'd put their "A" Daikin tech on the job. He's obviously a busy guy in high demand, and had also recently hauled all the way out to west bumfuk to have a look at a friend's systems at his cohousing site so we'd have an opportunity to compare notes.

This was going to set me back an additional bit of coin, but well worth having my system in a known state of repair.

The day for the checkup held a significant threat of rain later on, but there seemed to be enough time to do this in the morning. Just in case, I moved my canopy over the area in front of the unit to keep things drier in case it started spitting during non-interruptible operations but was careful to not place it too far in, as its wrong-sloping cover would shoot water *toward* the wall.


R410A recovery rig The guy arrived and I toured him through the system and the massive nordic saga behind it, and we agreed that pulling the old charge and doing all the proper pressure and vacuum tests before replacing it was the most sensible path to take. He got his recovery rig out of the van and hooked it up, put the system into the special "vacuuming" mode that opens all the valves, and extracted slightly under six pounds of refrigerant into the bottle.
A recovery machine is basically just a compressor that can handle both liquid and vapor, and move same from one place to another. It will bring a system to slightly negative gauge pressure but it is not a real vacuum pump.

Recovered refrigerant, even the more environmentally-benign R410A, has to have a paper trail. The recovery bottle is a one-shot thing per job and never got taken out of the box, and he had to write what was inside it and how much [from the electronic scale underneath] and even where the contents came from on the outside for when he took it to the collection facility. In theory, it all gets recycled and purified back into usable new refrigerant.

I assured him that the hutch and front posts could be disassembled and removed in a few minutes if he needed, but he seemed to have plenty of working room around the service valves with the post in place. Enough to put a couple of wrenches on the flare joints to check them, too. I had a vague notion we should open the flares for another check and maybe Nylog them, but his experimental pull on the big one let him know that it was *very* tight now and the better part of valor, in the interest of just not messing it up any further, might be to simply leave it as it was. I agreed, especially as we hadn't really tested it yet.


Nitrogen purge Pressure test
A tank of dry nitrogen was hooked up and used to break the recovery vacuum, and then he did a full-on pressure test up to 450 PSI. He put a small dot with a sharpie on his gauge where the high-side needle was and some leak-check goop on his own hose fittings, and we let it sit for several minutes during which the gauge didn't budge. While not the ridiculous 12-hour test described in the Daikin manuals, it was good enough for our purposes and if it had been done in the original install, would have pegged that leaking flare immediately.

This guy knew his stuff on these systems, and immediately spotted my extra pressure-sensor connector sitting on the wiring harness and asked "what's this?" I told him all about that and showed him my corresponding voltmeter connection breakout and pressure chart. I had also described the data-line switch inside and why it was there. He didn't bat an eye about any of this stuff, but instead realized that the two of us could basically talk tech-to-tech about everything we were dealing with.

He also pointed out that this model unit is actually geared more toward the small commercial market rather than residential, seeming a bit mystified as to why it had been installed for a home. I didn't have a good answer but postulated that maybe Daikin thought it the best match for the ducted air-handler, a relatively new product offering fundamentally obtained from another manufacturer and for which they'd maybe decided would go best with this outdoor unit and its slightly more sophisticated "D3-net" data-transmission setup. This implies that a typical residential minisplit probably uses a simpler control protocol.

I was sort of amused at the wheezy old manifold gauge he was using for this -- rather beat up, missing the glass, and very old-school. But it's mechanically tight and he uses this one *exclusively* for R410A work, eliminating any possibility of contamination from different refrigerants. It still had a little pressure in it behind the low-loss adapters from his last job, which he deliberately leaves in most of the time to keep ambient air out when it's stored in the van.


Vacuum drying Down to 400 microns
On releasing the test pressure he aimed the outlet hose blast at a light-colored rag, so we could check for any possible crud coming out of the lineset. There was maybe a tiny trace of refrigerant oil, but nothing that looked like dark brazing oxides. This was something of a relief.

Next came a triple evacuation, using a couple of relatively brief pumpdowns with nitrogen purge in between and then a final long one to boil away and pull out any remaining moisture. On the first run we could actually see a little mist coming out of the vacuum pump exhaust -- that's actually pretty typical on a just-emptied system, he said. For the final evac he hooked up a real micron gauge, which he had to clean the sensor on with alcohol a couple of times because it was being a little wonky. We wanted to get somewhere well under the industry-standard 500 microns, and this was going to take quite a while because once a system has had refrigerant inside it, for some reason various trace noncondensable gases take longer to purge.

While we were waiting for this, the tech showed me his printed copy of the service manual I had already mostly digested from the online PDF form -- he was pretty amused that I'd read all that stuff, but of course that makes me the informed customer. He also had a big looseleaf of slides from his training classes, which I *didn't* have. That would have made great reading because it probably translates a lot of those poorly-translated parts from the company-issue manuals into terms that techs can use in real life, as well as likely pointing out all the caveats and omissions and better real-world procedures for working on these units. Daikin doesn't hang that stuff out on the website...

He had pulled out the manual in the first place to double-check the spec on refrigerant fill quantity, even though I'd printed out the relevant pages from my PDF for him. This is when we confirmed that an additional pound and a half was needed to accomodate the indoor coil, and we added the compensation for the 17 feet of lineset to arrive at 7 pounds, 2 ounces. He just sort of shook his head in disbelief over the way the original installer had just ignored all these figures.

The vacuuming finally worked its way down to about 400 microns and didn't climb appreciably after the pump was shut off, so we declared it good and ready to refill with new refrigerant.


Almost took a complete fill Out came the pink bottle, valve-down on the scale to make sure only liquid was going in. He zeroed the scale and started slowly adding the juice, hoping the bottle had enough pressure to inject the full charge on its own.

It didn't, though, stopping about a pound shy of where we needed to be. Perhaps if it had been a colder day or his bottle was warmer it would have made it, but the saturation pressure/temperature curve wasn't in our favor today.


Using special filling-mode to finish No problem, though -- the system has another special mode used for filling. This basically runs the compressor fairly hard in cooling mode with relatively little restriction applied at the expansion valves, basically to just circulate the charge. Keeping the liquid-line service valve closed creates a situation very similar to a pump-down, letting the system push most of the charge into a dead end in the condenser and lower the whole lineset pressure down to where what's in the refrigerant bottle can easily overcome that and push more refrigerant in on the liquid side. He arrived at our desired seven-and-change pounds pretty quickly.

Pffft! The usual unavoidable trace amount of refrigerant went pffft! off into the great recovery vessel in the sky as things got unhooked, but we'd probably run more than that out the exhaust of the vacuum pump in the process of purging and drying the system. Hey, at least it wasn't R12.

Service Checker hooked up The tech wanted to do a couple of system runs with his diagostic computer hooked up. This uses a Daikin tool called a Service Checker, which is basically a specialized serial interface to go between a laptop and the F1/F2 data terminals that the system components communicate on. It's very similar to the OBD-II automotive diagnostic systems, in fact.

There had been a couple of little spits but the real rainstorm hadn't arrived yet, so we had some time to run through tests in both heating and cooling modes. With a nice moderate day we could put a good load on the system in both directions. Trips inside to mess with the 'stat weren't needed -- he could take control and override any setpoint right from the laptop.


Service Checker performance graphing The Checker had a concept of where various running parameters should be in the given conditions, and the live system readings came nicely right up to those targets as it stabilized. The tech was happy about that, and declared things to be in excellent shape now.

He possibly ran these tests a little longer than needed, but Service Checker is actually *dog-slow* about collecting its figures and he wanted to make sure we had good readings. Along with confidence that the system was now set up right, the fun HVAC geek-fest that he and I wound up having over this whole process was absolutely worth every penny I was paying for this visit. He said he'd mail me the data log file that the Checker had generated in the process, and did so after getting back to the office.

At one point he mentioned the existence of an "inverter checker" tool, which I might have run across a brief cryptic reference to in one of the manuals but no real details on. He didn't have one on hand, however. I found a few more hints about it online later and it seems to be a simple box that plugs into the compressor motor leads and lets the inverter output light some LEDs instead of spin the motor. In fact, it's likely very similar to the three-phase display we came up with to show the output of a Prius motor/generator, shown near the beginning of this tech-training summary. Bidirectional two-color LEDs are ideally suited for this sort of thing, so if I ever need an inverter-checker for this thing I know exactly what to put together.

The *right* flaring tool Flaring tool cam
Here's the flaring tool that *should* have been used on my lineset. Very precise, with a fine thread on the ram and a special rolling eccentric forming head that gently presses the flare out in a sequential fashion at exactly 45 degrees instead of just mashing a cone down into the end of the pipe.

Argh. Way too late to mess with mine now, unless it starts leaking again.


    ... And a wet Dow(g)

Stormy skies We got finished just in time, as the sky had turned *very* threatening and the wind was kicking up. As he packed up I put the unit cover back on and cut his check and after he'd departed, took the canopy down and stashed it in the basement. It had pretty much been up for most of the summer, and the cover probably needed a bit of cleanup after all that.


Attempt to waterproof the open rake This was to be the first real rain in a couple of weeks, and I knew parts of the incomplete roof and trim were still exposed and not necessarily protected particularly well. As long as the rain still hadn't really arrived I hauled out the ladder and got up there to see what I could do. To close up the shadow-board problem I ran a length of Dow tape all the way down to bridge the Grace and over the gap and right down onto the metal, hoping that would keep water out of that wood. That and another slap along the ridgeline, and a couple more patches over some screw heads partway down, was about all I had time to do before the big drops started coming down.

Splash from the hutch roof It was immediately obvious that drip off the roof overhang was pretty noisy on the outer few inches of the panels, and despite the outward slant there was a certain amount of splash back against the house wall. A steeper pitch wasn't really an option anymore, given how the top interfaced with the posts. I ran some pieces of backer-rod up underneath the center panels which reduced the clanking noise a little bit, and figured the eventual arrival of real gutters up above would pretty much eliminate the problem of high water volume landing on the top. But at least it was no longer landing on the condenser unit itself, and it and all the structural wood of the hutch top stayed completely dry, so I declared my little "baby roof" project a success.

    Foam fun with Foam Run

During the roofing I had gotten a visit from the spray-foam contractor, and we toured around the basement so he understood what needed to be done. I still had a bit more clearing away from the perimeter to finish, but he was pretty happy with the access I'd already created. Eventually we got a day scheduled to do the job, and I would make sure to be about as ready as I could for when they came in.

We had also finally resolved the whole closed-cell vs. open-cell foam quandary, as the Synergy folks had gotten some clarification while they were out at Joe's summercamp-slash-love-fest in Westford. They learned that moisture can not only migrate through wood, it can migrate across a junction of two pieces of wood touching each other and thus enter or leave a piece of wood that appears otherwise isolated in a structure. In addition, the concrete block that my sill is in contact with is relatively permeable including out toward the exterior above-grade surface which was going to remain uncovered by any kind of vapor barrier, so basically between the joists resting on the sill above and the block wall below the rest of the visible sill could safely be entombed in low-permeance closed-cell foam and still have ample drying opportunity. With my sill relatively high above grade in the first place we agreed that very little moisture was likely to capillary its way up through the wall that far, especially when the soil near the wall was going to remain far less wet under the new roof than it had previously. The moss growth patterns in various areas would tend to support the theory. [Compare with many houses where the mudsill is almost literally *in* the mud with mere inches of exposed foundation.] So closed-cell foam was clearly the way to go. Besides, I had more evidence right in front of me that moisture really just isn't a problem with this foundation in general.


Opening the building-science experiment In the continued interest of removing impediments to basement-wall access, I decided it was time to pull up the moisture-infiltration building science experiment. I hadn't ever seen any visible condensation behind the plastic all summer, and concluded that even with the runoff straight down the walls for a while there just wasn't as much moisture coming in through the soil and/or block structure as I might have feared. Not that there wasn't some -- the concrete underneath was definitely a little more moist-feeling than outside the caulk and what I scraped up definitely smelled a little like mushrooms, so it could still be a mold-rich environment without humidity control. I wiped down the area and gave it a shot of the anti-mold borate solution for good measure.

Strange cracked clouds On the morning scheduled for the spray-foam job, the sky had a rather odd "cracked" appearance that could make a nice wallpaper shot. Better this than the looming storm from a couple of days ago, however.

Spray foam truck arrives The foam truck arrived bright and early. The contractor warned me that the whole process might be a bit loud, as they carry their own power infrastructure and the process involves some amount of compressed air. After everything else we'd been through, I was unlikely to see any of that as a problem.

Basement items covered with plastic First thing the guys did was plastic up a bunch of stuff in the basement that we didn't really want to get overspray on. They even covered the "save me" board and old newspaper article I'd pinned up for photographing, and were properly amused at the inherent irony of the latter.

Window fan ready to vent basement While their foam compound and blowing agent is quite non-toxic and low vapor, we wanted to have good ventilation for the basement. We figured a fan in one window pulling air through from the other would be plenty; see why I wanted to keep the two openable windows at opposite ends?? So to have the most benefit from the fan they decided to begin the job right here so it would cure first and we could take the tape off relatively soon and let the fan move the most air during the remainder.

Tarping car against overspray With the fan pointing out across the driveway they suggested also protecting the car against airborne foam. They didn't seem too concerned about their own truck, but I threw a tarp over the near side of the car anyway.

Foam component tanks in truck Foam mixing pumps
The truck is a pretty amazing custom setup, with big tanks for the two foam components firmly mounted inside and -- guess what, all insulated up with spray-foam to keep the liquids inside warm. Each tank is fitted with a large electric heater. And the whole truck box itself is insulated, to keep all the handling equipment warm too -- the foam delivery stuff can't get too cold, or it simply won't work. With this rig, they can foam in pretty much any weather.

They've got two mixing pumps installed alongside, for main and backup delivery capability, and several hundred feet of hose they can hook up to reach from here out [and more often, up] to just about any area on a construction site.


50 kw generator up front It's all powered by a 50 KW [!] generator mounted in its own separate section up front, which powers the heaters, air compressor, and pumps for a totally self-contained infrastructure. It actually needs that much power to get everything stable for a given run of mixing and spraying. This was the loud bit the contractor warned me about -- they fired this sucker up right after arriving and let it run for a while to bring the tanks to temp, even though it wasn't particularly cold that morning. Vroooom.

Hose run out, vent fan running The hose is actually a group of smaller hoses wrapped in a big mesh sleeve, bringing the separate foam components through special insulated tubing along with a compressed air feed.

At this point everything was all masked up inside and I had the fan running, so we were ready to go.


Pulling out plenty of hose slack The guy pulled the hose from the truck all the way down to the end of the backyard, and then doubled back toward the basement bulkhead to have plenty of slack to work with.

In contrast to the generally big dudes on the construction crew, these guys were both *short*. Shorter than me, and I'm definitely not what we'd consider tall. Like they were the "foam hobbits" or something. Maybe that's better for crawling around attics and other confined spaces? Being on the small side has definitely given *me* certain advantages when squeezing through those tight interstitial spaces in old buildings.


Foam test patch They shot a test patch onto some plastic to make sure the mix was right, and were then ready to start.

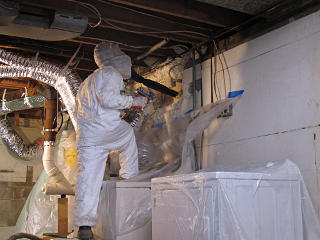
Starting foam job at fan window They stuck a spare scrap of styro of over the window opening and worked around it, to avoid sending too much foam through the fan. I quickly saw that the overspray and scatter was pretty minimal, and I could easily stay down here without any PPE and not worry about anything landing on me. The second guy didn't even suit up in Tyvek, just the primary guy spraying did and he didn't get that much on himself.

Accessing difficult spots Foaming behind HRV ducts
It didn't take long to work around to hit the difficult area -- behind the water heater, plumbing, and HRV vents which they said were fine to stay in place even though I'd offered to disconnect the HRV intake. They probably work routinely in much tighter spaces than this. He just went along in little pieces and didn't try to hurry, which is the right way to approach this as successive passes to build layers really need some settling time in between. It was also handy that he could just step up onto the HRV table.

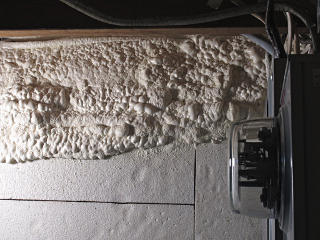
Up on washer to access along sill Finally he worked past the tight part, and the rest would be pretty smooth sailing along the sill area. They were foaming all the way around the foundation notches for windows and ex-window blockoffs, because that's where the 45-degree masonry parging continued from the sill and was a source of many air leaks. The whole idea here was to get a continuous air seal around the sill and related areas more than trying to add actual R-value, and connecting between the top of each bay down to the block wall and onto the top of the old styrofoam would cover all the known leaky bits along there.
I could see that these foam guns are not very forgiving tools, since they're designed to apply large volumes of this stuff at high speed in big buildings and here were only applying one delicate little strip of the stuff. The guy had to take *tiny* little shots, and it's rather impressive how quickly the foam expands after hitting a surface. I shot a little video of this. The steady hissing is from the compressed air, and the gun trigger valves in the foam components so they mix and then get shot out the nozzle as a fine but powerful spray. Not something you want your skin in the way of for a bunch of reasons.

Not only is the foam already warm, but the curing process is exothermic. Fairly high heat can develop inside applied layers, and the better foam installers know to go in very thin layers and give it generous expansion and cooling time before adding more. Extreme cases of foam applied too fast and heavy have actually started fires.

The guys were joking about one of their co-workers who wasn't on this job, who they said would have been "done already" when they were about halfway around. But that would have been at the expense of sloppy and hasty application, as apparently that fellow tries to shoot way more on per pass than he should. Hopefully they'll be able to talk some sense into him down the road.


Foaming behind the power panel The next difficult spot was behind the power panel. This used to be a huge air-leak spot because when the house was originally built, the old panel had apparently been put in before the mudding went around the sill and then when whoever was applying the parge got to the panel and couldn't easily reach the wall behind it, just gave up and skipped that part. So there wasn't even a hint of sill-to-foundation sealing back there and I'd wound up wedging handfuls of fiberglass into wherever I could feel cold air coming in. So with the new board and various wiring in the way, getting a foam gun back there wouldn't be easy either.

Fortunately the spray heads are fairly small, and from what we could determine the guy managed to wiggle it up in there and aim downward and lay a good line of foam all the way along the sill in both the bays in question. Between that and the fact that the exterior layers had gotten caulked to the wall too there were no discernible air leaks here anymore, even with the house depressurized in later blower tests.


Foam carved out for window And after less than two hours, they'd gotten all the way around the basement and were done spraying. Now it was time for some trim-up, notably to allow the windows to be operable again since the foam had intruded into their swing paths a little. This was quite easy with a utility knife, as the foam cuts pretty easily once mostly cured. I did this window and one of the foam guys did the other one; he cut away quite a bit more than I would have but he wasn't as familiar with the window geometry.

Not too much mess Even with various overspray and the trimming, there wasn't too much of a mess left and it all swept up pretty quickly. The foam fellas were back on the road toward another job by lunchtime. After another couple of hours I couldn't smell any hint of the already fairly innocuous odor anymore, but kept the fan running for the rest of the day just to give everything plenty of chance to offgas.

It's my man cave! As I had been out to Carlsbad Caverns the previous summer and came back with lots of pictures of stuff most people never see because it's too dark, the appearance of the foam struck me as rather similar to what I'd seen underground. This could only lead to one conclusion ...

It's my Man Cave!


This concluded the final component of the big retrofit, and now we were just waiting on the backordered roof material. There was a lot more that *could* have been done on the basement, and many case studies go into extensive detail on jobs that pour a whole new insulated slab floating in a foam "bathtub", put four inches of spray or rigid foam on the walls, dig out the entire foundation wall and slap Roxul or something on the exterior, etc etc. I decided early on that for my "not quite as deep as some" retrofit I probably didn't need to go to such lengths, given that the previous owner had added a nicely vapor-permeable R-5 layer of EPS when it was trendy in the seventies and I totally didn't mind if the basement generally ran a little cooler than the rest of the house in winter. The main thing was to get rid of all the air leaks, which my window/door reworks and now the sprayfoam had handily done.

In the meantime, there were numerous followup things that would be up to me to deal with, as it was pretty clear that the main construction crew was done with whatever they were going to do.


Bug screen hanging open With all the activity of the builders around the side door, they had forgotten to actually finish the details underneath and behind the stoop, leaving the bug-screen hanging open and exposing the polyiso -- in a location that had seen its share of carpenter ants in the past. I didn't even realize this was still open until quite a bit later -- an easy detail to miss with that pain-in-the-ass stoop covering everything. This definitely needed to be closed up and sealed, but there were two major problems to overcome: one, the screen hadn't really been cut wide enough to fold up very far, and two, just the difficulty of getting into this space. It might have been easier to take care of this before the door trim above went on, and I think I even remember the PM or one of the head guys call this out to some of the others along the way but it wound up overlooked nonetheless.

Bug screen open area fixed I found a scrap piece of Azek in my little hoard that would fit nicely, and drilled some deeply countersunk screw holes through the semi-obvious long way that would fasten it up in a continuation of the kick board above. Next, the challenging part: I managed to preload it with healthy beads of caulk and wiggle my way into the tight little space with it and a screw gun, and seat it up in there so it also pushed against the little edge of screen and the line of caulk right there sealed nicely to it. Without breaking either of my arms or getting myself hopelessly stuck.

The construction dudes were all on the big side, and would probably have had a pretty hard time fitting themselves into the narrow slot to do this given the interesting contortions *I* went through to get this together. I guess I can't entirely blame them for avoiding it. Well worth my followup effort, for the relief of not having a vulnerable spot in the perimeter.


Spare siding Another thing the builders left behind was the spare siding, under a ratty piece of wrap in the backyard. Realizing that nobody was going to take it away I pulled it out of the boxes to see just what I had left. Obviously I should save some of it in case the siding on the house needed any repairs, but this was probably more than I needed along with a bunch of relatively useless cut-offs. There was also a modest pile of soffit pieces already pre-cut to fit the front and side overhangs.

Moldy siding boxes Siding box fungus rhizomes
The boxes had been lying on the ground for a couple of months, and had turned to disgusting moldy oatmeal. I found more interesting rhizomes to explore the aesthetics of before hucking the whole mess into the dumpster.

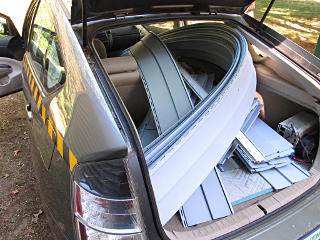
I saved out a dozen or so clean "fullies" and the soffit and a little bit of trim for spares, and the next problem was finding somewhere that would take the rest for recycling. It's generic "number 3" PVC, which most facilities can handle nowadays, but the twelve-foot-floppy form-factor evidently threw them off. My town wouldn't take it. The lumberyard the siding came from couldn't take it but eventually pointed me at a place in Framingham that might -- for a price. No wonder stuff like this just gets hucked into dumpsters -- trying to do the Right Thing meets too many roadblocks.


Prius-load of full siding pieces As a last-ditch effort I finally tried the "ReStore" at the local Habitat for Humanity, and they'd be delighted to accept it into their building-materials pool including all the miscellaneous cut-offs. Not sure what they could do with the relatively small quantity as far as actually using it as siding, but I wasn't going to argue. Arranging to take it to them made another fun shot for the Prius loads page.
It's actually been somewhat tempting to volunteer as build crew on some of the Habitat projects, as it might provide more learning experience. But they often get into some pretty nasty neighborhoods, so that along with the organization's religious ties gives it significantly less appeal.

Next section   (22)
Index

_H*   121226