
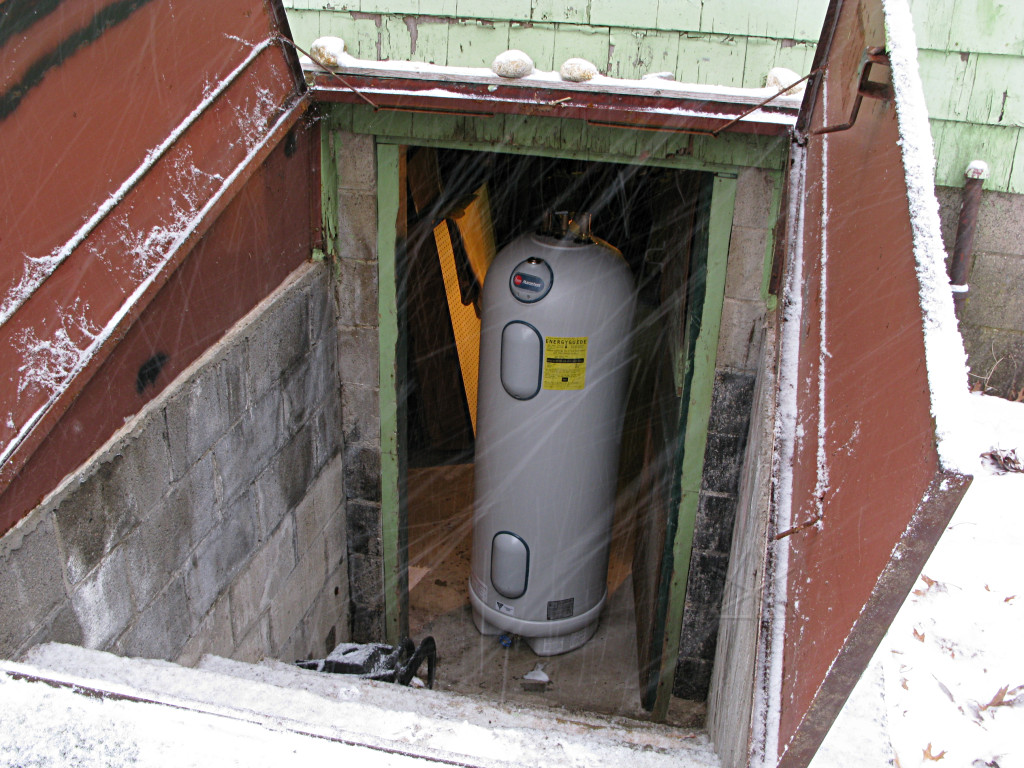
The brilliant white cinderblocks are explained in another document.
Discovery
|
In the middle of February '08 I discovered the hard way that it was time for
a new water heater. Actually I got pretty lucky and there were only a few
large puddles sluggishly creeping across the basement floor by the time I
found out, rather than the several feet of water and significant collateral
damage that it could have been. It could have been leaking for hours or days,
I have no idea since I don't go down there all that frequently.
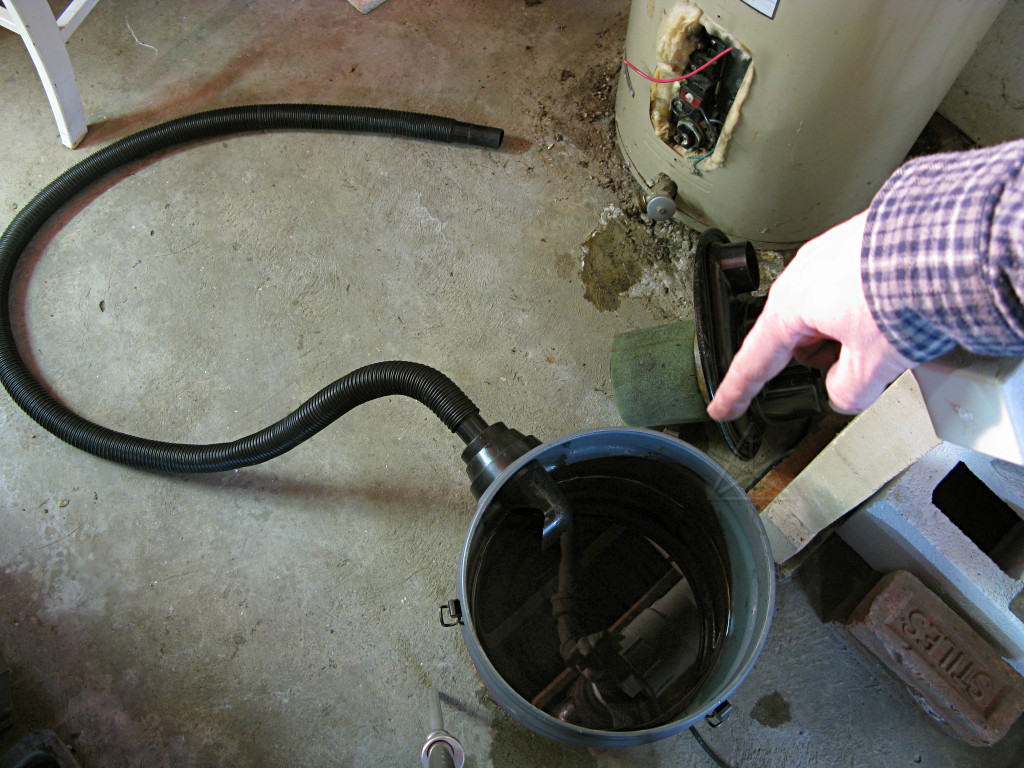
Anyway, this radically altered my priorities for that evening and I began triaging. After shutting off the cold supply to the heater [fortunately the valve, under its centuries of green encrustation, still appeared to work and didn't crumble in my hands], I worked on slurping up the water with the wet-vac and dumping it outside the basement bulkhead. Then came the problem of emptying the heater so its remaining contents wouldn't also leak out, assuming the leak was near the bottom. The drain stopcock was all of an inch above floor level, which does no good in a basement with window-level grade all the way around the house and no sump well. Those common diagrams showing how to blow down a water heater into a "nearby convenient drain" were all for naught here. However, the wet-vac hose fit very nicely over the stopcock outlet and I was able to drain the heater by sucking out a dozen or so vac-tank-loads of water and dumping them outside too. It took a while and was very noisy, but at least now I knew that the leakage was stopped. After things felt like they were under some semblance of control did I think about grabbing any pictures, because something told me this was the start of a somewhat involved project. I thought it rather ironic that water heaters had just recently been a subject on a local homeowners' mailing list that I'm on, with a couple of other people asking for recommendations on, uh, very short notice. |
|
|
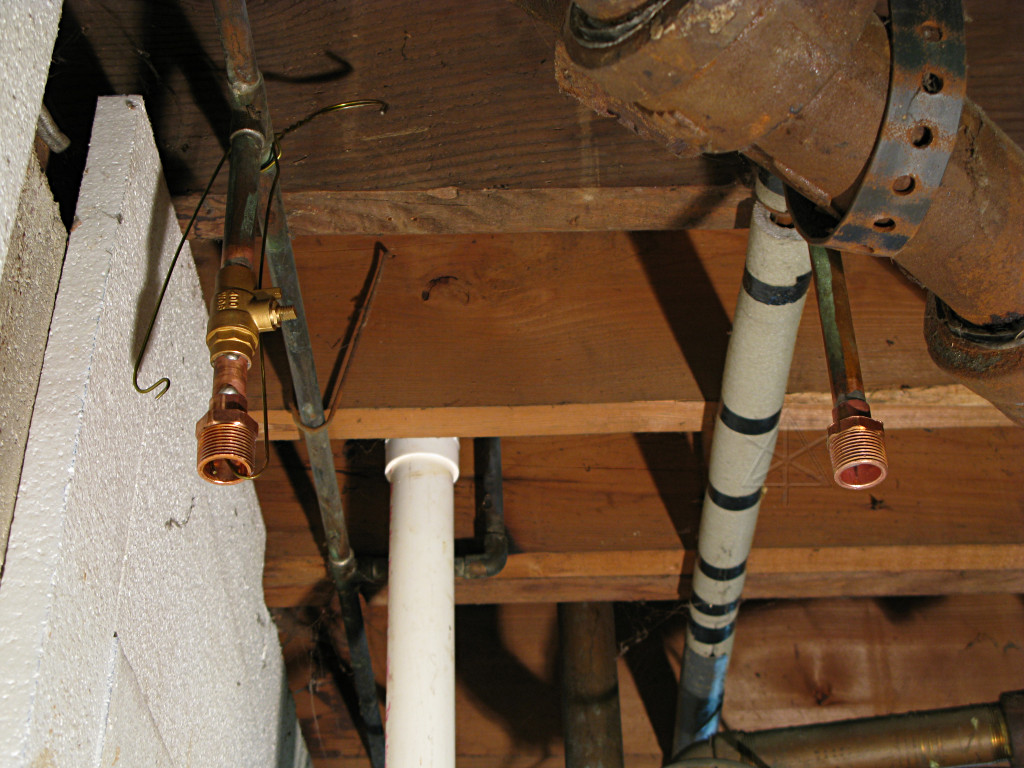
This was the scene after about two frantic hours of work with the wet-vac, but
the floor was actually beginning to dry up. Yay for the arid air generally
found inside a house in the winter! The offending appliance is back there
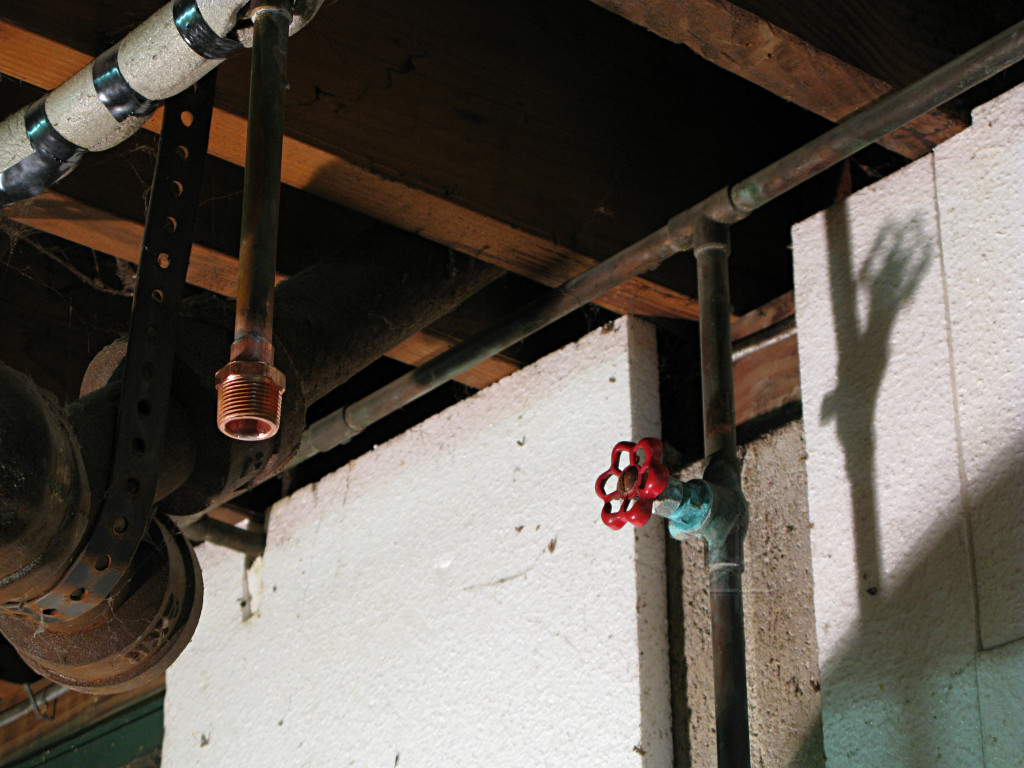
[green arrow], behind the PVC septic pipe. To shut down the entire hot side
of the system I also had to turn off the kitchen sink hot supply, since
otherwise cold water could easily crossfeed back into the hot pipe through the
single-handle mixing valve even if it was kicked all the way over to cold.
It's not that precise by any means, and I didn't want anything collecting back
into the heater tank.
The brilliant white cinderblocks are explained in another document. |
|
Once things were more or less cleaned up and stabilized and I could think
straight again, what followed was a whole lot of investigation into water
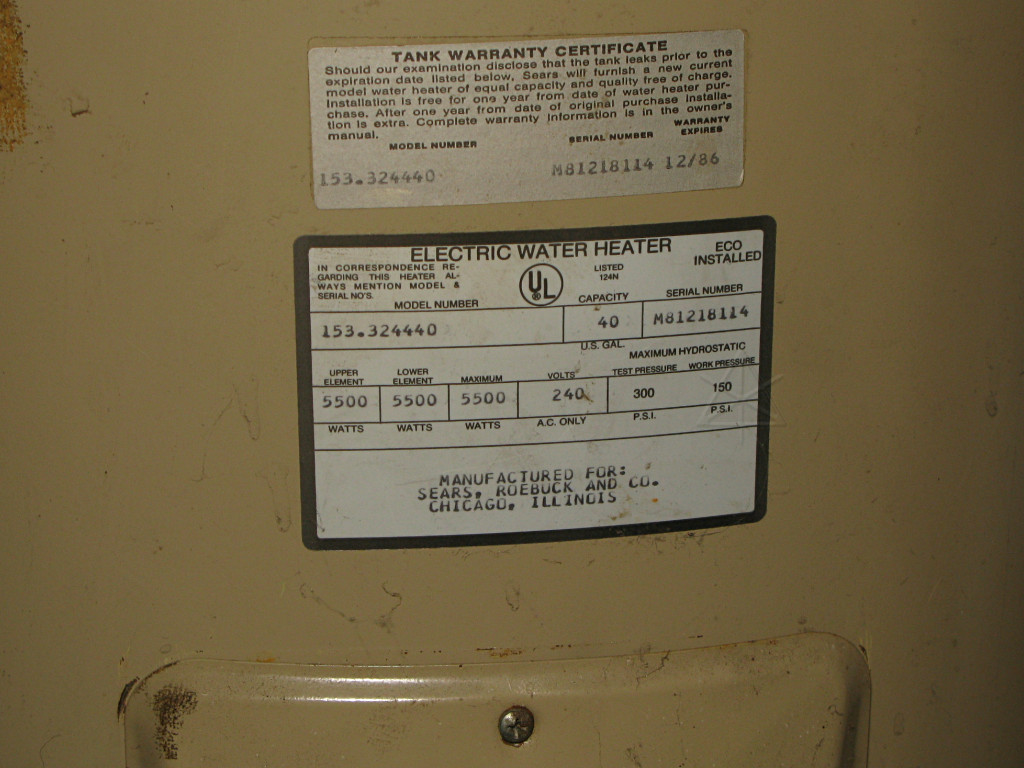
heaters and plumbers on the net. This 40 gallon electric heater had come
with the house; given when its warranty ran out it's pretty clear that the
thing had been on borrowed time for quite a while. I was almost surprised it
took this long to start leaking.
My options were a bit limited, though. With no gas service in the neighborhood it's almost impossible to do a tankless system, and my anemic electric feed probably couldn't handle any of the relatively few electric tankless heaters that seemed to be available. Any tanked system less than 30 or 40 gallons appeared to be considered "point of use" class, suitable for only one sink or shower, so it didn't seem worth downsizing in any particular way. |
|
But I needed to figure out what to do relatively quickly, because not having
hot water sucks in a variety of ways and in the winter, the stuff coming in
from the street is *very* cold despite all the piping being below frost line.
My ongoing research [and waiting for return calls] was punctuated by more
visits to the scene downstairs as I became more resigned to the concept of
having the thing replaced. Sure, it's a fairly common occurrence, but it
hadn't happened to *me* yet and I was pondering the situation in my usual
tiny careful steps.
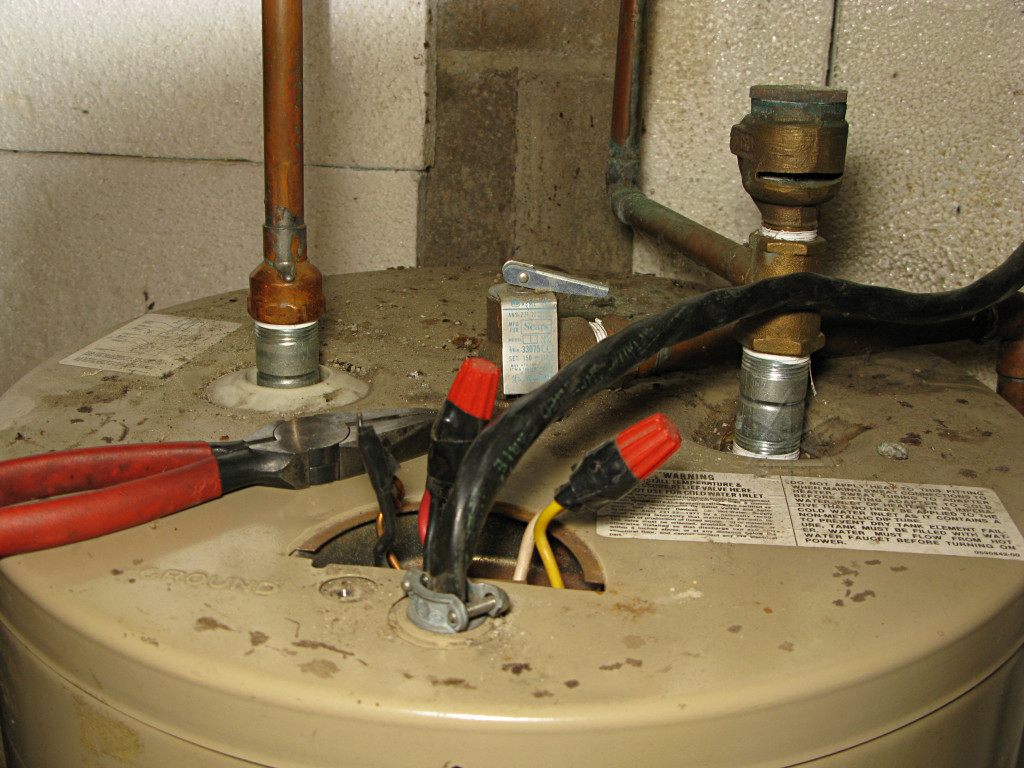
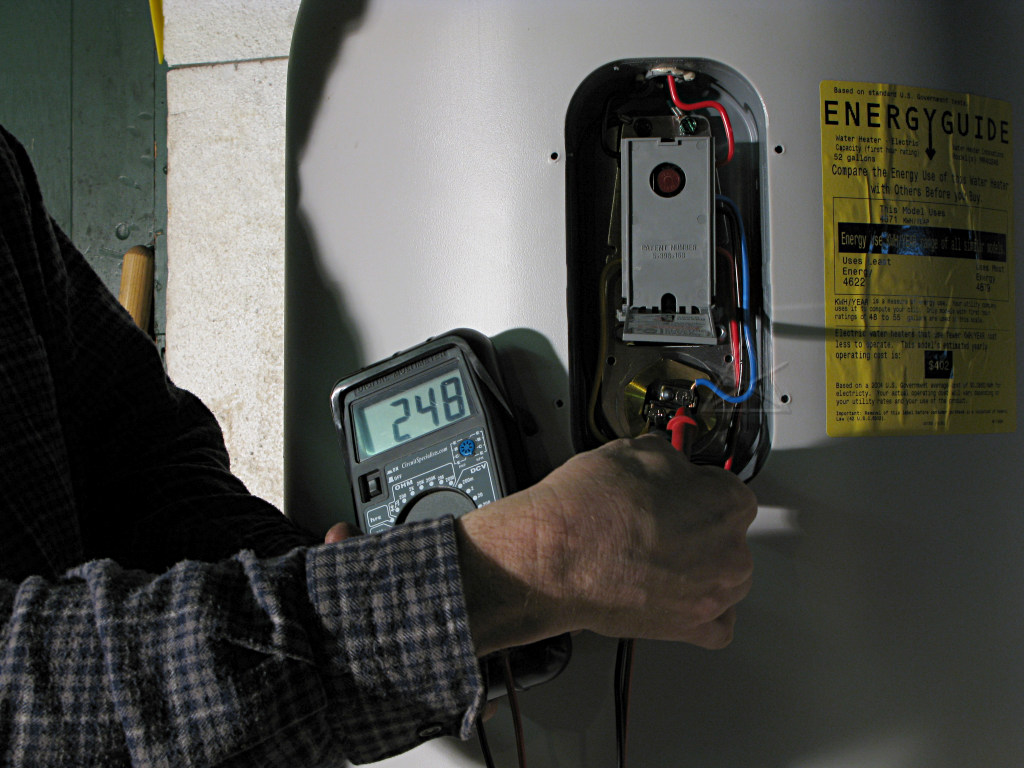
However this was going to proceed, I figured as much as I could do to unhook and remove the old tank would help, so to that end I began disassembling whatever parts I felt comfortable working with, such as the electric supply. And discovered that the numbnuts who wired this thing had used red and *white* for the 240V, including back at the disconnect box, so that would ideally be fixed back to black and red. Other than that the electric side of things wasn't that scary, the wire was in good shape and had plenty of slack to reroute to a new heater as needed. I hesitated to tackle any of the plumbing, so the heater and its crufty old piping remained in place for the moment. |
| So, what had gone wrong? Some bit of autopsy attempt was definitely in order, so I started removing the elements to try and uncover the lurking horrors within. A lot of crusty black icky stuff came out with them. |
| Both elements out. Also visible is the drain tap and some of the rather uneven concrete pad area underneath. |
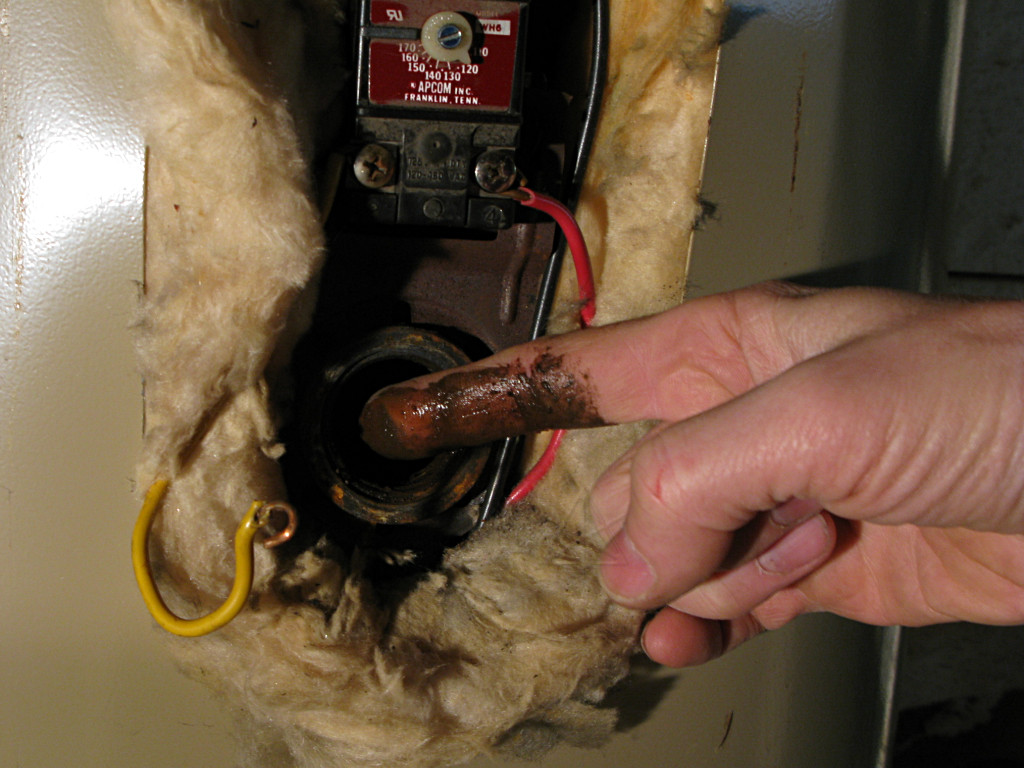
| A quick swab around the inside of the hole with a finger returned this. Blech! The water coming out of this thing was supposedly *potable*?! |
|
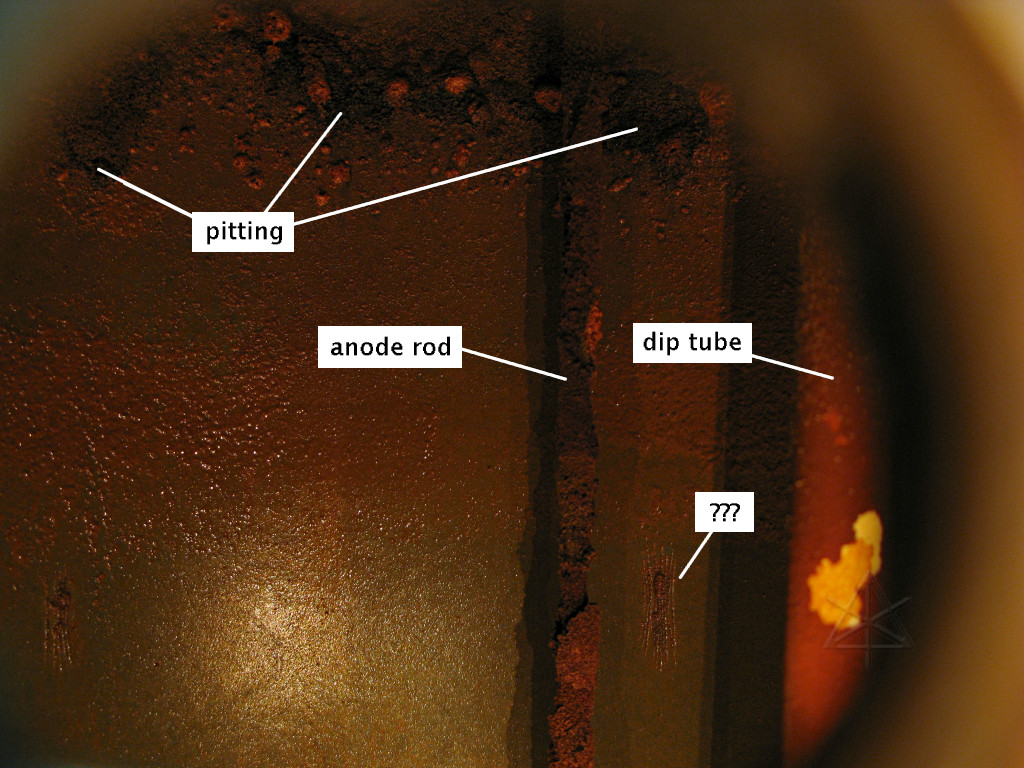
The inside of a water heater is ... very dark. To try and see inside I stuffed
part of a string of christmas lights down the upper hole, which provided a
rather feeble glow but just enough to try and get some pix on a *very* long
exposure. This is the upper section, with parts labeled in the big picture.
The corrosion is pretty obvious, and given that a> the slow flow
across the basement floor ceased soon after I began draining the tank and
b> the fiberglass insulation was damp around the upper element too,
I suspect that the leak was actually from near the top somewhere. Short of
cutting the whole thing open, I'd probably never be sure. The sacrificial
anode appears to have long since made its ultimate sacrifice, leaving only the
steel tank itself for corrosive agents to attack. The "dip tube" brings cold
inlet water to down near the bottom of the tank, allowing the warmed water to
rise by flow and convection to the top where the hot outlet is.
A couple of the small pitted areas have sets of fairly uniform scratches around them, which is quite mysterious. |
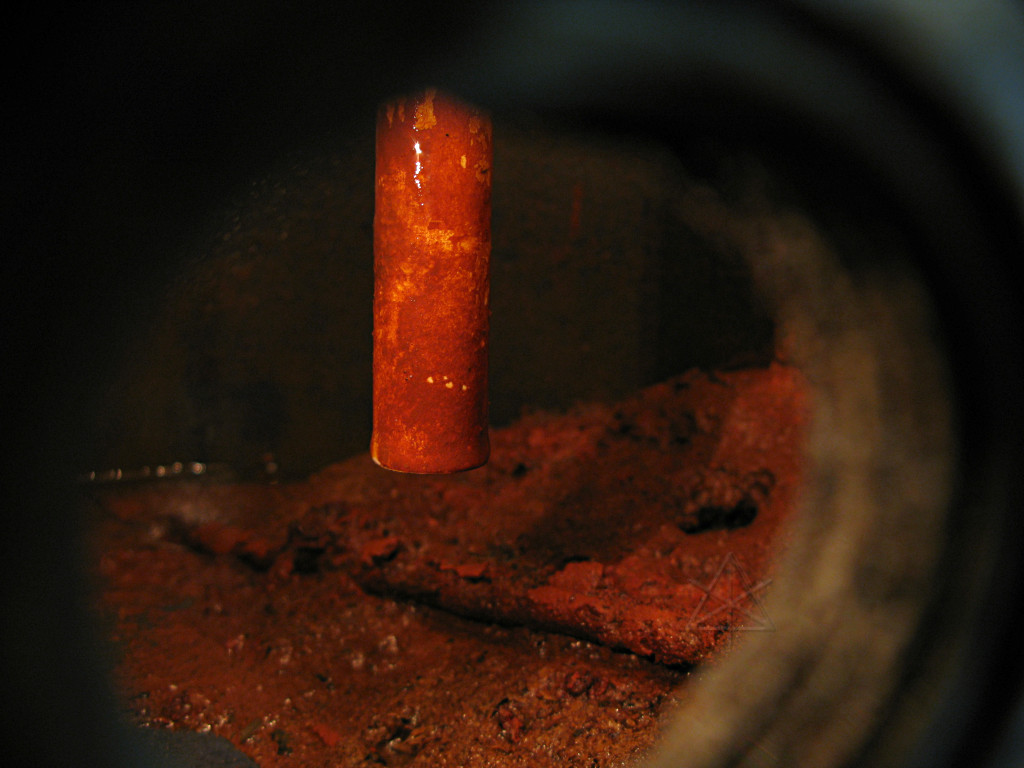
| Through the lower element hole we see a lot of accumulated silt, and maybe more of the anode rod that broke and fell off. Given the slant and the hint of bare enamel area in the foreground, there was probably much more silt in there before starting this process since I never really bothered to flush out the bottom of this thing. [Does anyone actually DO that?] Deposits in that area, toward the drain valve, may have gotten sucked out by the vigorous pull of the wet-vac. |
|
So the old unit was pretty clearly toast. Looking at the field of available
replacements was depressing -- tank warranties of only 5, 7, maybe 10 years.
Standards have evidently lowered severely in recent times, with new units
really expected to last less than a decade. That's ridiculous. The last
thing I was about to do was throw a short-lived "slumlord special" from the
Orange Box at the problem and only have it come back far too soon; I wanted
to see if I could find something better.
Someone on the mailing list mentioned the Rheem "Marathon" heater, and while digging around I ran across several references myself anyway. In stark contrast to everything else, these carry a *lifetime* guarantee on the tank for the originally-purchasing homeowner. The difference is a plastic tank which can't corrode -- seems like no-brainer technology, given the number of plastic tanks used in all kinds of other applications including containment of nasty chemicals. But no other manufacturers [including Rheem's own regular product line] seemed to offer something like this. About three seconds of math showed that even with the higher initial cost of such a unit, it would be more longterm cost-effective than doing the periodic replacement dance, so I decided that's what I was after. Next question was where to get one. The Big Box stores were hopeless, and most of the plumbers I was calling had never even heard of it. I did finally find a local contractor who dealt with them, but their lead time for ordering one was over a week. A couple of others pooh-poohed the idea, trying to tell me "aah, nobody buys those things". Which is complete bullshit -- these heaters are evidently really big in the midwest, and Rheem is only just starting to push them toward the northeast market. Anyway, the plumbing outfit that could get them quoted me $1300 for the whole deal, installed. For a $650 price on a 40-gallon unit, they were clearly out to make a huge profit on a couple of simple connections -- and that didn't include the electrician they claimed that I would need too. Bah. That made me think a little harder about just doing the installation myself, including the pipefitting. I understand soldering and can work on electronics and wiring just fine, and had even played around with sweating up some sample copper pipe joints a while back just to try it out -- but not on any live water-carrying lines. I even already had the requisite torches, tubing cutters, lead-free solder and flux, etc from that previous but not well-pursued impulse to finally sit down and learn how to do this stuff. Still, I didn't trust myself to be able to do it properly and then have it remain leakproof under utility water pressure. Meanwhile, a reference on Marathon's own "where to buy" webpage pointed at a somewhat peculiar place covering Massachusetts: Princeton Municipal Light. A regional power company out in the boonies. But it made sense -- these heaters are not only durable, they're super-insulated and very efficient, and power companies often rise above the profit motive and try to encourage customers to buy efficient appliances or at least wrap blankies around their old water heaters. So *they* had an assortment of Marathons IN STOCK in their back garage and even though I'm not one of their customers were perfectly willing to sell me one. I checked the dimensions on the target unit and realized that it would fit just fine in the Prius. I called the profiteering plumbers back and told them about this, asking if I delivered the heater from this alternate source could they still install it? After some "talk to the boss" hemming and hawing they said yes, so I told them I'd go ahead and get the unit and then call when the work needed done. I already had a sneaking suspicion that I was never going to call them again. |

|
I headed out on a snowy Friday into the hinterlands of northern MA to go
buy a water heater from these fine down-home folks. [This pic was taken a
few days later, for reasons I'll get to.] By the time I got there the roads
were already getting, uh, interesting, and there were maybe two people around
the whole facility but they were there and eager to serve.
As their logo implies, Princeton is definitely into wind power; they are in the process of rebuilding their local windfarm for much higher capacity. Snuggled right up to Mt. Wachusett, they're in a good spot for it. |
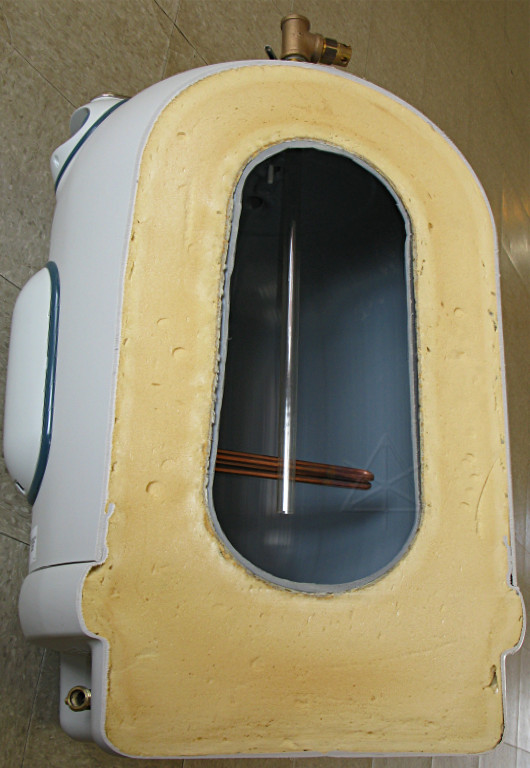
| They even have a half-size cutaway tank right there in the lobby to poke at. Like the Marathon website shows, this is how it's constructed, and there's quite a lot of insulation around it. The dip tube is plastic too. The only metal that touches water is the heating elements, and the copper and brass connection fittings on top. |
| Here's the secret to its being able to withstand utility pressure and have a working rating of 150 PSI: fiberglass cladding wrapped around it in multiple layers. The inner plastic really is this flexible, so without the fiberglass it would just blow up like a balloon. That's also why they insist on [and supply] a vacuum-breaker valve on the input, just in case the supply pressure was to ever go negative which would otherwise collapse the tank inward away from the cladding. In some systems, apparently the pressure can do that. |
|
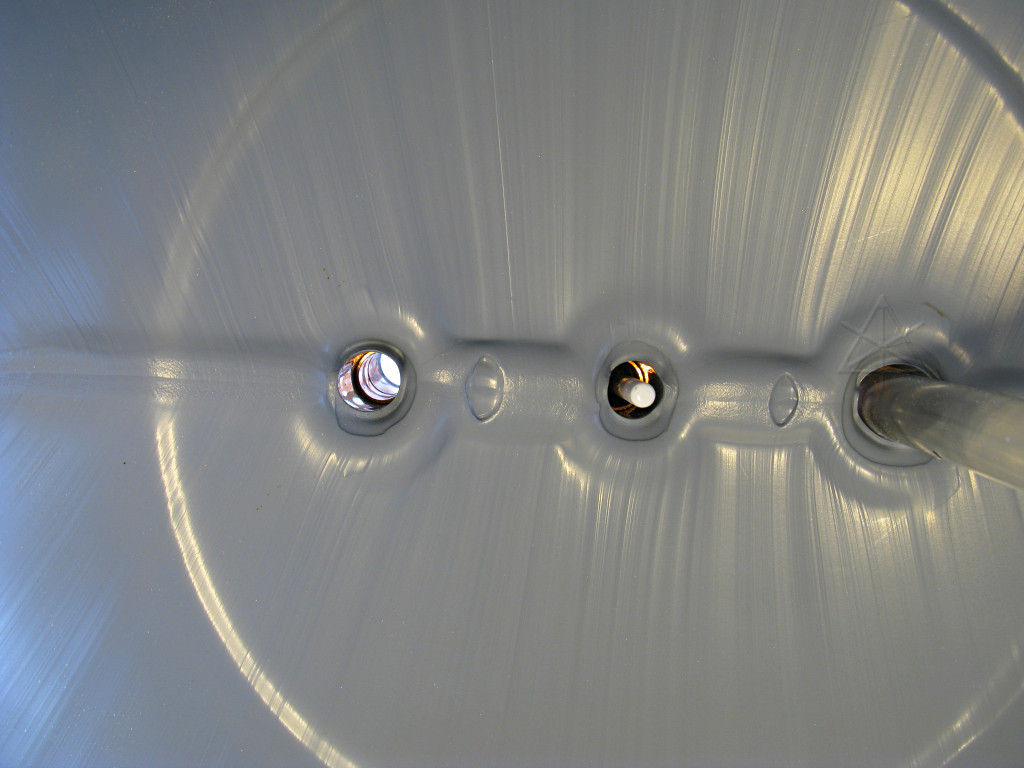
A water's-eye view of the I/O at the top. The copper fittings are permanently
swaged to the plastic somehow, and how that's done is not really visible here
either. Still, with such a metal-to-plastic connection, there are warnings all
over the place to not apply soldering heat anywhere near here, and to not twist
against the connections but rather be sure to hold the union connection nut
with a second wrench while doing hookups.
The website has a fairly badly-encoded video of some of their manufacture process, but it's interesting and worth a look. |
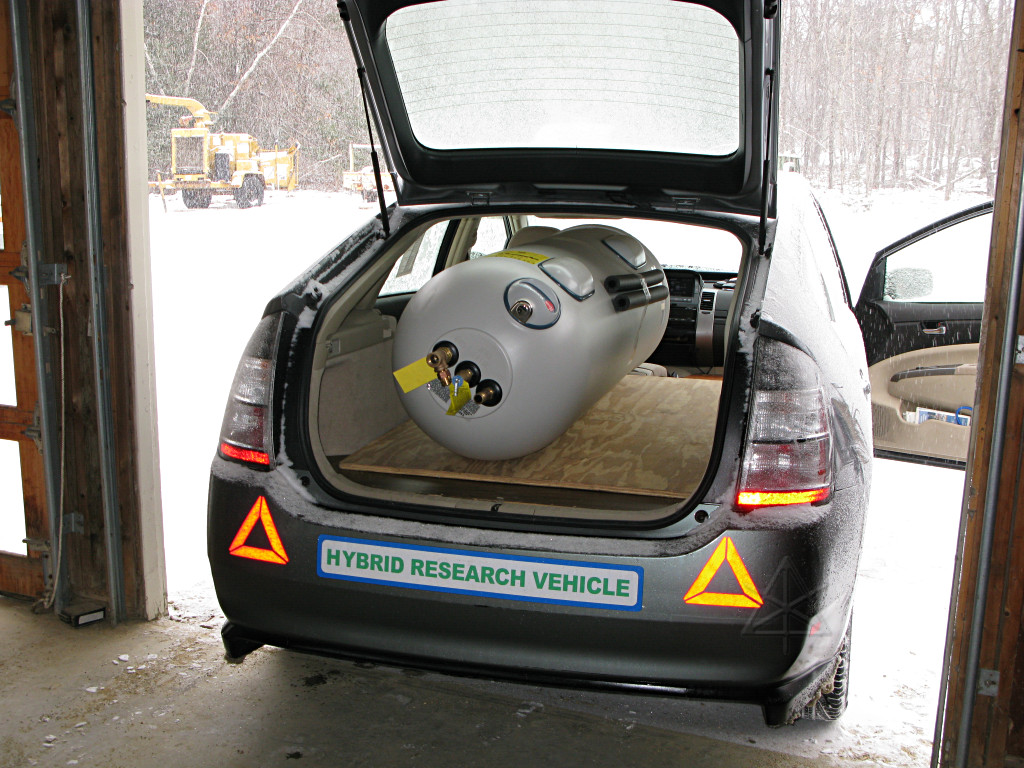
| We completed some simple paperwork and then I drove around to the back, and the same gal staffing the lobby came to meet me and we pulled the heater out of its box. Fitting it into the car was a no-brainer -- I could have gotten two of them in here, which would have really looked like the "Mad Max extra long-distance hydrogen booster tanks". This was funny enough. I bungeed it down and headed back out into the snow toward home, albeit with a stop by a friend who's considering buying a Prius just to show off another nice example of the freight-hauling capability. |
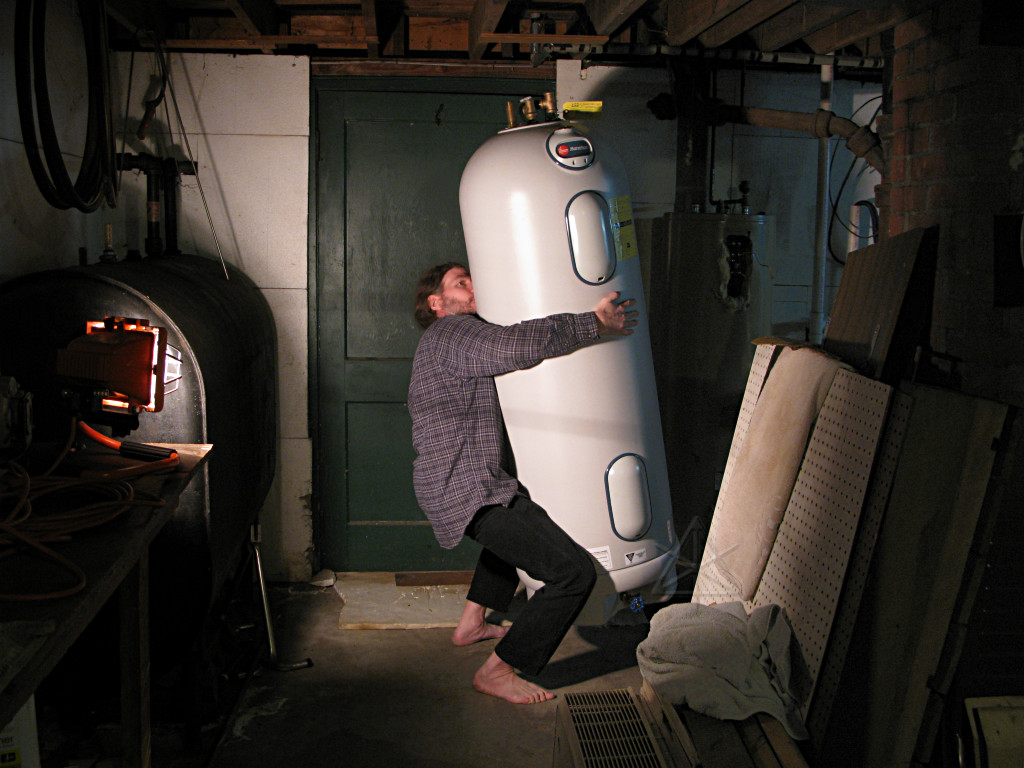
| Wrestling the thing into the basement solo was sort of interesting, if only from a balance standpoint. |
|
The empty tank isn't all that heavy, there's just no really good way to grab
onto it and the outer casing is sort of slippery. My left hand is way down
under the lower lip here, which is about the only useful purchase on the thing.
Hmmm... if the supplement spammers could see this, maybe they'd stop sending me all those ads. |
|
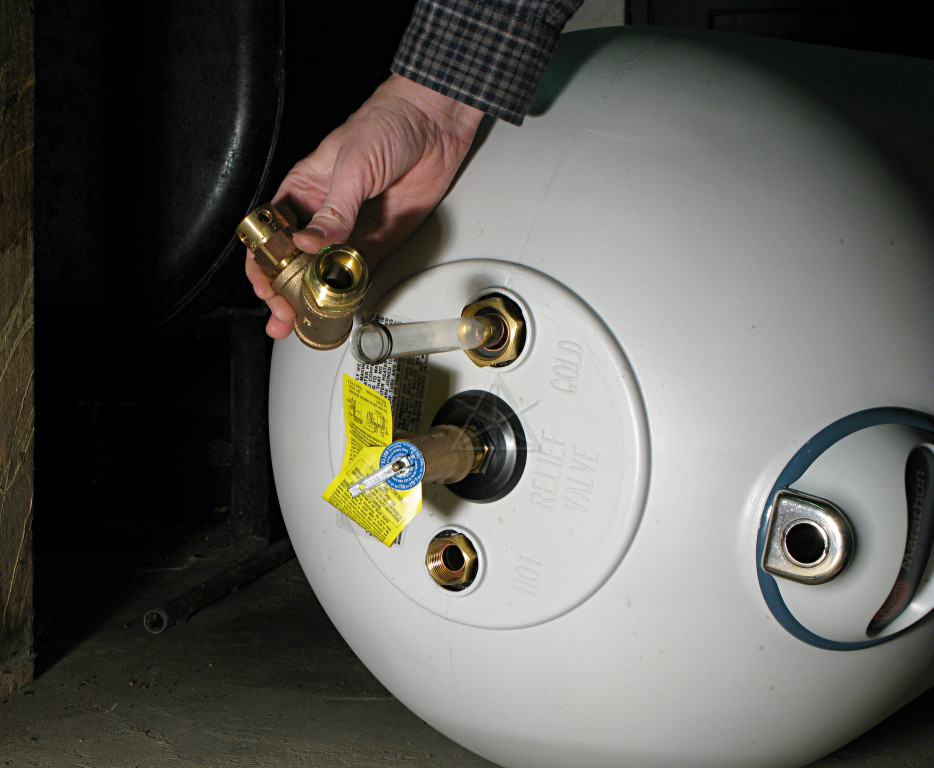
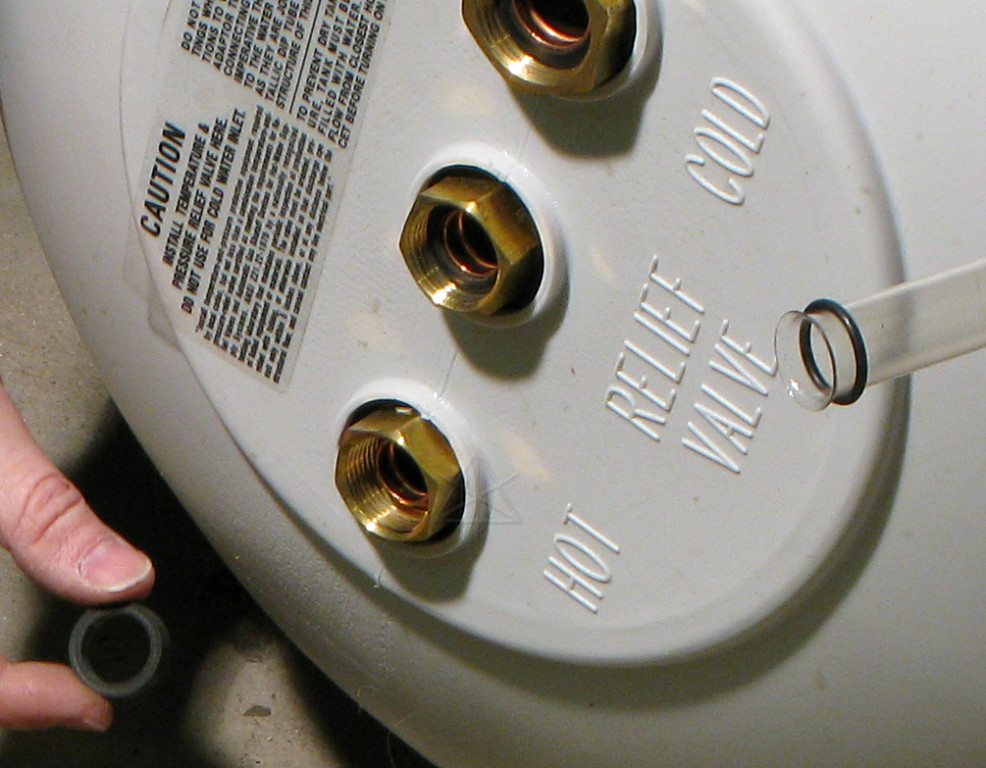
I laid the tank down and began studying its fittings, still not quite
understanding how the unions work. I'm holding the included vacuum-breaker
valve, which is a simple check valve that lets air into the system if
needed. The dip tube fits in here and sits right underneath the vacuum
valve with an O-ring to seal it at the top.
In the middle is a standard temperature & pressure relief valve, mandatory on all water heaters to prevent them from exploding. Mythbusters did a piece on exploding water heaters and found that they really *can* launch themselves up through a couple of floors of house if they have all their safety features disabled and rupture just the right way. Well, it's no secret that boilers can be dangerous, but efforts are made to keep water heaters well below that point. |
| Finally, I understood. The union nuts pull against a flange on the swaged copper stub, and tighten *upward* onto whatever is connected to the fitting, turning counterclockwise [from this viewpoint] to do so. The sealing surface is the flat end of a connecting fitting onto the gasket and flange, very similar to how a hose tightens onto a threaded faucet but in this case the water heater would be akin to the hose side. |

| All this research was gradually increasing my confidence about what needed to be done to install this thing, and around this point I decided that dammit, I was going to at least *attempt* the installation myself and call the pros if I got into trouble. Like the Lowes Hardware DIY webpage says, "no reason not to". It was high time I quit being such a wuss about it -- two lousy connections, and I should just dig in and learn already. As noted I had most of the tools, and I'd just need a few more fittings to interface all this to the house. |
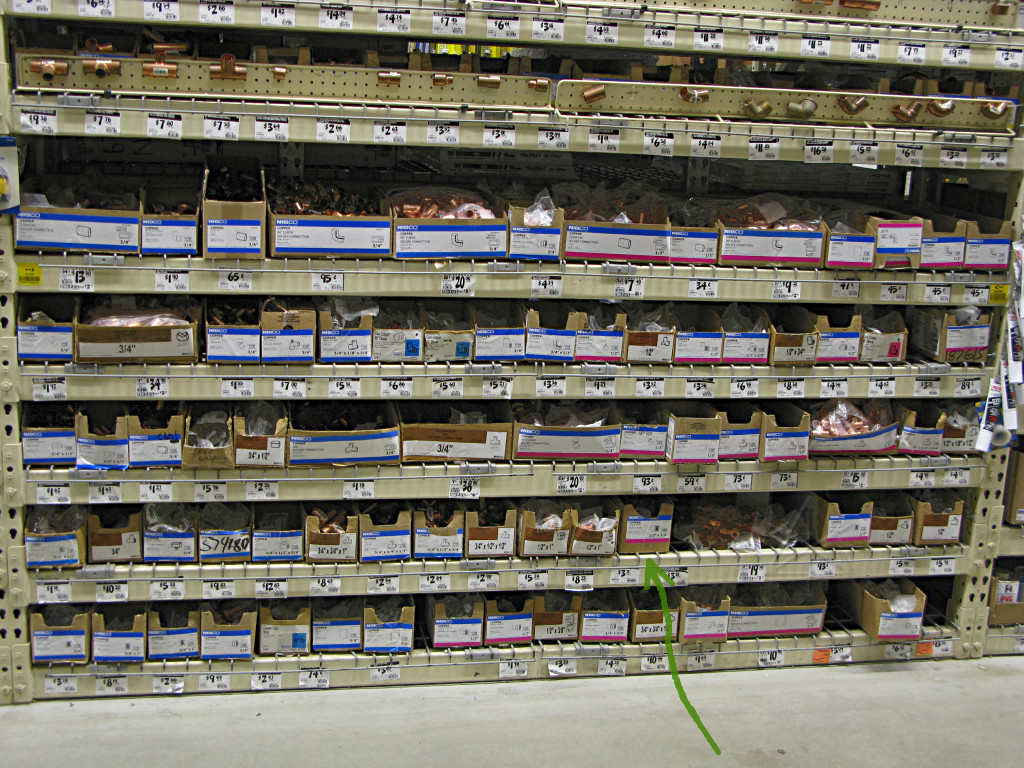
| The Big Box offers a bewildering array of plumbing fittings, but after finding the "water heater hookup kit" section and noodling over 1/2" this and 3/4" the other I spotted exactly what I needed, hiding there in the indicated box. And in theory I'd only have to do the torch-work once -- after such a rework, any subsequent water heater unhook/rehook should be doable entirely with simple threaded connections. Not that, in theory, I'd ever have to unhook this heater again, but you never know. |

| I brought it all back home and laid out all the fittings I'd need to use. Stainless-steel-braided hookup hoses are all the rage now, not only for toilets and sinks but now also for water heaters and several other things. In fact I've had a couple of flex hoses feeding the bathroom sink for, what, about 15 years now, and they're still in fine shape. Other than two of those all I really needed was another short male-to-male nipple and the two small magic copper thingies to adapt the half-inch pipe to the hoses. |
|
And just to test my own theory that I could really do this, I went and cut
away the output side of the old heater and then sweated one of said magic
fittings onto the hot feed into the house. This needed a minor kludge
involving a piece of strap steel and a hose clamp to hold the adapter up
*onto* the pipe as my other two hands held torch and solder. I couldn't test
any of it for leaks yet but I examined it with a light and a mirror and saw
the "silver bead" all the way around the joint and figured I'd done okay.
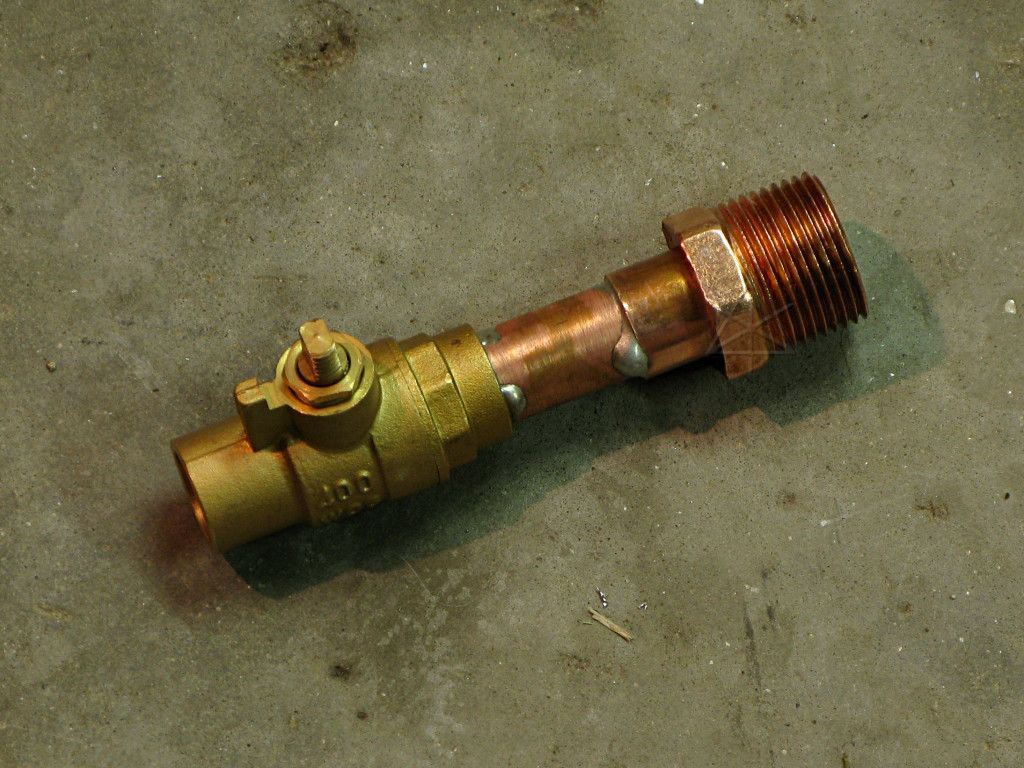
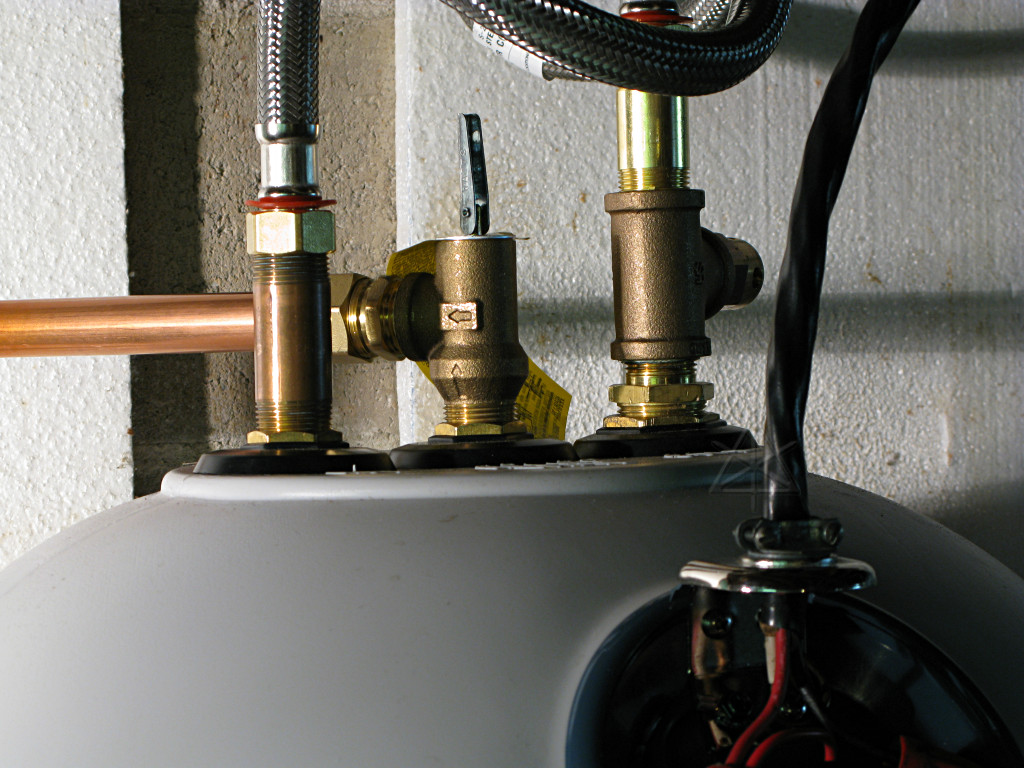
I took another step that I considered important but the guys at the Orange Box pooh-poohed as me thinking about it too hard: flattening the bottom of the adapter fitting. Normally such adapters are designed so that the slightly tapered pipe thread, with pipe dope or teflon tape, is the sealing surface against another female threaded fitting. But this was going to hook to one of the stainless hoses, whose end fittings have flat gaskets similar to hose bibbs or the unions on top of the water heater itself, and the large end of this copper adapter as it came was somewhat rough. So before sweating it on I swirled it around on emery cloth for a while until I made a nice flat surface. Then, my slightly enthusiastic soldering job sent a big blob down the inside of the fitting which beaded down onto my nice fresh surface and solidified, so once it cooled I had to scrape that away and smooth it off again. Lesson learned: don't use too much solder; once the flow visibly goes all around the joint and just begins to expand, stop feeding. The big picture also shows the input side, with its crufty old valve which was now the only thing holding utility pressure back from the old heater carcass. And I knew that valve was leaking a little despite my best efforts to close it firmly, because I could see a drip coming out the dip tube inside and the fact that a little water was slowly accumulating in the bottom. |
| The inlet valve's leakage was slow but steady; after only a day or so I had to suck quite a bit more water out of the heater, and had already put the bottom element back in to make sure it couldn't rise to the level of that hole and go onto the floor again. There was no reason, I thought, I couldn't also replace the crufty valve and in fact doing so would allow shortening of that whole input-side tee which would make the flex hose fit in better. |
|
So it was off to the hardwarium again where I found a nice little 1/2" ball
valve. Everybody loves and uses ball valves now, too, since the manufacturing
precision and gasketing materials have improved. They seal well, last better
than gate valves, and only need a gentle quarter turn to go full-on to
full-off. When they're turned on they present a smooth straight-through path,
which doesn't generate as much flow turbulence as traditional valves do.
With my second magic fitting and the valve and a bit of pipe, I constructed this little assembly on the ground, which would be another good plumbing competence test. It took much longer to heat the valve, with its higher volume of metal. I was totally paranoid about damaging the seals on it, but then again they're teflon and the valve is *designed* to be sweated onto pipes so it's expected to get fairly hot and survive. With a regular propane torch instead of MAPP gas it took bloody forever, but I appeared to finally get two reasonably good joints. |

|
Well, perhaps.
Very close examination showed a good "silver ring", except for one tiny pit that I couldn't see the bottom of. Okay, so I probably buggered this one up and it'll piss right from that hole. But I hooked up one of the stainless hoses and dunked the assembly under water and with the valve closed, blew into the other end of the hose as hard as I could and saw no bubbles. Maybe it was okay. But I can't generate 100+ PSI with my lungs. |
|
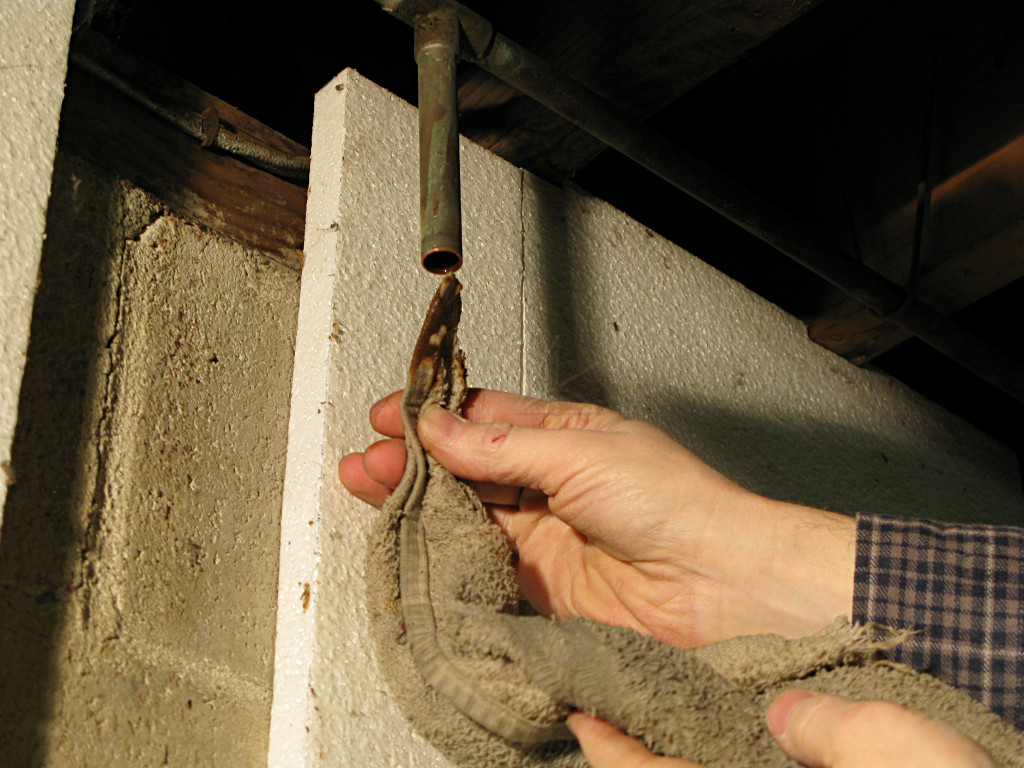
Overcoming another little mental-block hurdle, I shut off the main house feed,
drained out all the rest of the piping, and cut the input feed just above the
old valve. I was committed now -- I had to make this work or I would have no
water at all. The inside of the pipe had the same disgusting brown slime, and
it took some time and more wet-vac action over at the laundry hookups to get
it to stop dripping.
At this point I could finally move the old heater away from underneath, opening up much more room to work. It should also be noted that the white styrofoam on the walls is an artifact of the previous owner's weird ideas on how to conserve energy back in the seventies. Must have read about this in Popular Mechanics, or something, a few pages away from the jar-lids-nailed-into-the-rafters trick. The panels are glued all over the inside of the foundation blocks, sticking up slightly past the sill in most places. Great, but the guy apparently missed the fact that the final seal between foundation and sill had plenty of gaps in which were letting in lots of cold air in the winter, right over the top of the styrofoam. [I've since stopped most of that with fiberglass wads and expandy-foam.] Unclear how effective or worthwhile the panels are in blocking heat transfer through the walls, especially since most of it is below frost line. |
| Another kludge was necessary to hold this assembly onto the pipe stub once it was all cleaned and fluxed, and I astounded myself by getting another good joint out of it even if a tad crooked. That's okay, it helped turn the fitting toward where the flex hose fits on. I was *very* careful to limit the amount of solder, since dribbling excess into the ball valve mechanism would be bad. Close examination up through the full-open valve with a light and a mirror didn't turn up anything amiss, so I guess I managed to contain it all in the joint itself. |
|
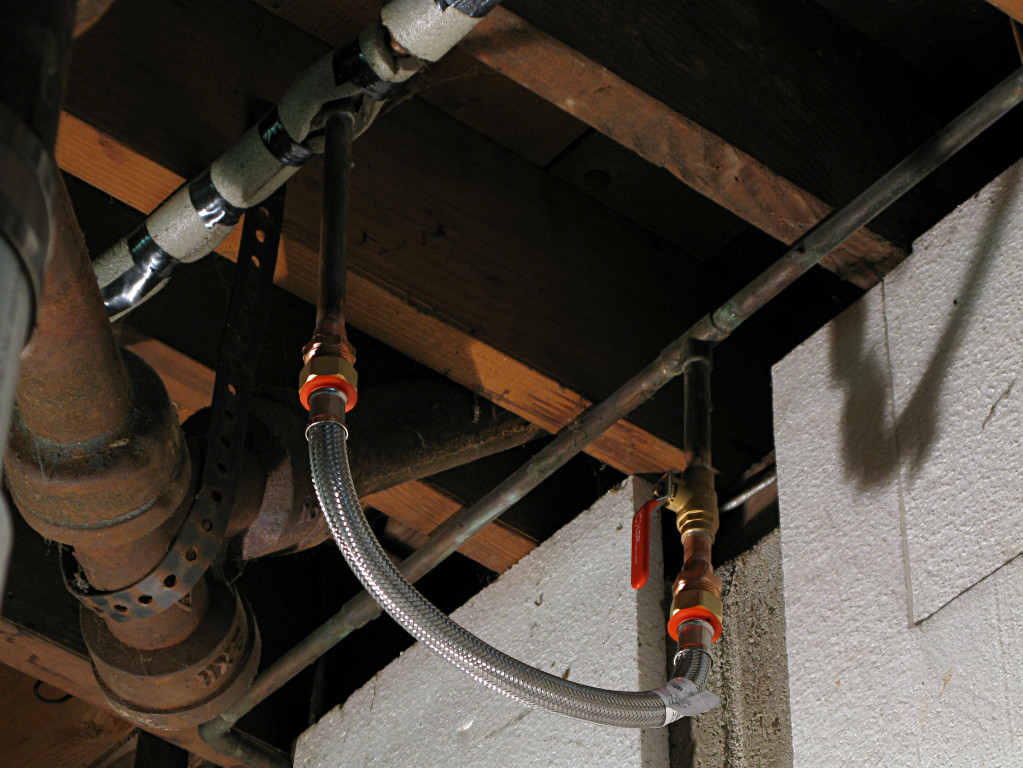
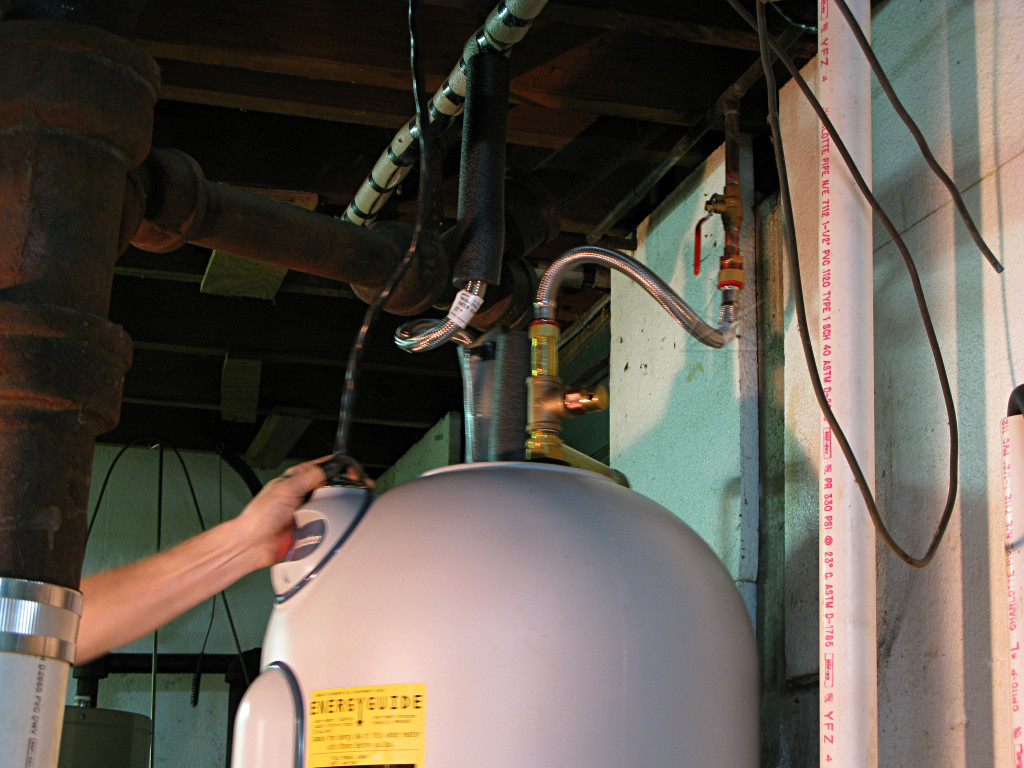
Leak check. One flex hose was just long enough to bridge my shiny new
inlet and outlet fittings, so I hooked them together and repressurized the
whole system and expected the worst.
And was totally astounded that it all held water and remained dry. The flex hose nuts were only hand-tight, too, and even those weren't seeping. I was more interested in making sure the sweating job had gone right, which appeared to be the case. What an incredible relief. |
|
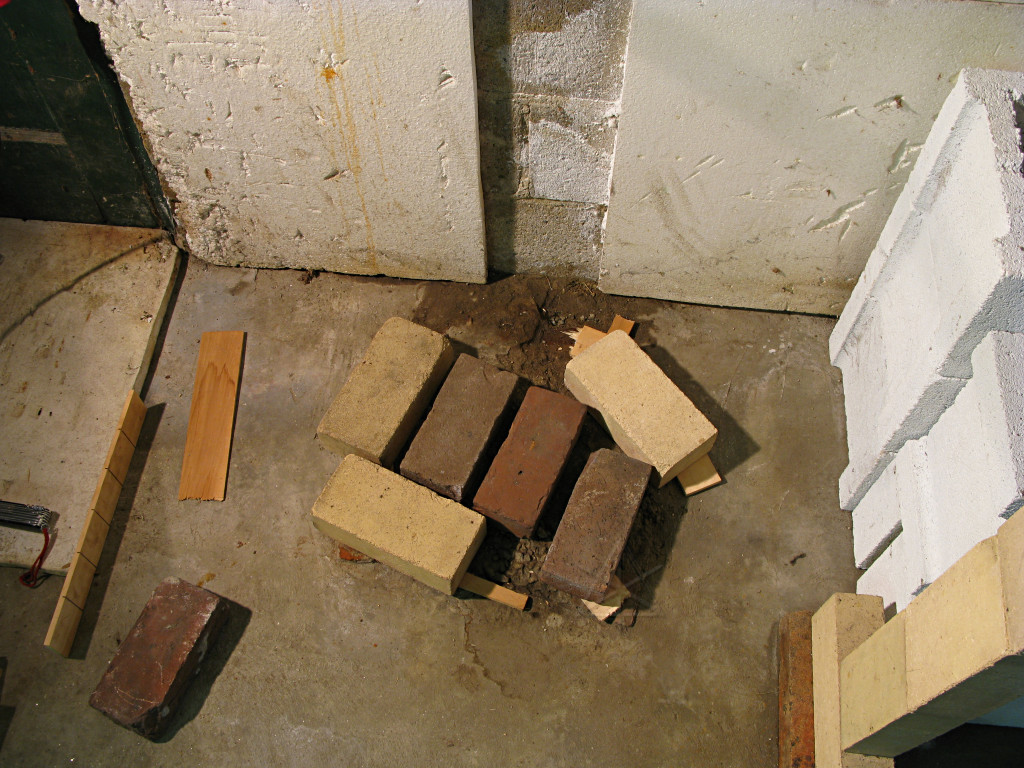
Next task was to construct a platform for the new heater. I removed the
remains of several long-rotted old wooden shims from where the old heater
sat, but those had been in there for a good reason -- the "pad" underneath
is very uneven concrete, with a couple of old steel bolt-heads of some sort
poking up. I wanted the bottom of the tank up off the floor a little bit
anyway, to leave more room under the drain cock, so something to elevate
it a little was needed regardless.
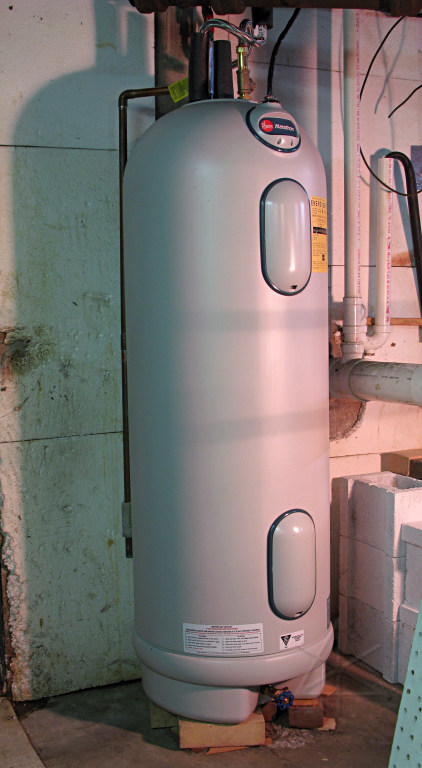
Now, the right answer here would probably have been to mold up and pour some sort of additional low concrete platform on top of the old mess, but at this point I didn't want to get into yet another construction project and more trips to the Box, not to mention curing time. There are "water heater stands" commercially available, but would have been way too tall for this application. I happened to have several random bricks of varying thicknesses sitting around right nearby, and careful placement [and a few new shims to even things out] yielded an amply acceptable firm and level surface that would conform to the shape of the new tank bottom and support it evenly. It's not round -- there's a big indent at the front where the drain valve emerges, and a corresponding one at the rear, producing a sort of hourglass footprint. |
|
The previous clumsy efforts at lifting the tank when bringing it in would
clearly not do when trying to carefully place it down on the assembled brick
dais without disturbing the arrangement. I needed another way to lift it
with better control, and from the front.
The lower element access hole was the answer. Removing the outer cover, a layer of fiberglass, the inner cover, and *two* more layers of fiberglass [yes, they're serious about insulating this sucker] finally exposed the cavity containing the element and thermostat, which also provided a convenient lifting handle. Holding this and the fittings at the top allowed me to float the tank very precisely down onto the bricks and make minor adjustments until it was sitting in the right spot with almost every point underneath well-supported. At this point, the rest of the plumbing was a no-brainer -- hook up the flex hoses, being careful to not torque the tank fittings in the process, and attach a proper blow-off pipe down the side of the heater from the T&P relief valve. I re-used parts of the old pipe to crock together a new relief assembly, and connected it with one of the 3/4" compression fittings that was included in the "water heater hookup kit". In theory, I could now turn the water back on and pressure-test the whole thing, and began having some hope that I'd actually be able to have hot water again that very day. |

|
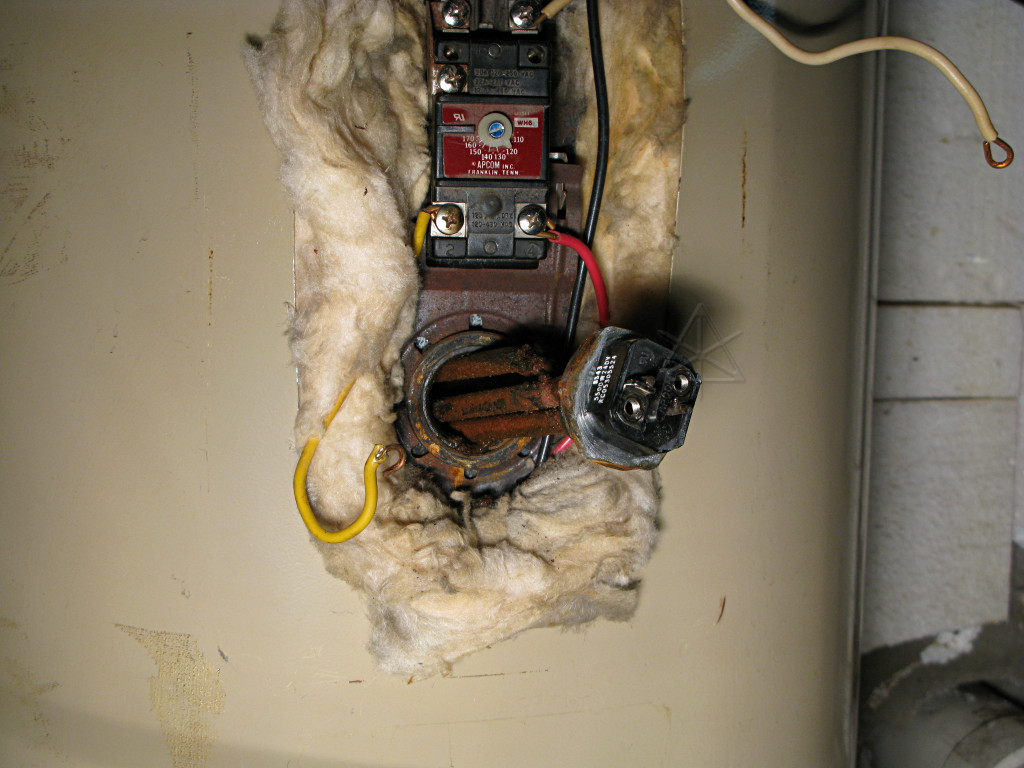
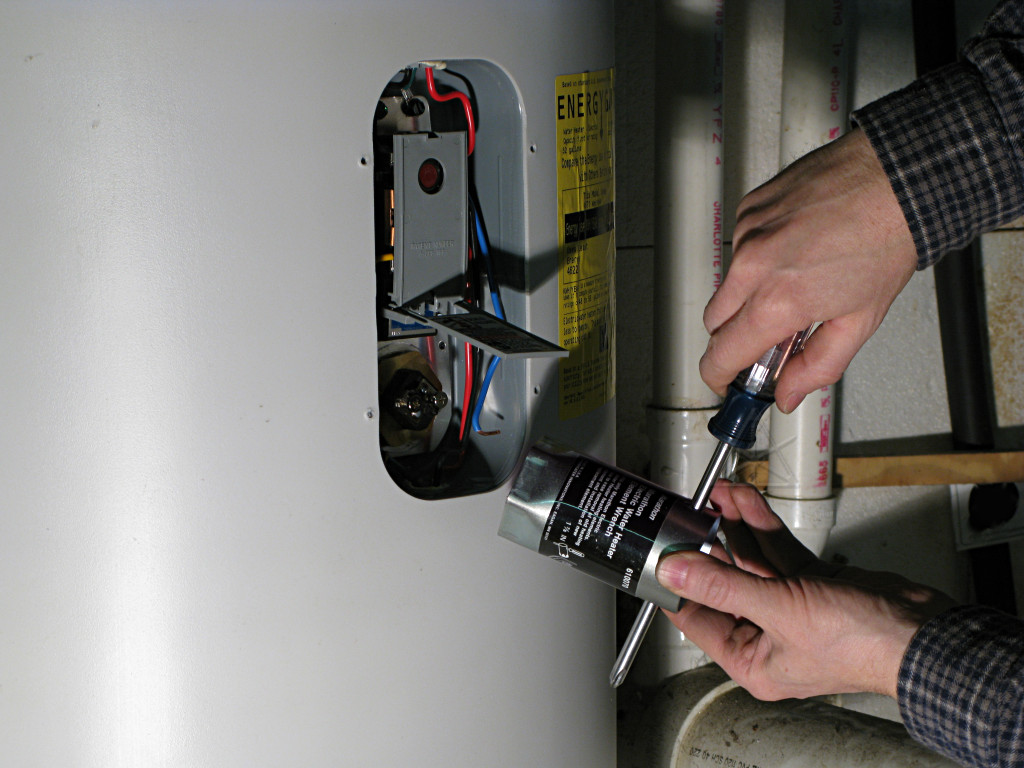
The remaining step would be the electric supply, an easy two-wire-plus-ground
hookup. With the cover off the lower element and electrics, I almost randomly
thought to check the wiring connections just because I'm sort of anal that way,
and found one of the element screws not quite as tight as I thought proper.
For completeness and just to see how the two were interconnected and what both
thermostats were set to, I also popped off the upper cover and all its
fiberglass to do the same check.
And stood there staring in total disbelief. See if you can tell what's wrong with this picture, without reading ahead. The bigger picture gives a little hint. |
As I wrote to a friend a little later on that otherwise fine Sunday afternoon:
	well, you're absolutely *NOT* going to believe this.

	Everything was going along fine ... got the old tank out of the
	way, the new piping done, including a new ball valve for the cold-
	side shutoff which was a slightly more ambitious way to go at the
	plumbing ... all soldered up, leak-checked okay, the floor site
	cleaned up and reworked with some bricks and shims, and the tank
	into place ...  and then I just *happened* to pull off the top
	thermostat cover for a quick looksee, and guess what's *not*
	actually there?

	The top element.

	There's a huge HOLE in the side of the tank where it would have gone
	in, and two non-connected wires nearby.

	I wanted to fucking cry.

	Naturally nobody's home at said small-town power company on Sunday,
	so it looks like I ride out again early tomorrow to have them rectify
	this situation.

	Hopefully I can still bring the cold back online and at least have
	*water*, and in theory the new ball-valve will hold it from going
	into the water heater better than the corroded old thing I replaced.

	Good thing I checked, huh?

	I'm going to have some lunch, go do the electrics, and then sit
	around and sulk.
Obviously, if I had gone ahead and tried to fill the tank, bad things would have happened when the water reached this level. So I was stuck, and back to cold-water-only configuration. I did run some water into the tank anyway and about half-filled it, just to get some weight onto the bricks and make sure everything was sitting level and so I could run some water out the drain valve and flush out any cruft that might already be at the bottom. When the Princeton Light folks finally found out about this, they were falling all over themselves apologetic and as near as they could figure, someone had "temporarily" pulled an element from one of the tanks in their stock to do a quick repair for a customer and had failed to order a replacement, after which I happened to get that violated unit. A mostly honest mistake, although it's incredibly lame that someone took the time to put all the covers carefully back on as though nothing had happened and didn't bother to LABEL the heater as incomplete in a rather hazardous fashion. How long does it take to slap on a piece of white tape and write "no element" on it?? They agreed that they really needed to keep a stock of spare elements, to replace this one and to avoid continuing to move a floating "hole" around between tanks. |
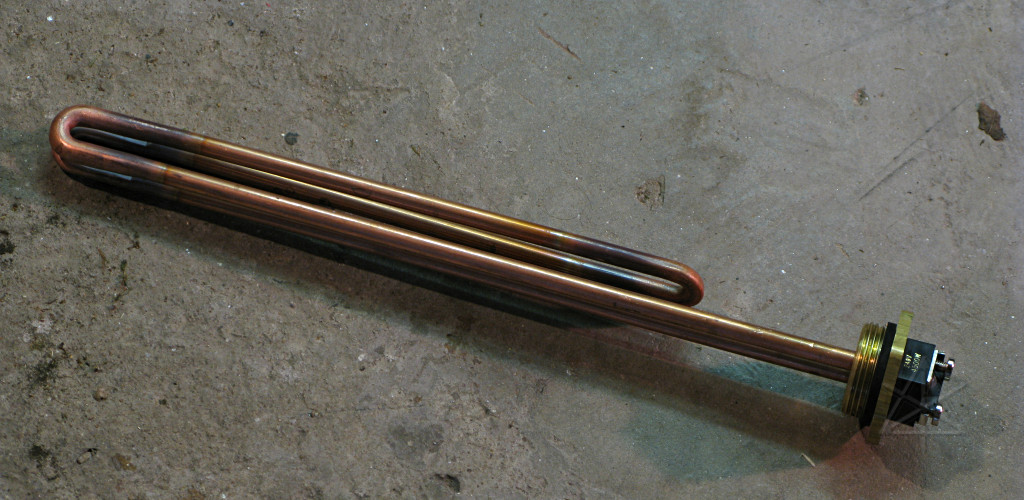
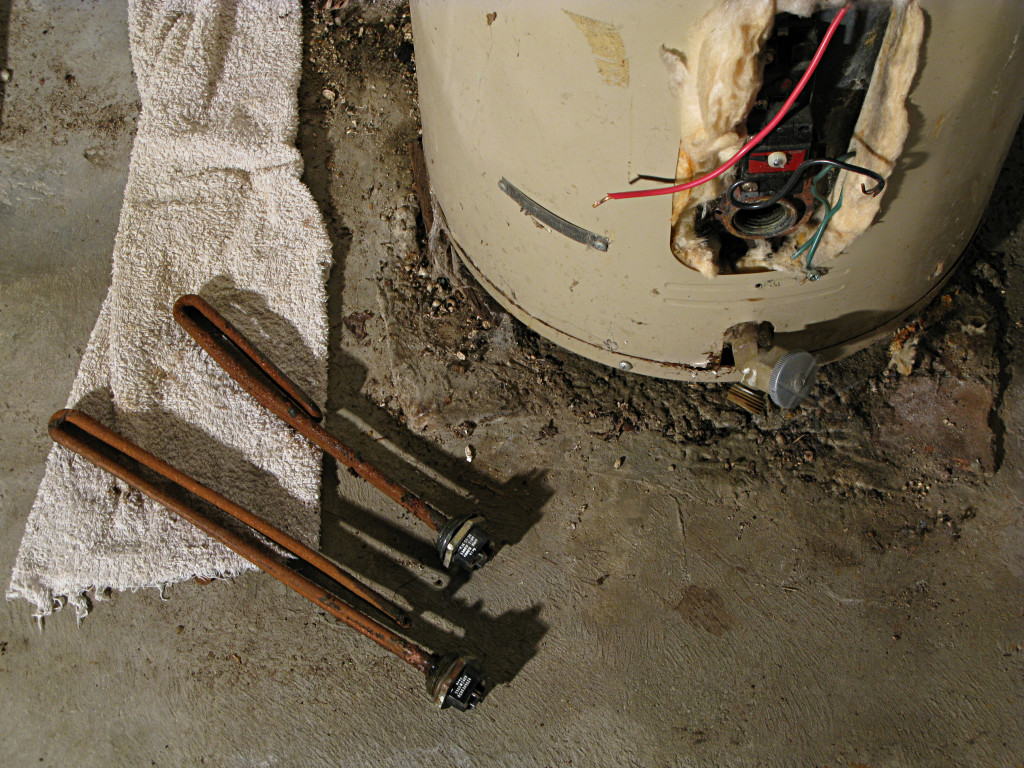
| Nonetheless, they went and pillaged *another* heater to find me an element and I took another little road-trip into the hills, this time in much more pleasant weather and under which the picture of their offices was taken, and returned home with the right element. These are special ones, designed for these heaters and not available on the Big Box shelves. The lower element handles most of the routine heating load, and has a special outer coating to resist sediment and scale buildup. The upper one is optimized for fast recovery in a smaller volume of water and contains a thermal fuse to protect against "dry firing" if the water level ever happened to fall below it. |
| They also gave me this nobby little element wrench that's supposed to come with the heater anyway, a simple stamped-steel thing but definitely needed to fit the oversize brass mounting fittings. My largest sockets could handle the standard elements in the old heater, but couldn't deal with this. |
|
Finally I had the system sealed up, and could begin doing the pressure testing
I was thinking about in the first place. In case anything was going to leak
under pressure, I didn't want to fill the tank completely in case I had to
drain it again. So I left all the hot-side taps closed and continued filling
the heater, to let the incoming water compress the remaining air until it
reached equilibrium and I could listen for anything hissing or leaking or
whatever.
As I did so, I happened to notice a curious thing. |

|
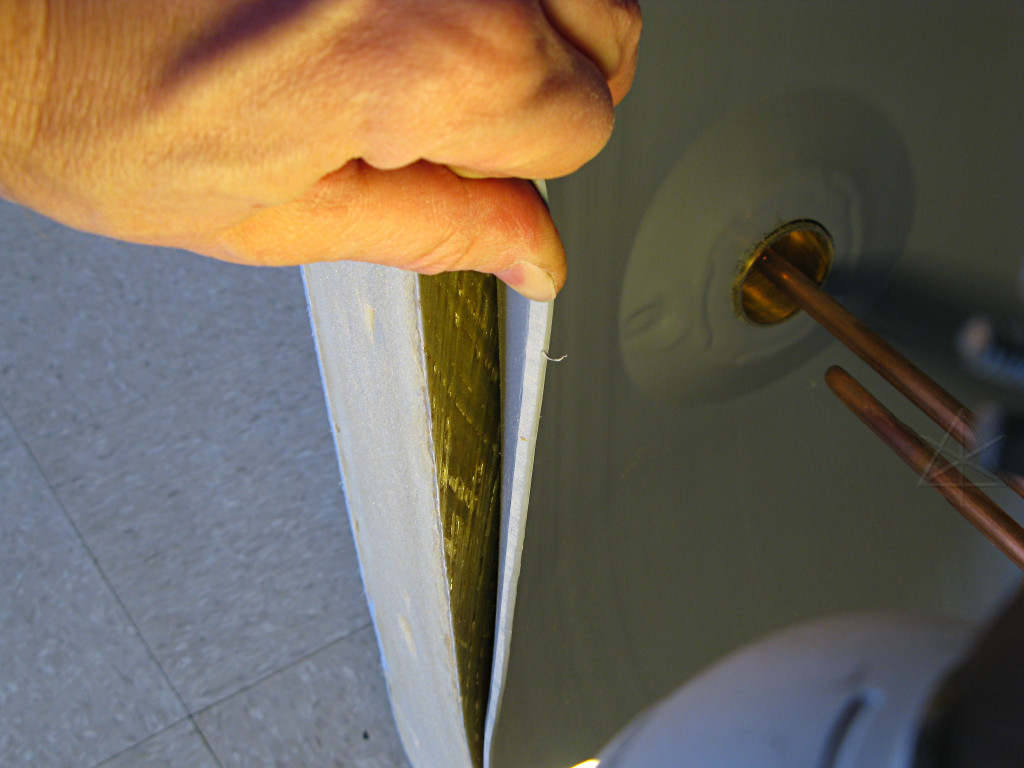
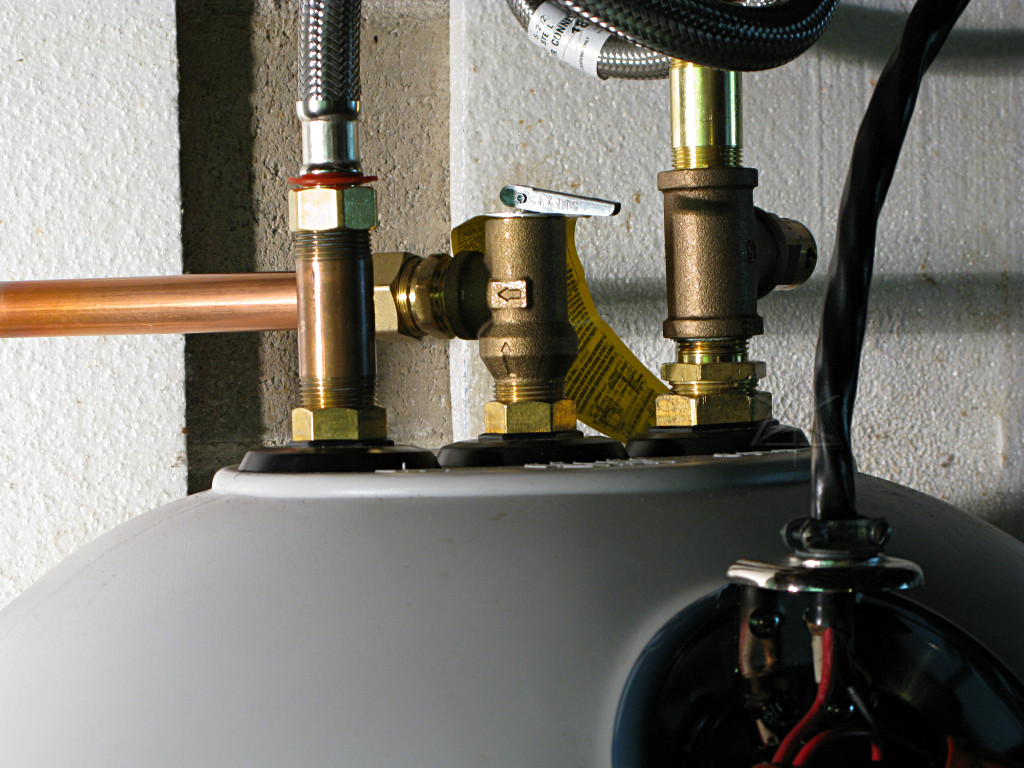
After the water stopped flowing, I noticed that the little plastic bushings
around the connector union nuts were no longer flush with the top of the tank.
Thinking this rather odd, I pushed them back down and noted that I could see
more of the union nuts than before.
Nothing seemed otherwise amiss, so I closed off the supply and relieved the built-up air pressure through the T&P valve to make sure it was working. The water still wasn't high enough to reach the top, so all I got from it was air. But as I did so, the union nuts sank right back down into the black bushings. |
|
Remember how flexible the plastic tank is? Well, even with the fiberglass
jacket in place, when you hit it with 80 or more PSI of pressure it expands
some. This shows how far. Note that the fittings angle more outward as well,
as the top dome of the tank inside changes its shape.
The tank made some scary creaking noises as it did all this, but it seemed to be from the copper fittings simply moving past the surrounding foam a little. Still, it was rather disconcerting. But when thought of in a similar fashion to the valve stem on a bicycle tire and how it sticks farther out of the rim hole under pressure, I figured this for being normal. [I later confirmed it as mostly harmless with the Marathon tech support people, but maybe they should add a note about this to their installation guides.] But it made me really glad I had decided to use flex hoses for the interconnects. If I had hard-plumbed the outlet straight up into the tee above, as it had been with the old tank, this would have now been pushing that whole hot pipe *hard* up into the joists by a half-inch which probably would have damaged something. The flex hoses are absolutely the right thing to use wherever substantial movement is possible. |
| After filling the system the rest of the way and flushing out all the air and remaining detritus from the plumbing job, I finally flipped the breaker on and applied zoobs to the elements to let it start heating. The top element comes on first, to try and give a small hot supply quickly, and then the top thermostat switches power over to the bottom element to heat the rest. |
|
Done. A while later I had a nice warm *SHOWER* in my own bathroom, as opposed to relying on the kindness of friends. My, how we take modern conveniences for granted. |
| This is how far the tank can wiggle, sitting there on its brick platform. For something with a flexible plastic base, it's fairly rigidly placed. While it is said that New England is due for the Really Big One someday, we don't have the bracing requirements that are part of California code. For the moment, we'll assume an absence of external forces to upset the balance. |
        .-.                   .-.
      .-' /       _____       \ `-.
      `-. \   .-~~     ~~-.   / .-'
         \ \ /             \ / /
          \ /               \ /
           \|   .--. .--.   |/
            | )/   | |   \( |
            |/ \__/   \__/ \|
            /      /^\      \
            \__    `-'    __/
              |\         /|
              |\`"IIIII"'/|
              \ `"""""""' /
               `-._____.-'
                 / / \ \
                / /   \ \
             .-' (     ) `-.
             `-'._)   (_.'-'
About a day and a half later, I began to think the new tank was posessed.
It was *breathing*. Iiiiinn, ooooouuut. A subtle clicking over in the
direction of the water meter in the basement alerted me to this, as well
occasional bouts of the same pressure-related creaking. Examining the water
meter showed the little spinning leak-detector, that moves whenever water
flows even a little bit, turning forward and then backward over about a
ten-second cycle -- sometimes just a turn or two, sometimes many. On the
backward half, when my house system was evidently feeding back into the
utility briefly, the meter would click a little louder than on the forward
half.
It was downright creepy. Tune in to part 2: Taking the Pressure Off for the solution to this little mystery! |