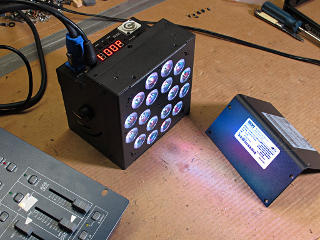
As part of helping the
Somerville Armory
with some repairs and improvements to their lighting rig, I went shopping
for simple LED fixtures.
My primary criterion was the best "lumens per dollar" ratio, for whatever
was available with the right beam width and power appropriate for their
space and stage size.
The existing rig in the performance hall consisted of a couple dozen
wheezy old aluminum par-cans driven by an elderly CD80 dimmer pack, and
a mysterious rats-nest of wiring connecting it all.
Two years before I had used it for the
fashion show
related to Somerville Open Studios, and had done a bunch of neatening-up
and relabeling in the process of doping out what they had and what I
could do with it.
After a year hiatus the show was slated to return, and in its early planning
stages I decided to do things a little differently.
I knew where I'd *wanted* to put lights, even though what I wound
up with back then was sort of a compromise with borrowed gear.
This time I figured a permanent installation could serve several needs
at once:
Amazon seemed overrun with cheap DJ-grade gear that I knew wouldn't last or throw nearly enough light. I cruised some of the more professional-market oriented places, comparing photometrics and prices, and LONG story short(ish), a family of PAR-style wash units from Blizzard Lighting came out on top. In particular, the Rokbox 5 RGBAW seemed the most suited for the need -- 26-ish degree beam, more rated raw output power than most of the others, and half the price of anything with zoom capability [which I didn't need]. And *out of stock* at several places, as they've evidently been quite a popular unit. When I called Full Compass to ask about their stock, not only did they still have a small handful left, they offered an even deeper discount price for the quantity I needed. Awesome, *done*. And the shipment arrived astoundingly fast. |
|
Blizzard supports an add-on device for several of their products,
named "wiCICLE", intended to carry wireless DMX between units.
The transceivers come in the form of small XLR-barrel shaped
dongles, that plug into the input DMX port and have an antenna on
the other end.
They are powered by the device they connect to, by means of bringing
the XLR *shell* connection to +5 volts and drawing from there to ground
on pin 1.
What this means is that if a cable that [erroneously, but very possible]
connects its pin 1 signal ground to the metal connector shell, it shorts
the Rokbox's 5V supply to ground and *smokes it*.
There's at least one forum thread taking Blizzard seriously to task for this bad engineering decision, which they already clearly acknowledge as a problem, because every unit comes with a bright red label saying "STOP! Check your cables" pasted *over* the DMX input jack which you have to remove. What they didn't do was make that power *optional* with a recessed slide switch or the like. At worst they could have used 5-pin connectors with the extra two pins providing the power instead, which would frankly give a better chance of avoiding cable-related mishaps. |
|
|
|
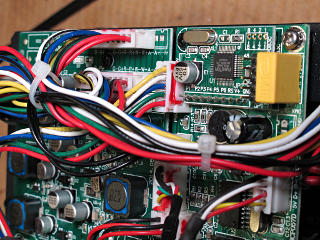
The control processor is a little OEM daughterboard from Nuvoton,
sporting one of their
ARM Cortex M0
series microcontrollers.
This appears to have a dead-simple interface -- power, a reset, and
six GPIO leads.
The LED driver board is at the lower left where the inductors with blue
bobbins are, and what's not shown in that picture is an unpopulated area
labeled for driving the UV emitters used in the six-in-one Rokbox unit.
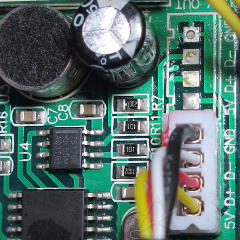
Near the connector where DMX data arrives we find a bog-standard 75176B transceiver chip, and we can easily dope out the surrounding bias network for the RS485 line coming in. Yes, these units each have one -- 10K to +5 and ground. And 100 ohm series resistors, which we've already determined aren't really necessary for "matching" line impedance. For more on bias networks and their rationale and why connecting too many receivers that provide bias might lead to some transmission problems, see this DMX discussion. As is typical with these units, any self-run setting is likely to begin *sending* data on the DMX bus with the expectation that slave-mode units are listening, so in a typical installation with a controller it is essential to leave all units in "Addr" mode with the correct addresses set. This is true via wiCICLE or hardwire, of course. Slave mode appears to go into 10-channel mode on address 001 so a master unit can control all attributes with relatively short packets. | |
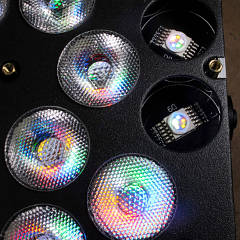
The emitters
|
At DMX value 001, the emitters pop on with a gentle glow that's clearly visible but not too bright to photograph. |
Output measurement
|
One of the difficulties in the shopping process was determining net
output of any given candidate fixture.
Most manufacturers of LED gear give their photometrics in terms of lux at
various distances away in meters, without really taking practical beam
angle into account.
This leads to a bit of math needed [read: guesswork, because these are
soft-edge wash units!] to determine
raw ballpark lumens, but that coupled with a notion of full-up input
wattage yields an approximate basis for comparison.
I wound up calling a couple of source companies to strongly suggest
that they also give their output ratings in lumens, similar to makers
of things like video projectors, and let designers worry about beam
geometry as a secondary concern.
In the LED market, buyers also look at lumens per watt efficacy as a
metric of how well the emitters are doing and thus how hot they are likely
to run, which has implications about their long-term useful life.
In pursuing that, I pointed out two fairly easy ways they could measure lumens in the lab. A circular flat beam 13-1/2 inches in diameter is one square foot, and measuring footcandles on that plane directly translates to lumens. Alternatively, such as in a stage setting, a circle on the deck 11 and a half feet across encloses 100 square feet, thus footcandles measured in the middle times 100 gives rough lumens. Either method is fairly easy. |
Spectral analysis
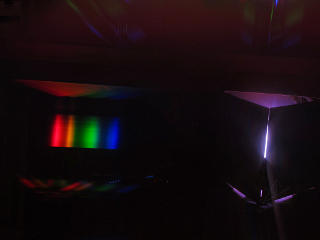
| While adding amber and white to an LED unit nominally allows creation of those delicate theatrical pastel colors that should look decent on flesh, it's still not perfect color rendering. Most LEDs are inherently peaky sources, which is one reason typical RGB output delivers such punchy color purity to our perception. To analyze what I'll get from the Rokbox RGBAW, I've set it up inside one of the shipping boxes with the flaps forming a narrow slit across the output. A piece of high-dispersion-angle holographic diffraction grating held over the camera lens shows a nice first-order spectral spread of what's emerging from the slit, enough for a pretty solid qualitative view of what we're getting. |
|
Now we add the green channel, which is a little wider but rather separated from the others. We're still not going to obtain a true yellow out of this, but can probably fake up something that looks close enough. |
Control strategy
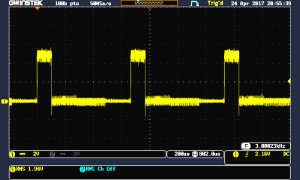
| The easiest way to run these units from a desk is in 5-channel mode, directly mapping RGBAW to what the board is sending. The other modes seem to just be confusing and not really worth fighting with. Another complaint about these units seen around the net is that their output response is somewhat nonlinear with respect to DMX value. They do seem somewhat fast off the bottom with quite a lot of the output on by the 50% point, and not a whole lot left in the second half of control. One could presumably compensate for this by setting a "slow bottom" dimmer profile on the relevant channel if the board supports it. For theatrical work it is also definitely worth setting dimming "mode 1" or higher on the Rokbox itself, which applies smoothing to all brightness changes and approximates filament delay in conventional fixtures. Setting "mode 0" will allow instantaneous on/off changes and strobing for club environments and such. |
|
The main signal is a low level on the blue, but there's a little bit of crosstalk hash from the red and green whose levels are up a little higher. [Or maybe my ground connection is crap...] The positive width seems to vary in precise linear accord with where the slider on the console is, going from no pulses at all at DMX value 0 to very near 100% duty at DMX 255. Qualitative visual output doesn't quite follow this, however, and is best shown in a couple of short videos to capture the time dynamics of what's going on. |
|
Nonlin.mov [682k, 28s]
demonstrates a couple of things: the temporal smoothing of dimming mode 1,
and a subjectively nonlinear brightness in the unit output dimly reflected
in the surface of the scope screen.
The sound is of the "blackout" button being toggled on the board, and
the non-instantaneous drift of the resulting PWM is clear to see.
Modes above 1 make that even slower.
Then, the channel slider is moved slowly up and down.
There is an additional visual nonlinearity from the camera dimming
itself down as overall light level increases; pay attention to how bright
the 'scope front panel looks above maybe 50%.
Startmod.mov [83k, 10s] is on a shorter time scale and shows the port output from the first very few DMX values increasing from zero and again, the reflection of how that looks from the unit. No idea why the first pulse is shaped the way it is; perhaps something to do with how the port hardware gets re-enabled for the start of every pulse. The MCU has plenty of time to do other things in between pulses, and may put the port back in tri-state mode when not actively outputting. But that's getting in a little too deep here; we have the piece of info we need about the output curve, and how we might compensate for it on a desk that can do dimmer profiles. Unfortunately, the configurable dimming modes only affect speed, and don't offer any internal curve changes on their own. Adding that would be a relatively simple matter of firmware and associated documentation. In practice when shot onto a stage, the nonlinearity is not a big issue. For a baseline of 100-ish footcandles read at a particular spot, taking the channels to 50% leaves about 60 footcandles on deck. So sure, the output curve is slightly "bowed upward" but certainly not in any unreasonable way, and anyone who's inordinately fussy about it can apply a gentle compensation profile as desired. | |
|
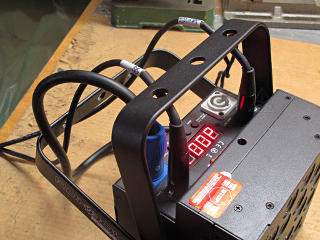
And check this out: because of where the power and data connectors are
located, there's plenty of clearance to swing the yoke *over* them, even
with the long "switchcraft" style DMX heads.
Try that with a Selador / Lustr from ETC, or a lot of other fixtures
with relatively compact yokes!
The natural hang of the box with the thumb-screws loose is about
45 degrees downward, too, so in a typical hung position there's relatively
little likelihood of tilt drift if the screws aren't torqued in very hard.
Just don't run them sitting upright on a floor or table and firing horizontally, e.g. the position this one is in now, because the entire air exit would be blocked off. |
|
[Important note:
There is a serious design flaw in the yoke knobs and their configuration
in these units, leading to knobs breaking apart and presenting some
risk of yoke-to-unit separation.
Here is a description of the problem
and an easy fix.]
| |
| Overall, I would say "nice job" from Blizzard and their collaborators. The wiCICLE thing needs some work and output linearity could be better, but on early examination their *BOX line seems to be a pretty robust platform with professional-grade build quality and attention to detail. Now we get to see how it holds up over time in a fairly busy event space. |