Enabling key-off power windows
Do you miss being able to simply roll down the car windows on a hot day
before actually getting *in* the car?  Or, did you just pull in and shut
down, and then realized that a window is still open?  Power windows usually
have the annoying characteristic that they don't work until the car's ignition
is turned on, usually to the "run" position which powers up far more things
than just the electric window motors.  The Prius allows 45 seconds of "grace
time" after power shutdown as long as you don't open a *door*, but usually it
isn't until you've already stood up out of the car that the passenger points
out "hey, this window's still open over here."  Wouldn't a quick way to close
them be nice to have?

This is a very silly hack for the '04 and up Prius, to allow control of
the power windows without having to turn on the whole car.  Two versions
are presented -- the simplest one requires moving only ONE wire, and
the more advanced version requires an easy circuit mod using a diode.
Choice will depend on desired functionality -- the former uses the
rear dome light's "door" switch position to enable the windows, and the
latter uses the parking lights which are not only easier to reach but can
also *warn* you about the "enabled state" and potential battery drain.

Meet Pinky. She and her colorful friends will be your tour
guides, pointing out important features along the way.
Each picture is a link to its larger version, and viewing the full-size
ones is generally *necessary* to get all the information.
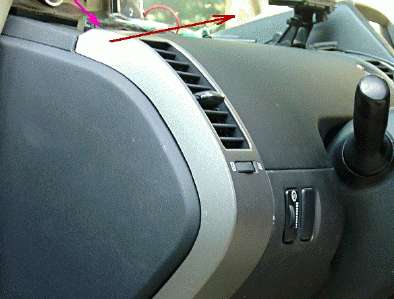
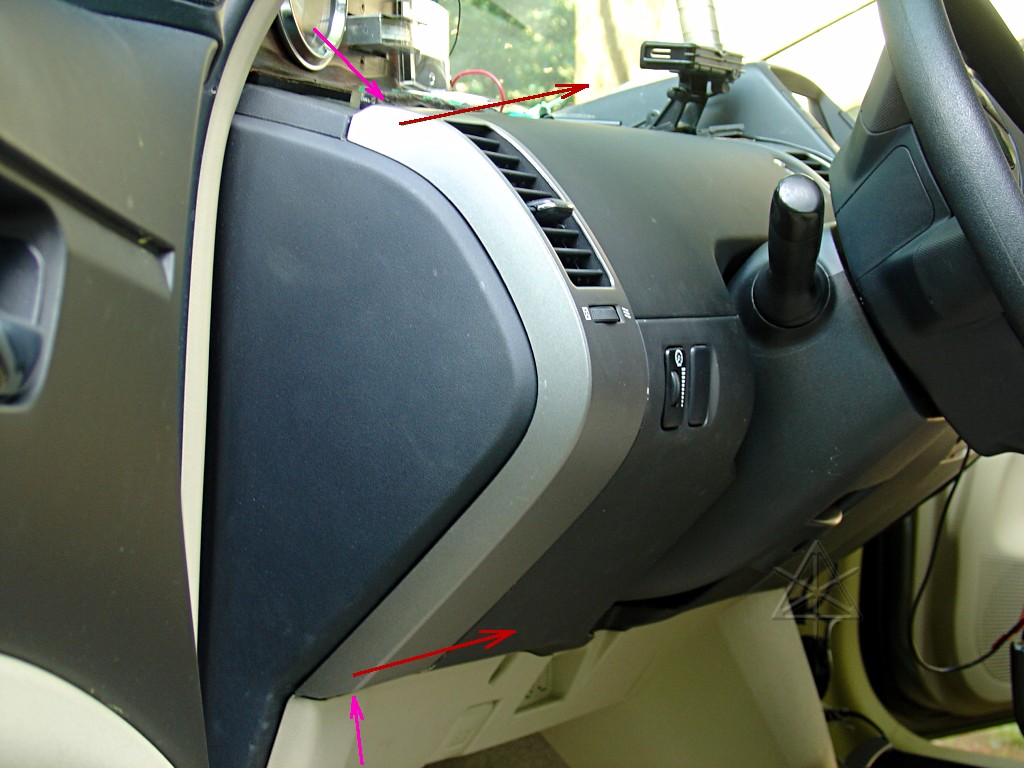
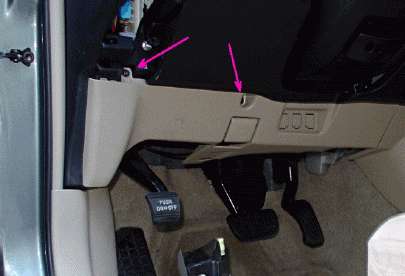
Yes, you'll have to take some of the dash apart. It's easy, really -- most
of the parts just clip in. For these silvered-finish vent panels, simply
get your fingers mildly sticky against the plastic somehow [moisture? gaff
tape? grip-gloves?] and grab top and bottom where the pink arrows are, and
pull straight away following the red arrows. It is useful to put your body
directly in front of the panel and pull with a sort of straight-armed motion
from the shoulders, so that if one end of the panel suddenly pops off, it
won't travel very far and twist. Straight removal is unlikely to break any
of the little nylon clips, but twisting one end around is wrong wrong wrong
and may cause damage. You can also try using a non-marring tool to carefully
pry up the edges to start them moving.
For some more reassurance that this is the right thing to do, see Chris
Dragon's excellent rundown on accessing the stereo unit, hosted here.
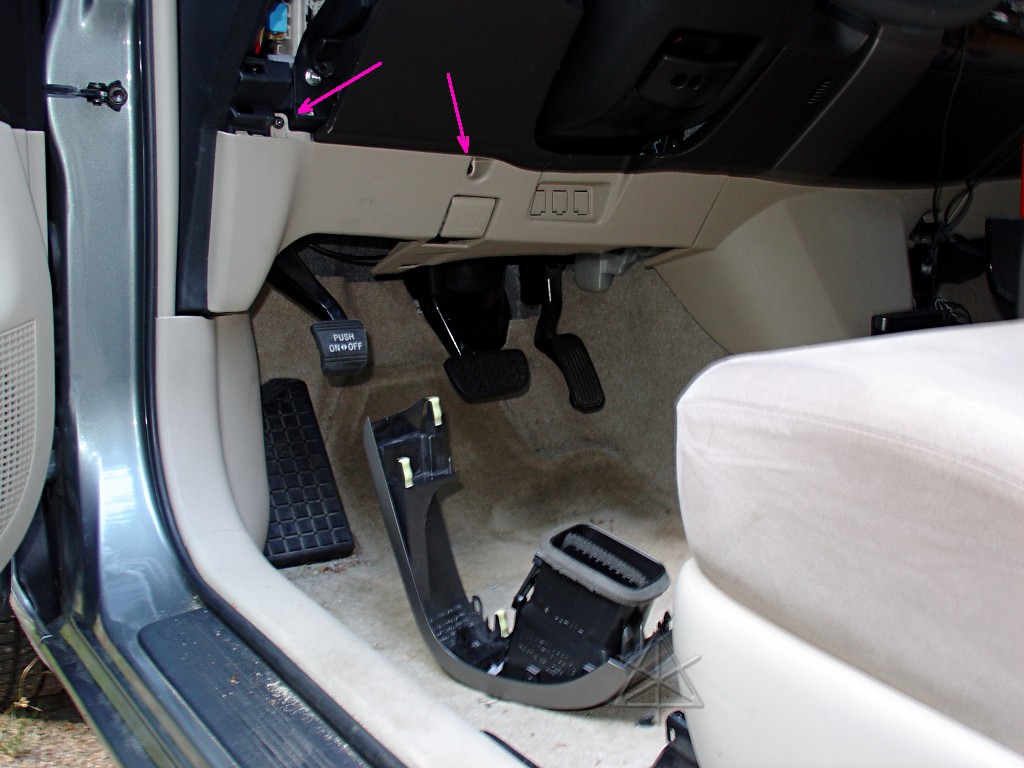
The next step is to remove the lower panel, which is held not only by more
clips but also the two phillips screws indicated. Once the screws are out,
pull around all the edges of the panel -- it's all one big piece from the
left edge of the car over to the stereo. It also clips into the top piece
holding the "power" button, so make sure to separate the panels along that
seam as well.
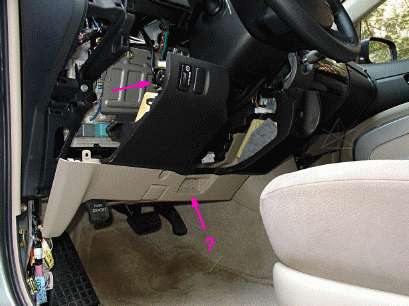
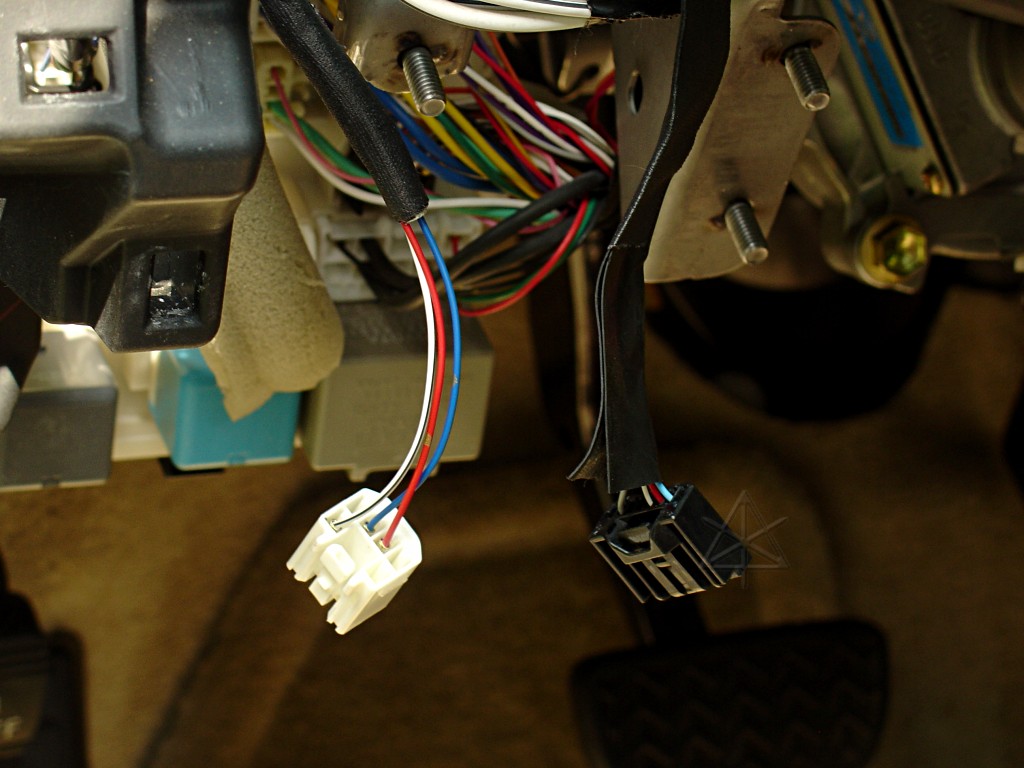
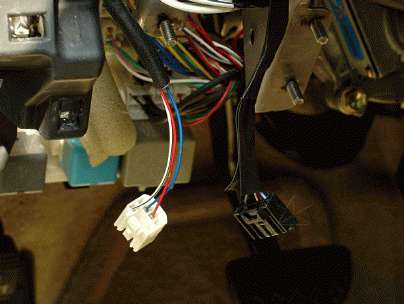
Once the panel is free from its clips, it will be dangling gently on the hood
release cable and a couple of small wiring harnesses -- the keyfob-reader
on the right, and the dimmer rheostat on the left. And if you have SKS,
possibly more from where the question mark is. Find the tab on the rheostat
connector [upper pink arrow] and disconnect it. This allows the panel to
lower farther down.
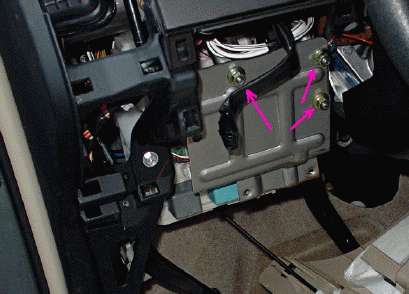
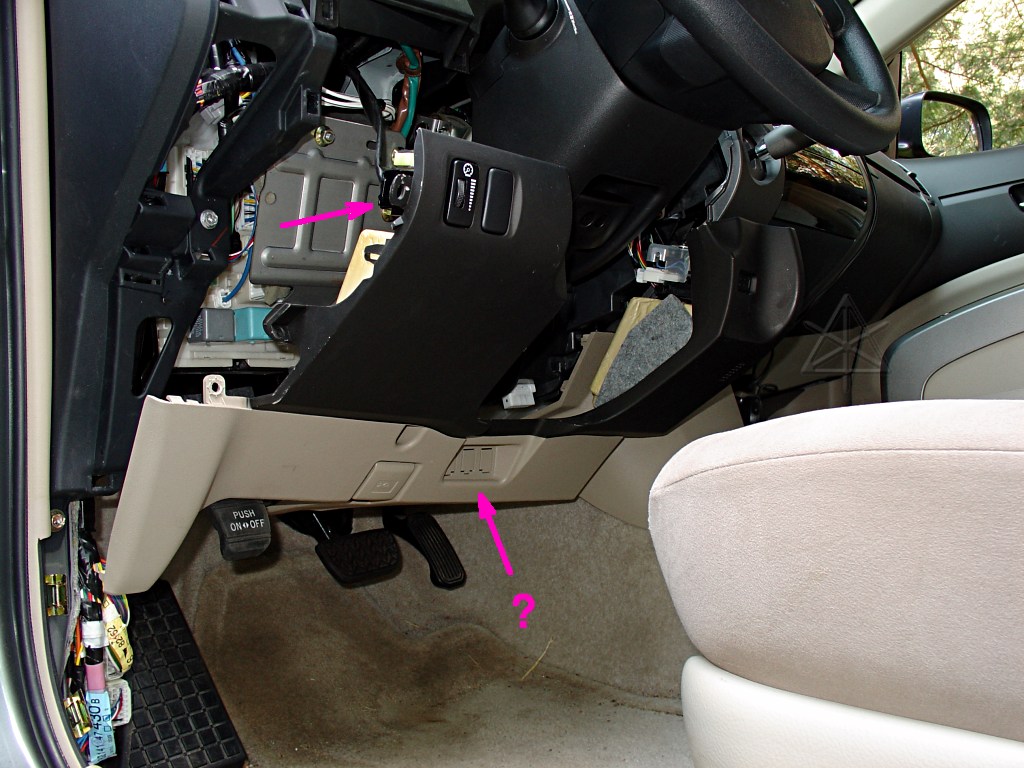
The panel can be left to hang on the remaining wiring and the hood release
cable; it is out of the way now. This reveals a steel plate, presumably
mounted here backing the foam piece to prevent your left knee from smacking
into the electronics in an accident. Use a 10mm wrench to remove the three
nuts shown and the plate itself.
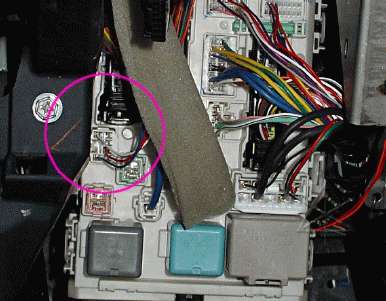
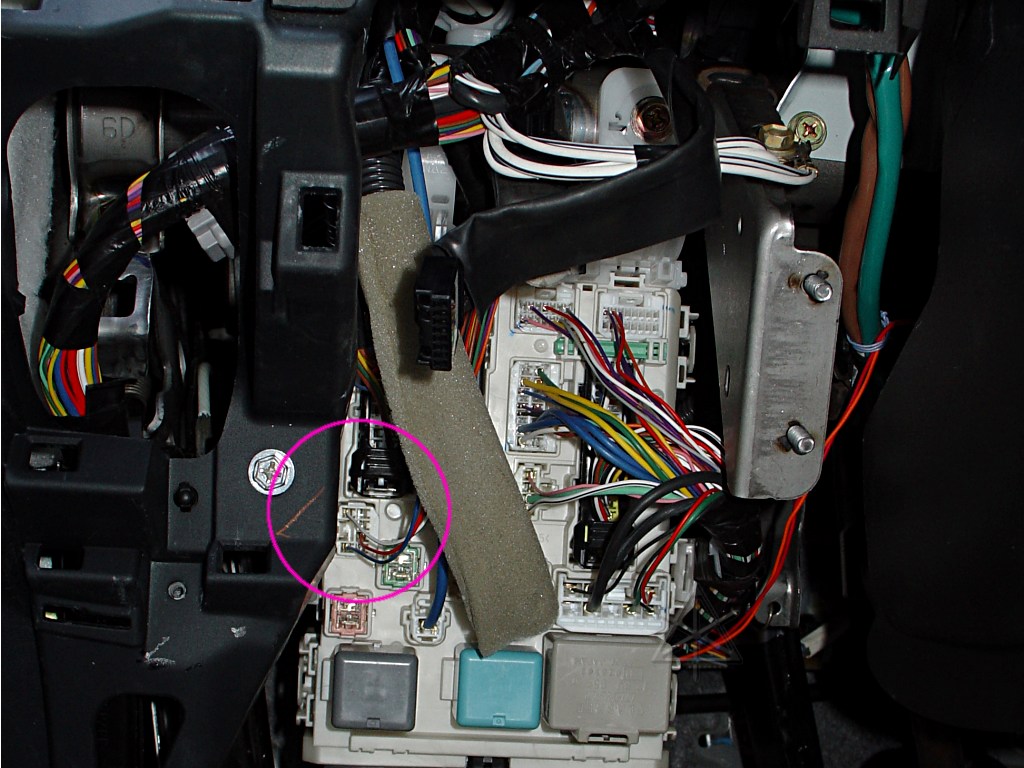
This reveals the "drivers side junction block", which also contains the
body ECU and fuses. We are now targeting the circled area...
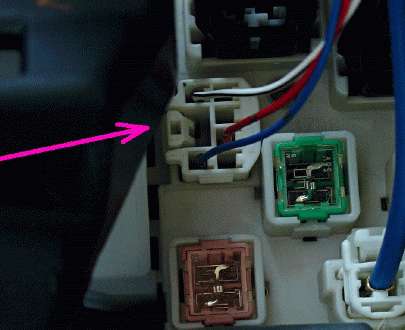
to remove this small connector. You may need a small screwdriver to push
the tab toward the right and release it, since space is tight.
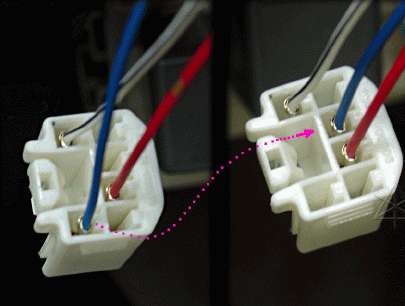
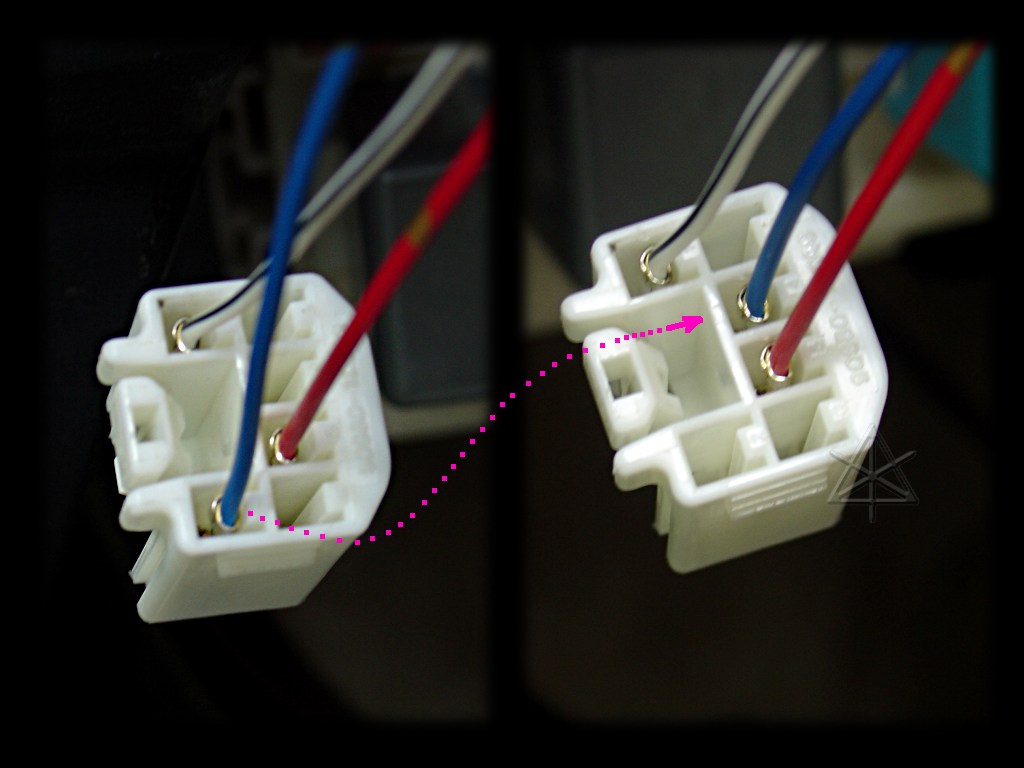
What we want to do here is simply move the blue wire from HERE to THERE.
From position 2 to position 4, in fact. But to do that effectively, we
will need a special tool.
This is what Toyota suggests doing, using tools that their technicians can
fashion from random junk lying around the shop. The key thing is the
one-sided chisel point.

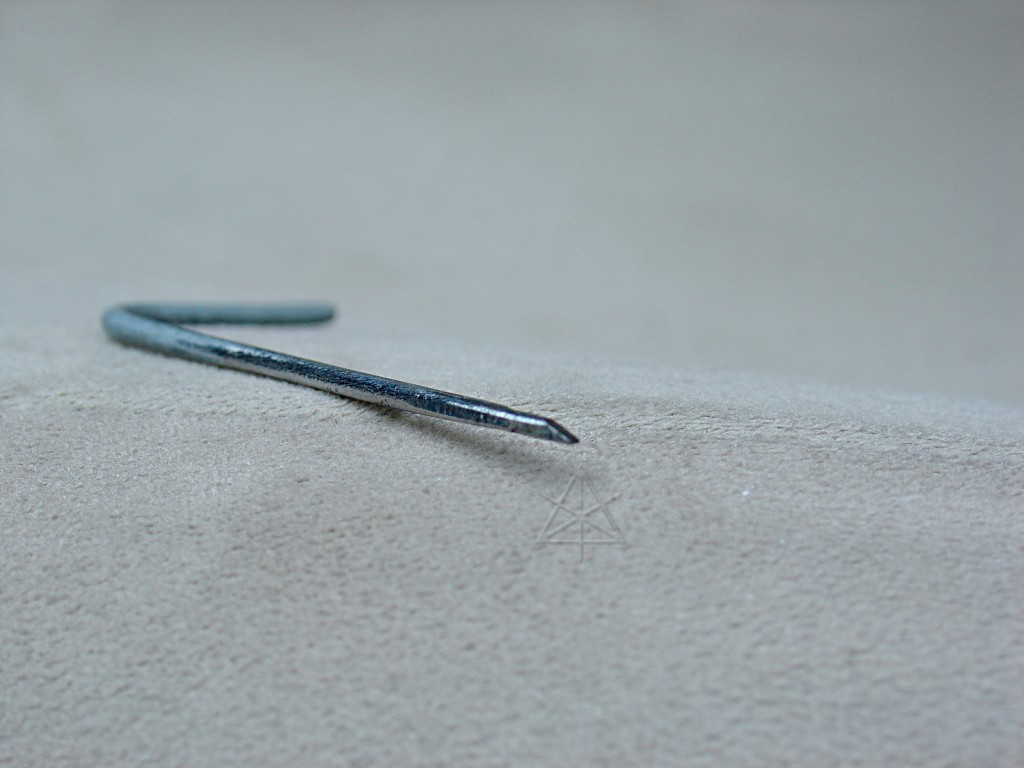
This is one of several connector-removal tools I've made over time. It is
possible that a very small jewelers' screwdriver would also work on these,
or even a strong pin.
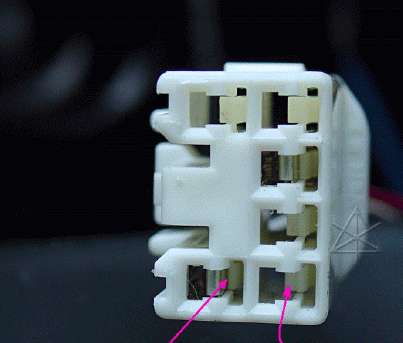
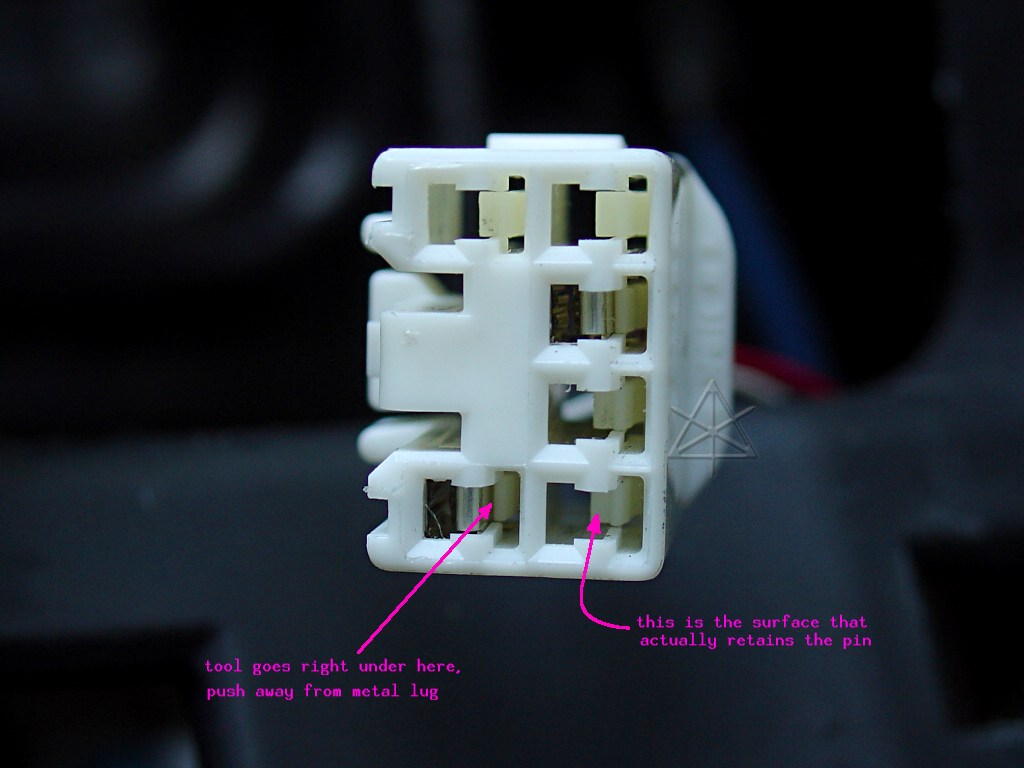
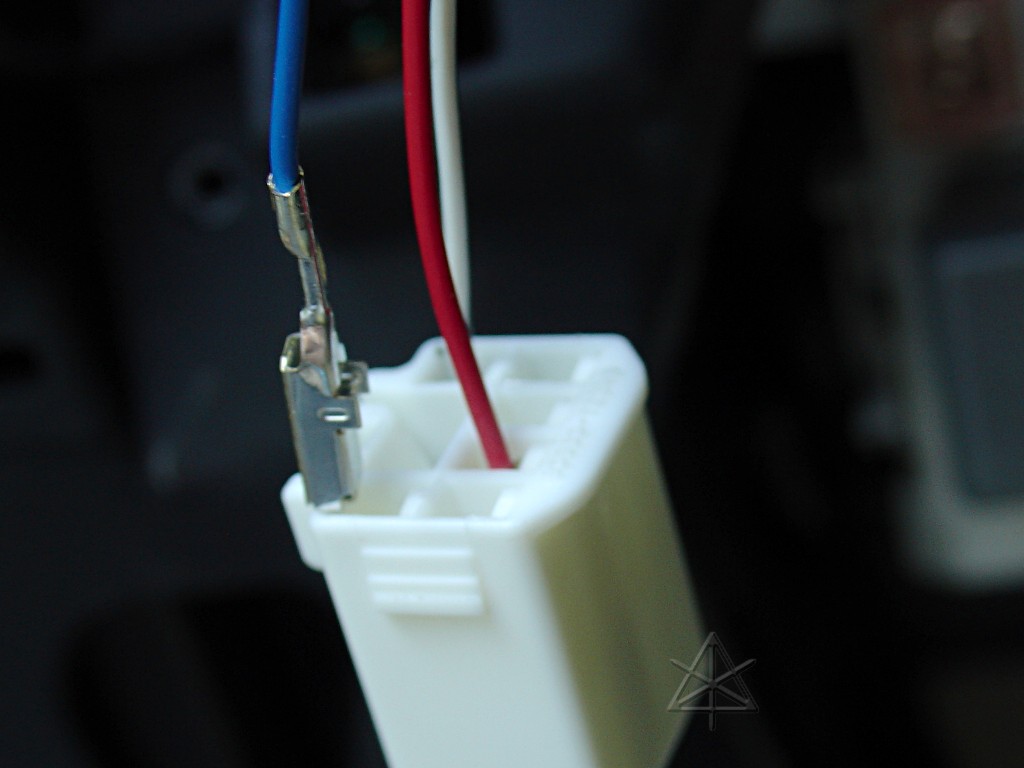
A dog's-schnoz view of the connector shows the plastic latch pieces holding
the lugs in. Other connectors use bent-out barbs on the lugs themselves --
it's not very consistent throughout the car. In general, it's best to get
a magnified look like this down *any* connector before trying to remove pins,
to solidly determine what the retention mechanism is and which tool to use.
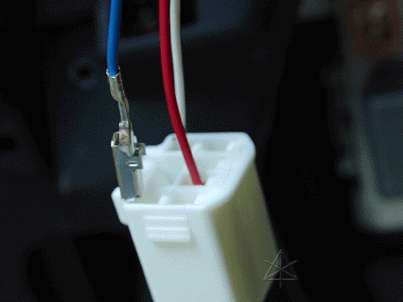
Finally, the lug is out, and can simply be moved from its original position
at pin 2 and clicked down into the hole for pin 4 as shown above. Then, plug
the connector back into the body ECU.
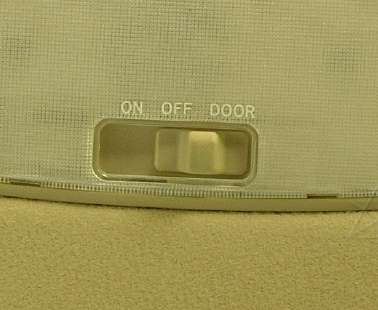
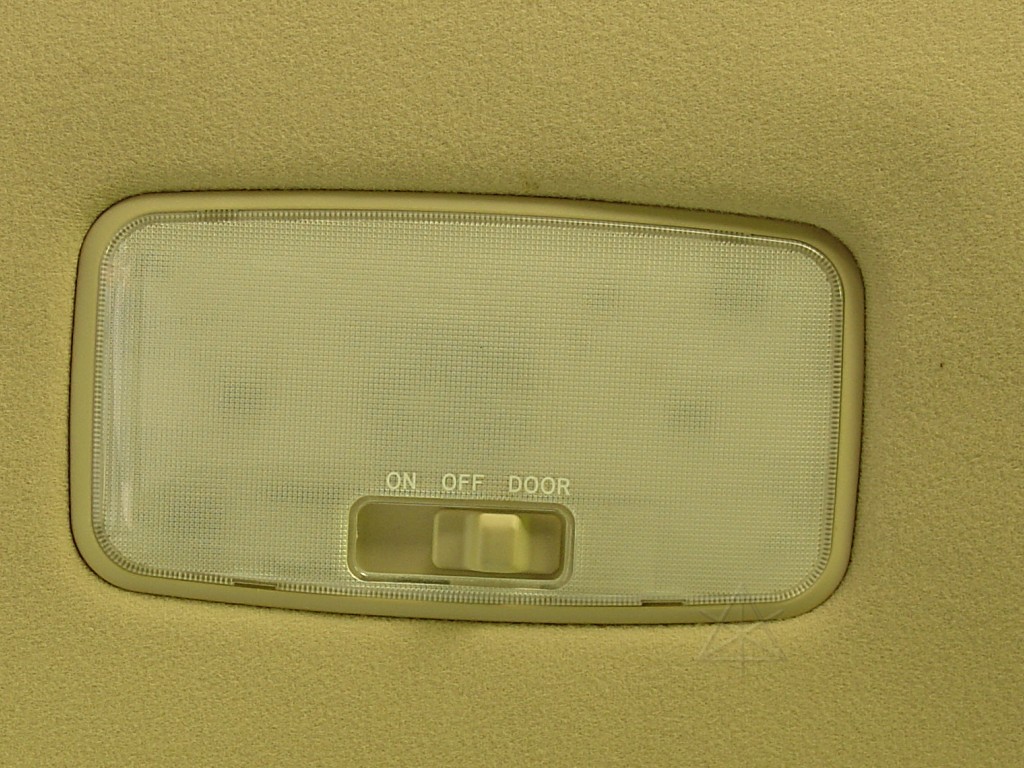
What this does is change the "door" position of the rear dome light [over
the back seats] to not turn on the light, but to enable the windows. As
sick as that sounds -- it's reachable from standing next to the car or
leaning in over the drivers' seat. But be sure to turn it back off once
you're done moving the windows, or you'll continue to draw 70 milliamps or
so powering the window relay. The power comes *through* the dome lamp,
so if it's blown or missing this won't work until it is replaced.
The only downside is loss of the "door" function of the rear dome light,
so if that's something you can't live without, neither variant of this
mod is for you *unless* you can find another usable pin like the one on
the blue wire somewhere else around the car, or even from a junkyard.  I
haven't bothered, because I never run the dome lights from the door switch
and even if I wanted to, the front one is plenty.

But the rear dome light is still a little clumsy to reach sometimes, and it
turns out that a simple mod involving just a little bit of soldering can move
this functionality to the headlight switch [which is right there next to the
drivers' door] instead.  So, here's the more advanced version.
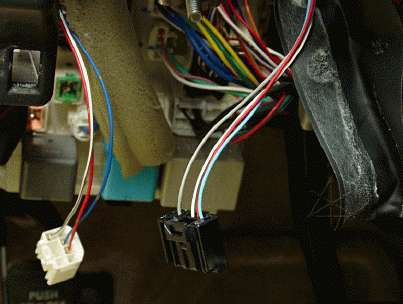
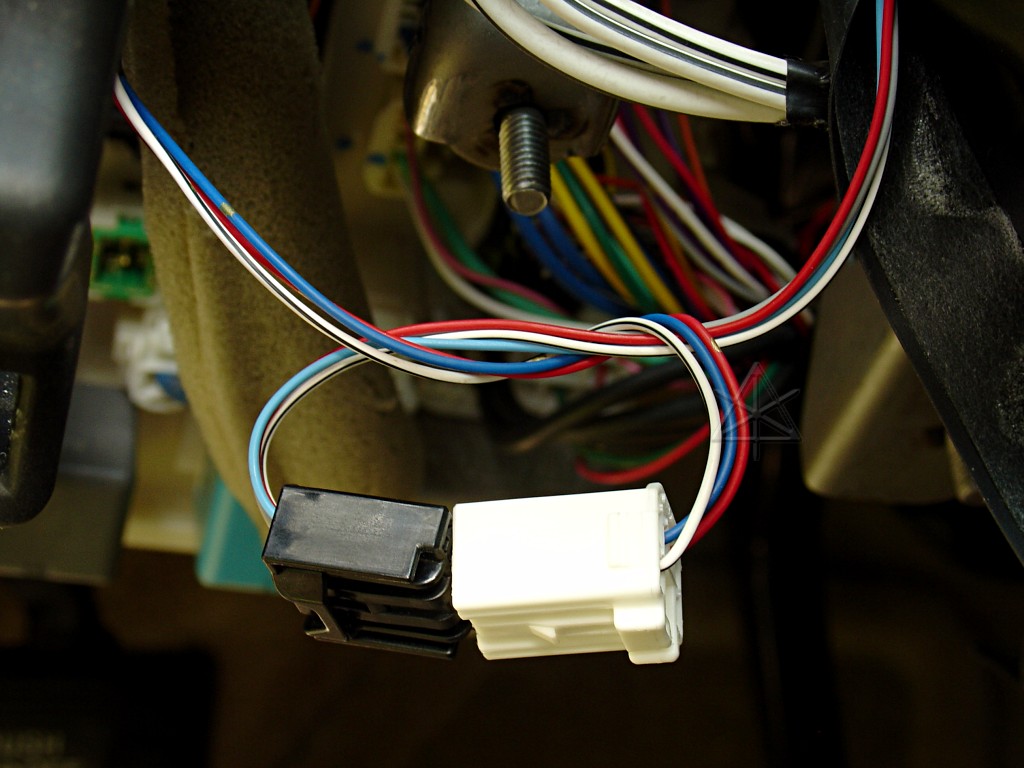
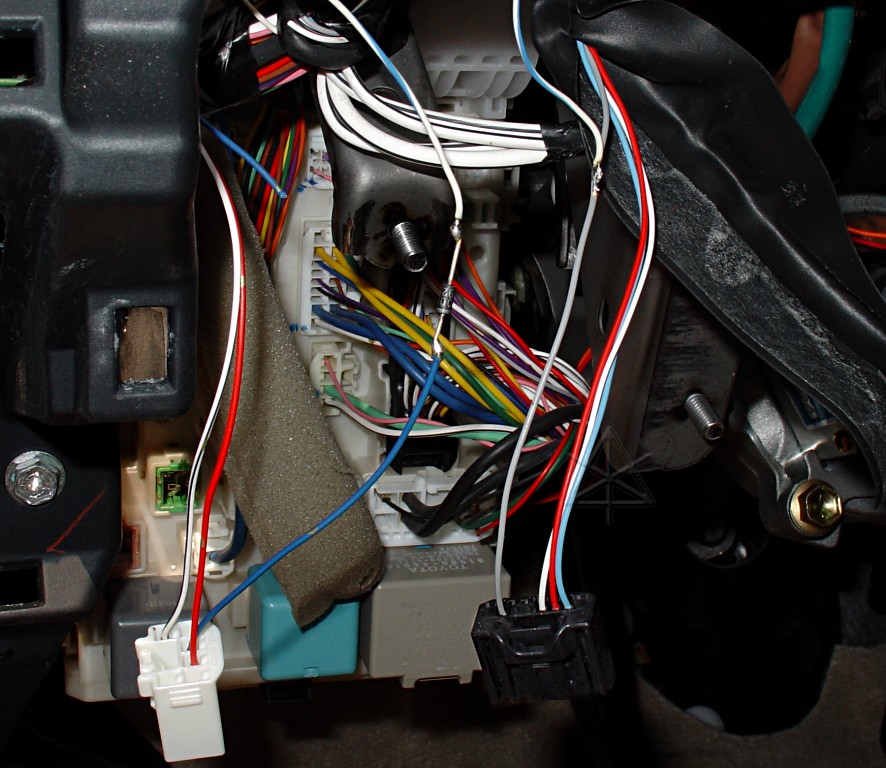
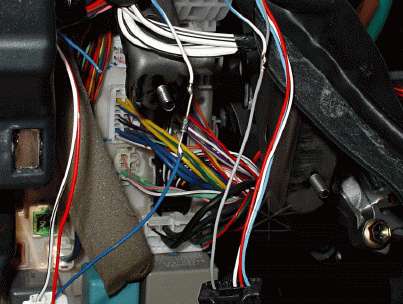
Remember that little rheostat cable you unplugged to drop the lower dash
panel? It's still hanging there, probably very near where you've just been
working on the dome-light connector at the body ECU. The flat sleeve around
it peels back fairly easily, exposing the four wires.
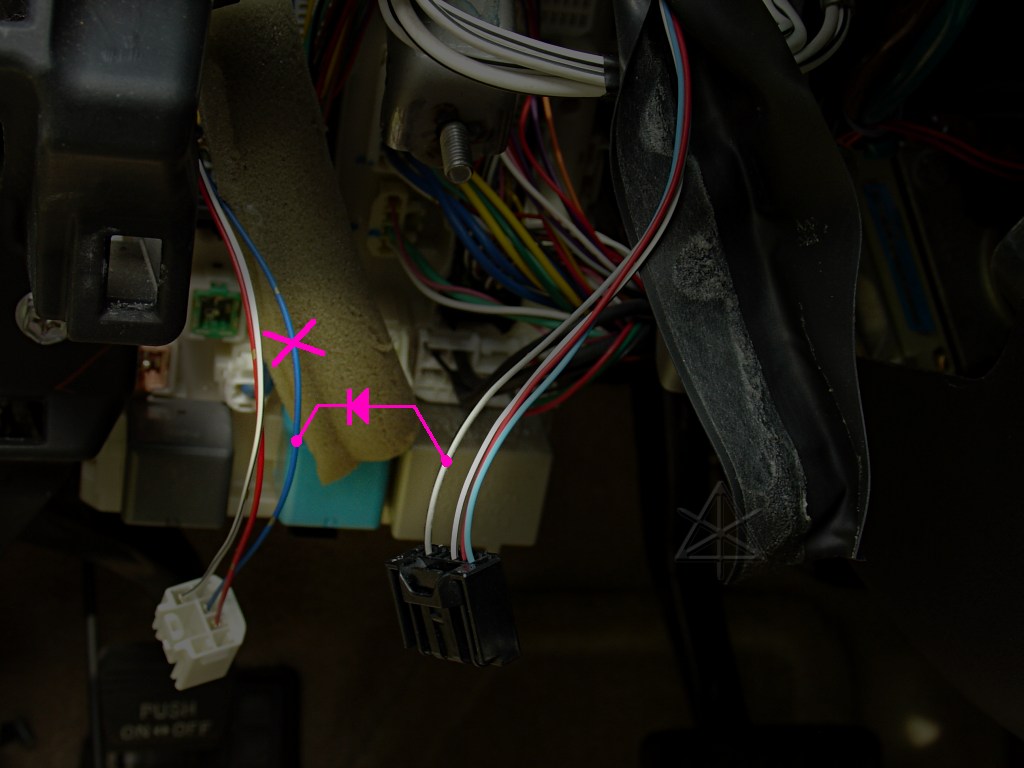
What we want to do now is marry those two cables.
No, not like that, silly...
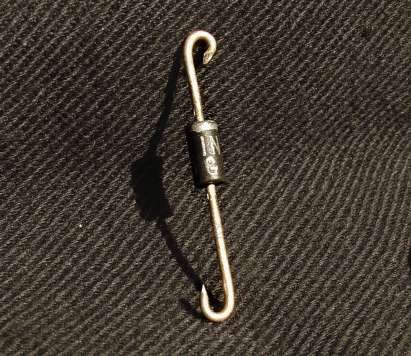
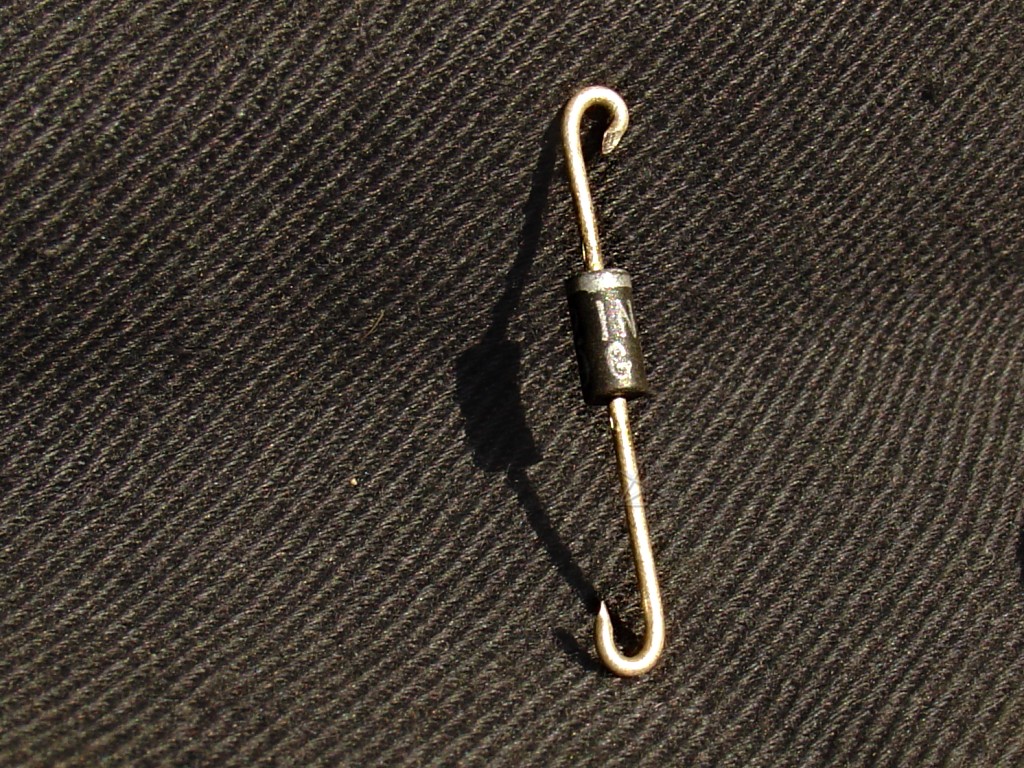
This shall be the binding symbol of their union, in fact.
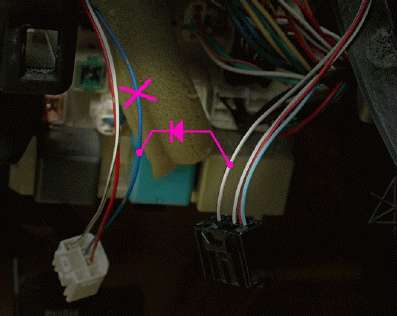
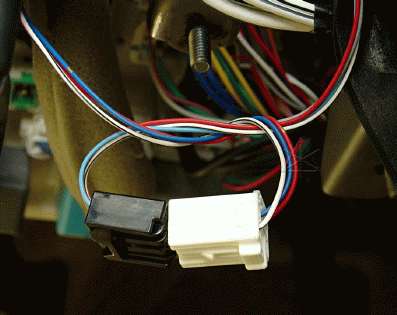
Here's what's really happening. The relationship is admittedly a little
one-sided, with one of the couple always in control, but the other provides
a certain amount of grounding. The BLUE wire from the body-ECU connector
is callously cut off from its previous relationship, and once mated to the
diode, becomes subservient to a small tap from the GRAY wire at the rheostat.
And we can now pronounce them source and sink. The path between them passes
through an added short length of wire, following both harnesses up and over
where they meet inside the dash. The jilted remains of the blue wire are
now doomed to hang endlessly in space, serving no further function.
But as everything gets buttoned back up, the forsaken dangling blue end
is at risk of becoming a drain on society, and should be jacketed up and
locked away to avoid harming anyone else. The happy newly-joined couple
get dressed again and retire to their own separate little domains, becoming
a distance relationship carried through the extra little bit of wire.
Now, everything else can be reversed and put back together, with no one the
wiser that anything happened -- other than that the rear dome light no
longer follows the door switch, like anyone's going to ever actually notice
something like that because dome lights are always flakey, right?  Its "on"
position still works fine.

The nice thing about the parking-lights method is that if the driver's
door is open and the lights are turned on, the beeper under the dash starts
sounding steadily as a reminder that you're about to drain the 12V battery.
This serves as a nice warning that the power-windows relay is also enabled
and makes you more likely to turn it all OFF once done with the windows.
Why it works
The body ECU provides a lead called KOF [presumably, for "key off"] that is
brought to +12V and enables the PWR relay -- including for the extra 45
seconds after car shutdown.  In this case PWR means "Power windows relay" and
not "Power".  The relay is inside the body ECU block itself, so KOF only needs
to run internally to the junction block.  However, there are a couple of places
where it appears externally, such as pin 4 of this dome-light connector for
whatever strange reason.  That position is normally not populated in the
connector shell at all, requiring us to grab a pin from somewhere else.  The
obvious target, complete with wire already attached, is the extra existing
lead from the dome light itself.

The PWR relay coil draws about 70 mA, and there is no harm in forcing the
KOF lead high along with it since that has its own output buffering inside
the body ECU.  The diode is to make sure that KOF doesn't back-power anything
else when *it* is pulled high.  I used a 1N4002.

It is entirely possible to install a completely independent switch somewhere
to enable KOF instead of using either of the above methods.  I had a similar
thing in my previous car.  You just need to find a source of always-on 12V
to feed it.  In this case, the diode is still needed to avoid the normal
output functionality of KOF from going somewhere unexpected.

The driver's window won't work at all if the auto-up feature hasn't been
reinitialized, such as after the 12V battery is disconnected.  The car must
be put in the IG-ON state to do that, after which the KOF hack works again.

Related reading
http://techno-fandom.org/~hobbit/cars/bodyecu/
A closer look at the body ECU and junction block unit
http://techno-fandom.org/~hobbit/cars/subie.html
Previous car with a separate windows-enable switch
_H* 060902