As expected, 85 or 90 PSI right off, and even though the town system wasn't in a backflow cycle at the time I saw it varying quite a bit, and soon while I watched it peaked slightly over 100. Wow.
|
After observing the little leak-detector widget on the water meter spinning
randomly forward and backward, I called the town water department to bounce
some ideas off them. For one thing, I wanted to make sure this behavior
wasn't going to rack up a bunch of gallons I never actually used.
A little situational explanation is in order. My neighborhood is a short distance up the street from one of the main pump houses -- in fact, I sit on the other side of where the pump-house tees into the mains such that it is between me and the line to the storage tanks. Town well water has to pass through a whole bunch of filtering, and given all the iron, oak tannin, and other spoo that may seep down as far as the water table the filters need to be purged on a fairly regular basis. This, in fact, happens about twice a day in the mornings and evenings. This is done by backflowing the filters and sending the results to a big settling tank outside the building, which has to get pumped out a couple of times a year. The backflow causes pressure variations on the facility's output. The town guy also pointed out that the main pressure at my altitude is likely to be in the neighborhood of 90 PSI which *is* considered rather high for normal residential service. In some municipalities, the LEGAL limit is 80 at any point in the system. Thus, the water coming into my house is subject to fairly severe ups and downs in pressure sometimes. In fact this has been going on for years, with one noticeable symptom that the toilet valve would suddenly push open and run a little bit, in a fairly noisy fashion. And I'd see the faucet flow rise and fall if I was using the water at the time. So this was a known quantity, a normal part of living here. I hadn't thought too much about it, but after seeing the water heater fittings rise out of the top of the housing like they did and a few other demonstrations of the effects of water pressure, I began to get *really* paranoid. Well, I've always been a little paranoid about this, opting to turn off the main feed whenever I'd be away for any extended time, but mostly to make sure a freezeup wouldn't totally flood the basement if the heater should quit for some reason. But the water system had never had any sort of check valve or regulation, it was just the utility straight into all my fixtures. And evidently, back out. The amount of flow was clearly being assisted by the fact that the new water heater was much more like a big stretchy bag than the old one. |
|
|
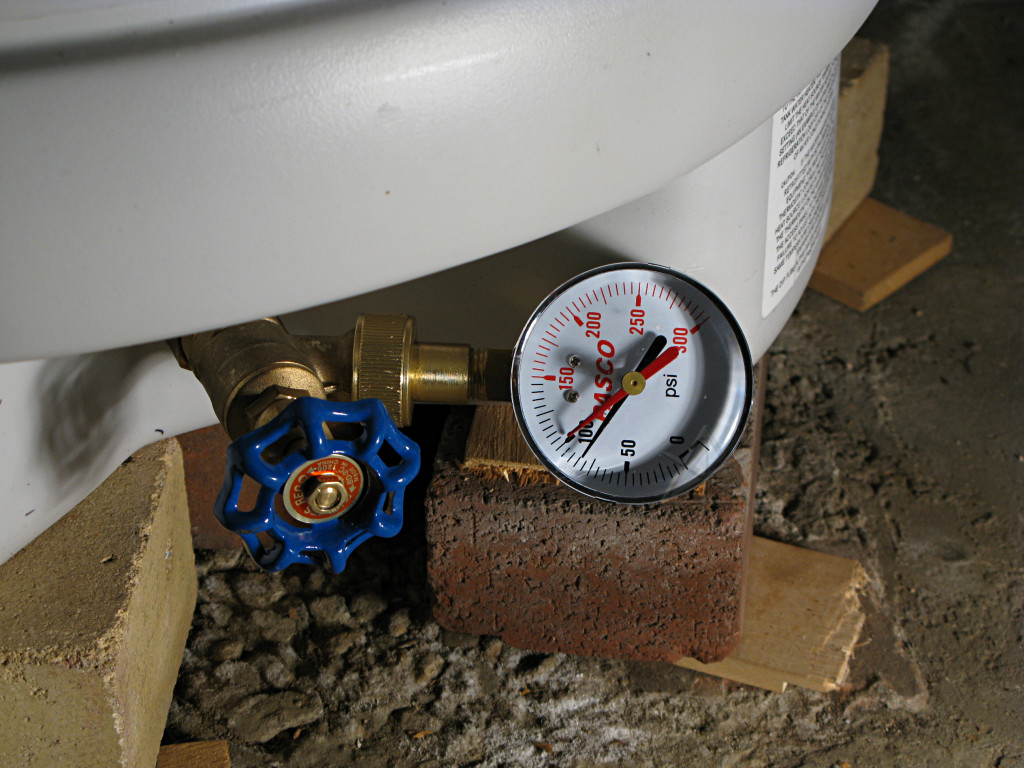
So just how much pressure was it? Well, clearly it was something to measure.
Google told me that I could get a simple test gauge at
F.W.Webb in the next
town over, so I did that. This screws quickly onto any hose bibb or threaded
faucet like the laundry supply or, conveniently enough, the drain cock on the
water heater. It has a "dead hand" to record the highest pressure seen by
the live one while the system is under observation.
As expected, 85 or 90 PSI right off, and even though the town system wasn't in a backflow cycle at the time I saw it varying quite a bit, and soon while I watched it peaked slightly over 100. Wow. |
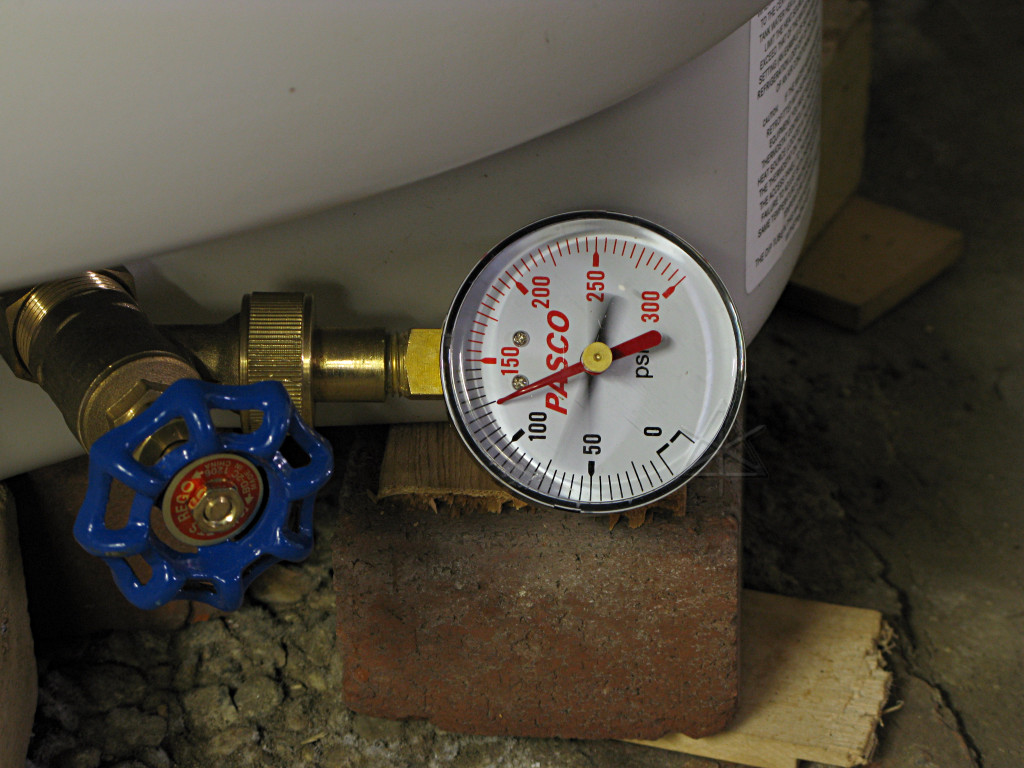
| Now, whenever the toilet made its little noise I'd run downstairs to have a look at the gauge, to watch the purge cycle in action and see how high it might go. Some of the purge activity brought the pressure much *lower*, as in this time shot where it's wandering all over the place between 50 and 75 and eventually returning up to normal. But more importantly, after a couple of days not touching the dead-hand, I had received peaks well over 120 and in monitoring further I think the maximum I saw was 130. That's frightenly close to the red zone, and the rated working pressure of most plumbing fixtures. Including the Marathon, which by now had already undergone several days of this mild abuse. Sure, it's rated at 150 continuous, but all that random *cycling* up and down couldn't possibly be good for it. |
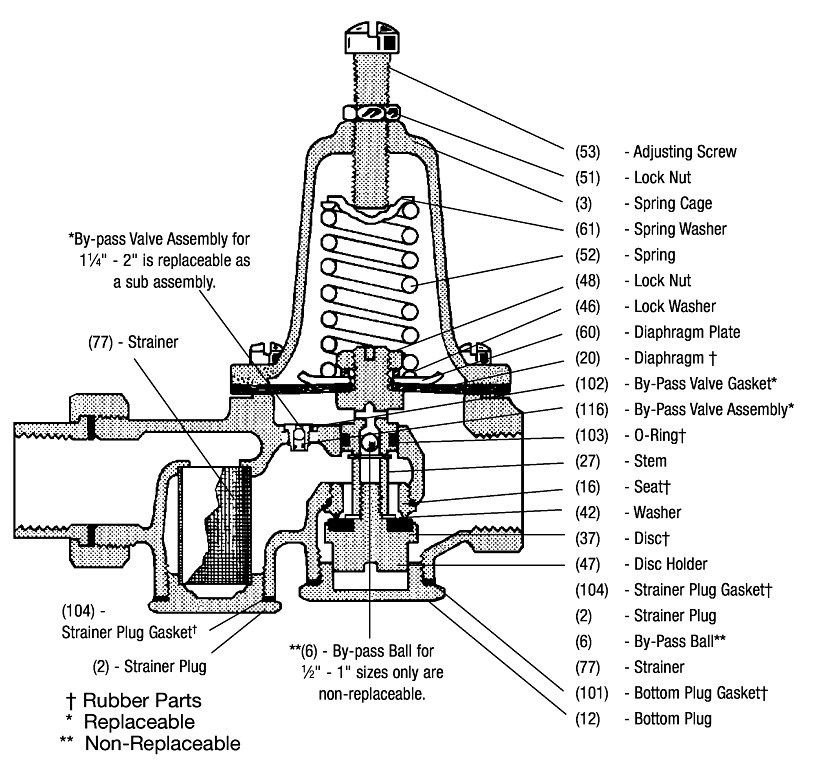
| Clearly, and several friends I discussed it with agreed, I needed one of these. |
|
(Taken from this PDF, as
listed here.
Many more helpful documents about pressure reduction, expansion valves, plumbing, boiler fittings, etc are available at the Watts Regulator website.) |
|
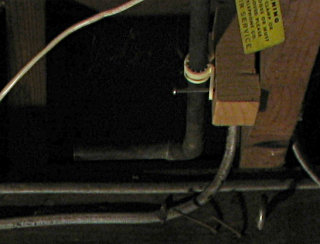
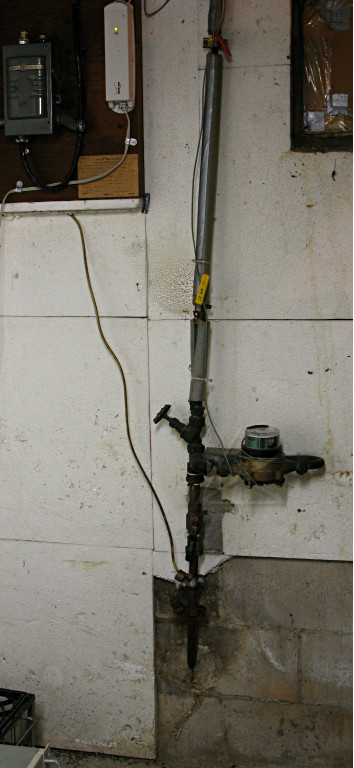
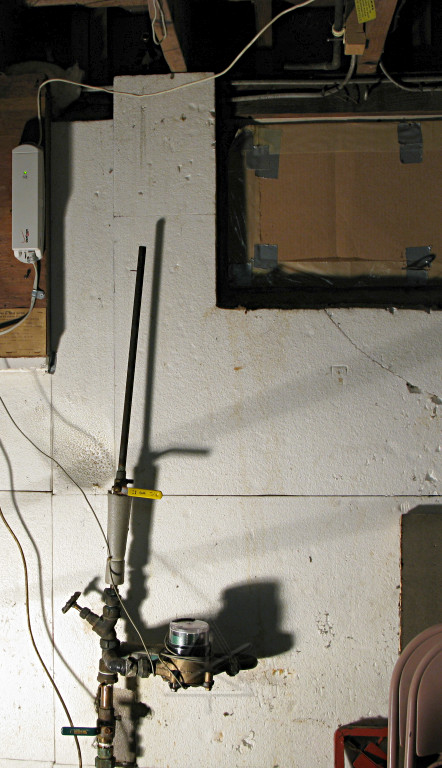
Here's the incoming feed and meter, and somewhere along this I'd have to cut
in the pressure reducing valve. The supply has *three* valves, of differing
ages and types, all sort of suspended in midair by the stiffness of the
surrounding pipe and the kind of crufty that makes you think "don't touch any
of this if it ain't broke". Fortunately, the two ball valves work [although
the lower one possibly leaks a little] and those are what I use to turn off
the feed.
The incoming line also sports several vintages of grounding clamps, at least one of which is completely disused but solidly rusted shut around the pipe. The white box on the panel is the power supply for the FiOS ONT, and the water heater fusebox and switch is next to that. And of course, more of those silly styrofoam panels all around. |
|
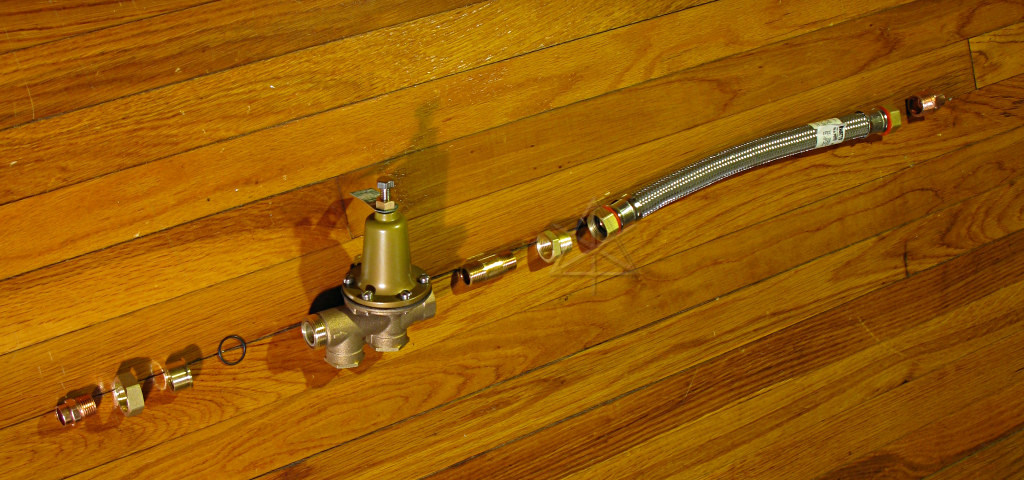
Another trip to Webb yielded another collection of parts to use. Yes, the
perspective is a little screwy in this picture as it was 90ed from a shot of
the floor. Another water-heater flex hose, more adapters, and of course more
nipples. A good story has to have lots of nipples in it, right?
Frankly, I have no idea why short lengths of MALE to MALE threaded pipe are called nipples. One of those weird plumbing-trade things, I suppose. With terms like that and "ballcock", ya gotta wonder. |
|
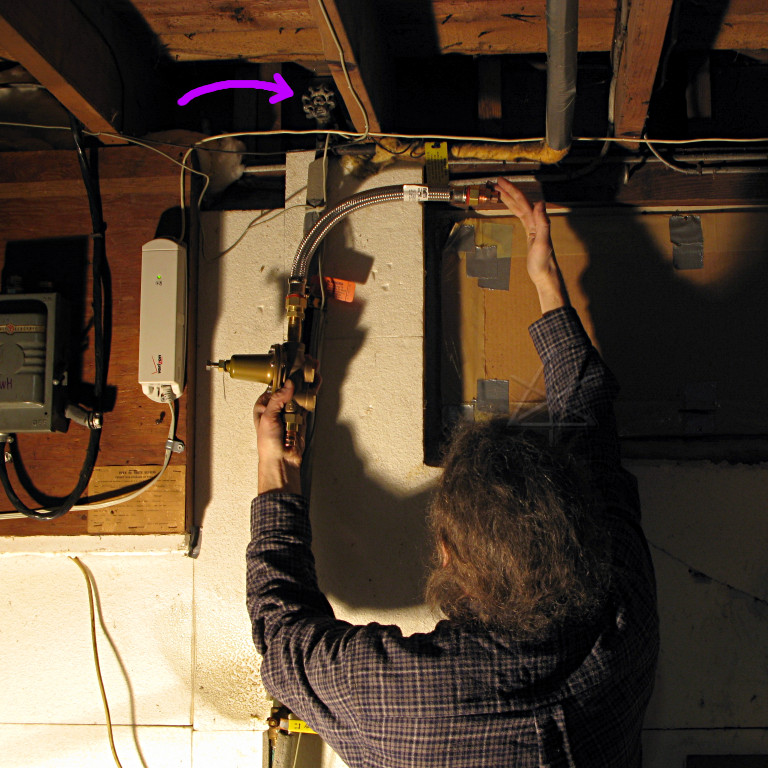
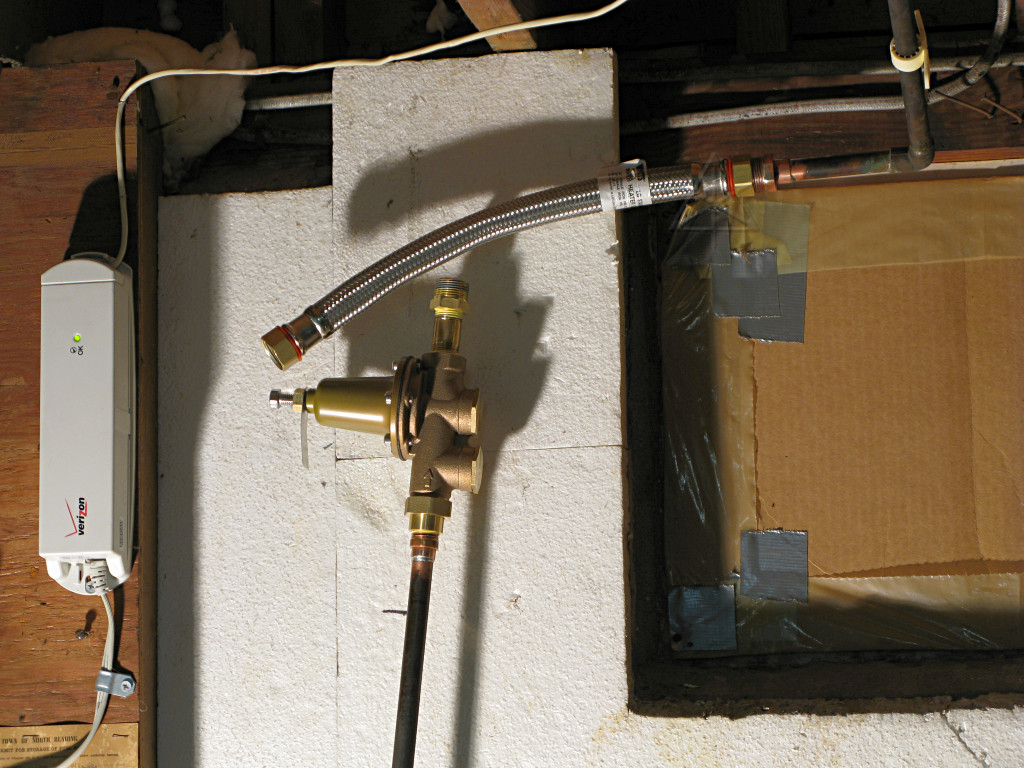
Here's the proposed mounting configuration -- arrived at after much noodling
and rejection of several ideas involving far too many elbows. The idea was to
get away with a minimum of parts, and also eliminate the tee and valve out to
the outside faucet [purple arrow] which I never use. I'd had trouble in the
past with its inside shutoff valve anyway and didn't trust it, so here was a
beautiful chance to just bypass all that crap and be done with it.
The regulator doesn't care what angle it operates at, so the sideways mounting is fine. Furthermore, the flex hose is pretty happy with a simple 90 degree bend and would place minimal strain on its surrounding fittings -- unlike the somewhat screwy twisted paths the water heater hoses had to take. So letting it be the thing to turn the corner allowed plenty of movement slop for hooking the surrounding pipes together again. Still, I'd have to cut reasonably accurately to minimize static strain on the nearby stuff, so I was measuring twice. Most of this was to remain in the 1/2" universe, except for the flex hose which is nominally 3/4" size but whose inner diameter comes closest to matching the copper pipe itself. I had to put togther enough other stuff to adapt up to 3/4" and back down again. Plumbing size specs are weird. |
|
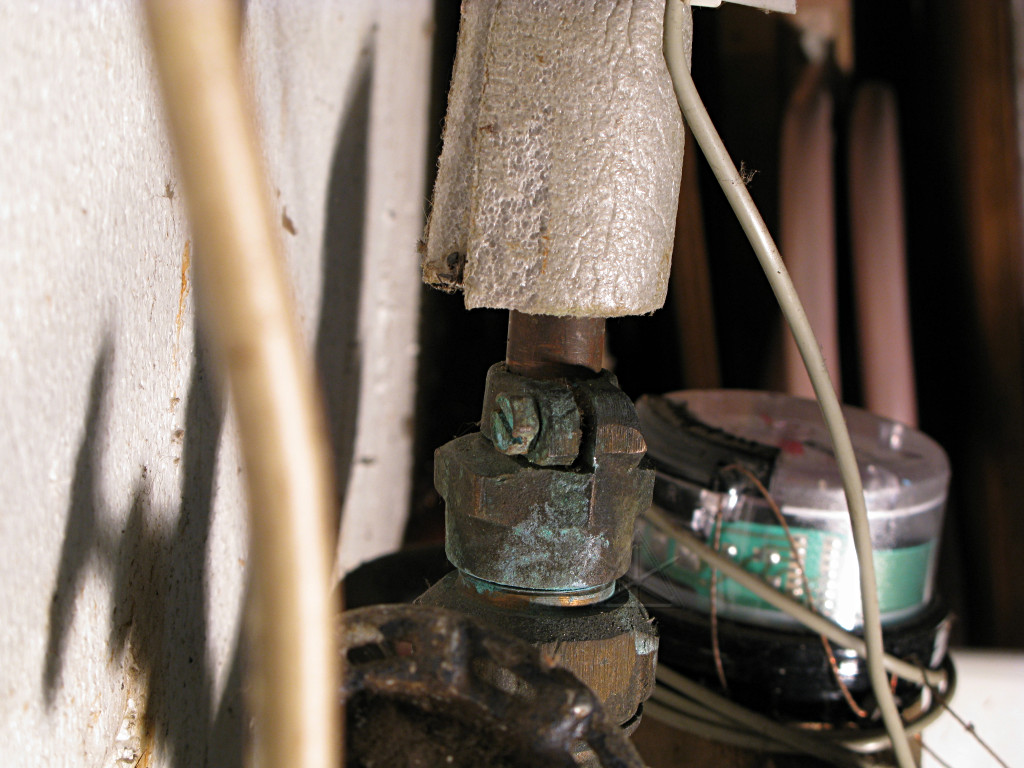
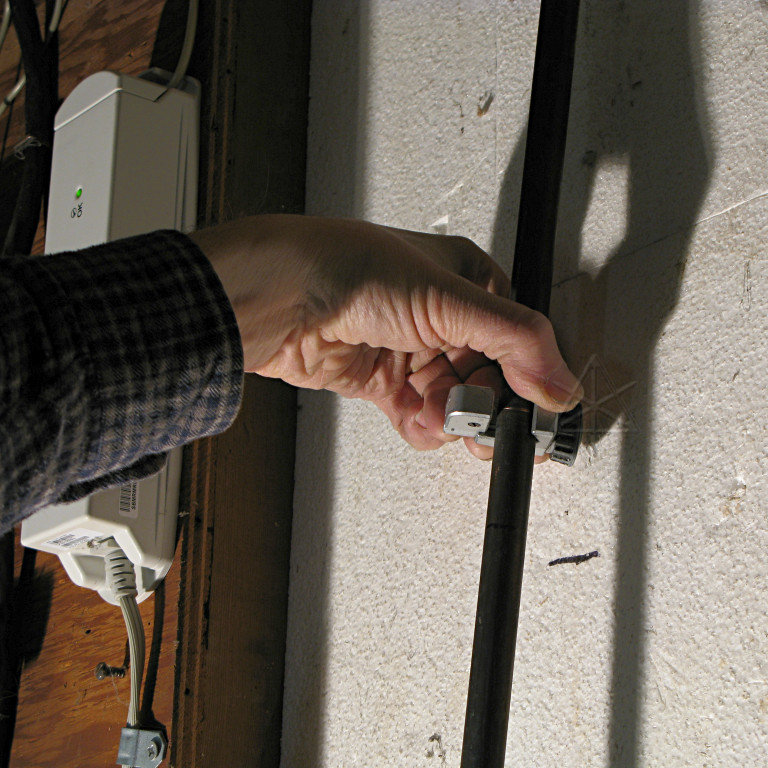
The hardware around the meter is generally fairly old, and involves a crazy
mix of compression fittings, unions, sweated joints, a weird out-and-back-in
widget feeding the loop where the meter sits, and this particularly
sketchy-looking thing. It reduces the outlet from the main and meter loop down
to half-inch, and looks like it simply grabs the copper pipe in some sort of a
clamp and who knows how it is actually supposed to *seal* inside. [If you
know, tell me!] I gave this screw about an eighth of a tightening turn, just
to make sure it still could move and to maybe reaffirm its hold on the pipe
above, but avoiding placing any additional strain on it.
All of this stuff is still on the high pressure side of where I was about to install the regulator, so it remains subject to the crazy variations from the town. I was loath to mess with any of it without a well-stocked worktruck of parts ready to hand, and was being careful to not move or bend things any farther than needed while working. For example, I have no idea of the condition of the big stopcock right after the meter, and I'm not about to turn it and risk having the stem packing start leaking. I'm considering this installation semi-temporary until such time as the whole main feed can be reworked with new fittings, which would of course involve the town shutting off the water out at the street and approving a re-installation of the meter. That's probably NOT something I'm likely to tackle myself. The point here was to just take the load off the inside plumbing and treat my nice new water heater a little more gently. |
|
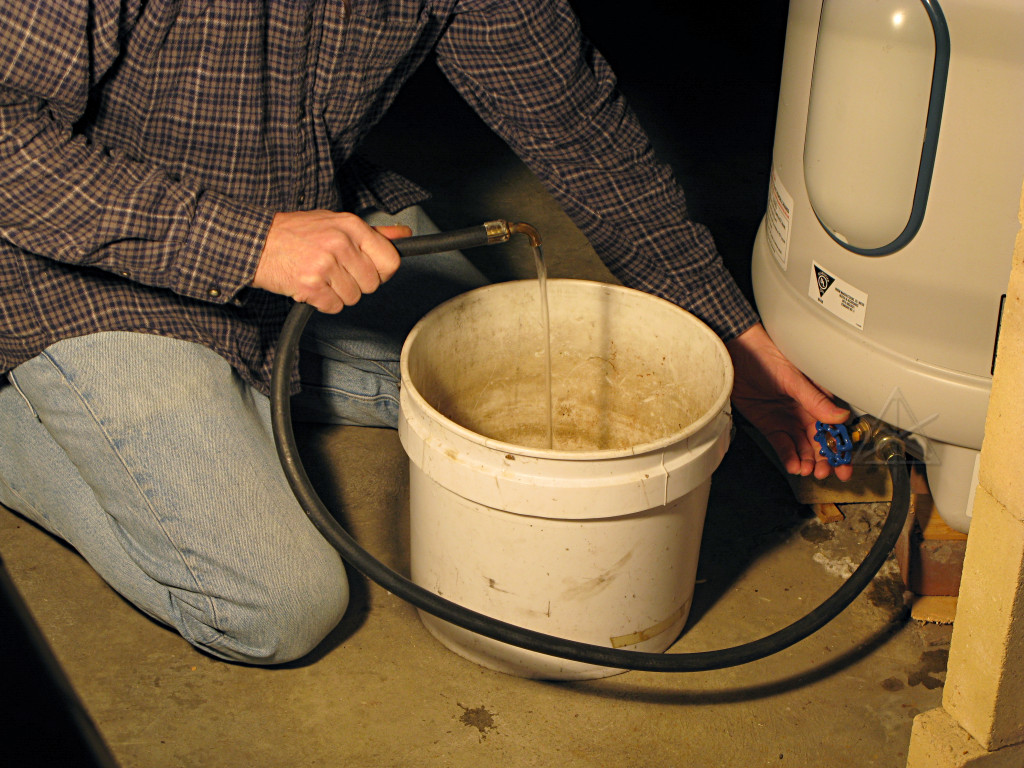
But for the moment, bolstered by the evident success on the heater after
all that worry-warting, this job was well within reach provided nothing
upstream went flooey. The house system needed to be drained down again, of
course, and one convenient way to do that was via the lowest point at the
water heater. And this time I did it right, by reclaiming an old washer hose
as a useful drain fitting for the purpose and not having to use the shop-vac.
The heater level didn't have to come down particularly far, of course, just enough to keep water out of the pipes up at joist level. The reason that a water heater dip tube has a small hole in it near the top is an anti-siphon hack -- to avoid an opening at a lower point elsewhere in a water system from pulling all the water out of the heater from the bottom via the dip tube. As soon as a little air gets into the inlet column, the pipe above it empties and the water left inside the heater isn't going anywhere. |
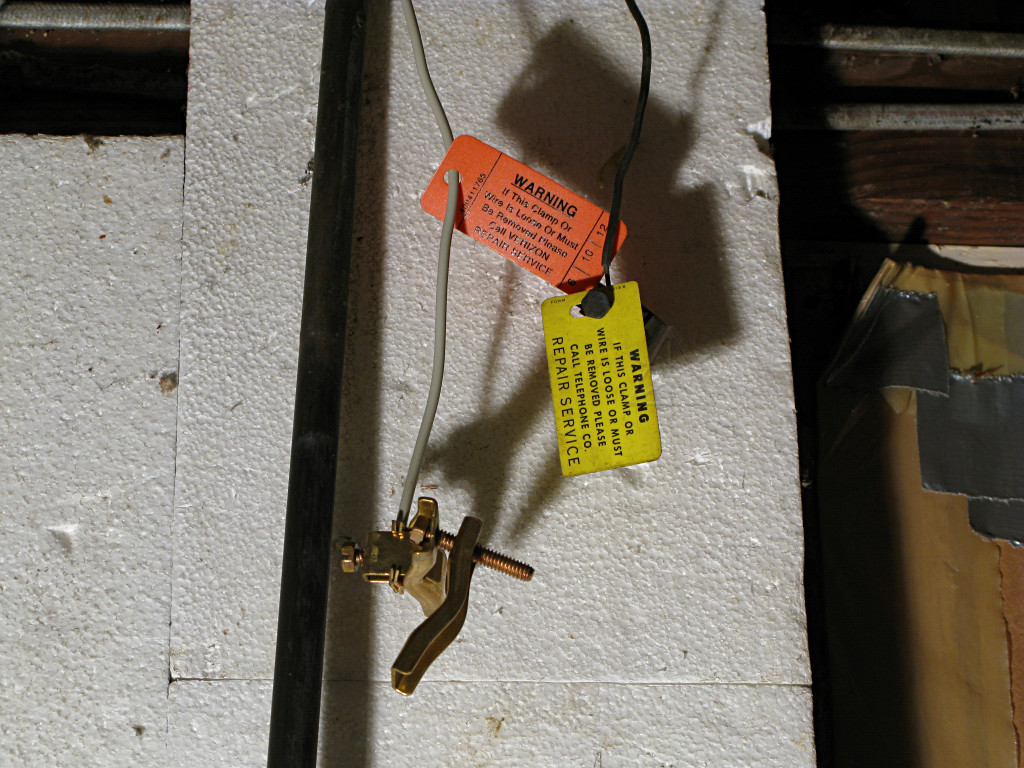
| Various equipment grounding clamps had to be removed first. But I'm sure the underpaid offshore drones that one would undoubtedly reach upon trying to call Verizon frankly would not care one whit that CPE earth grounds had been temporarily removed. See, yet another means by which outsourcing is going to kill us. But it wasn't thunderstorm season, so no worries. |

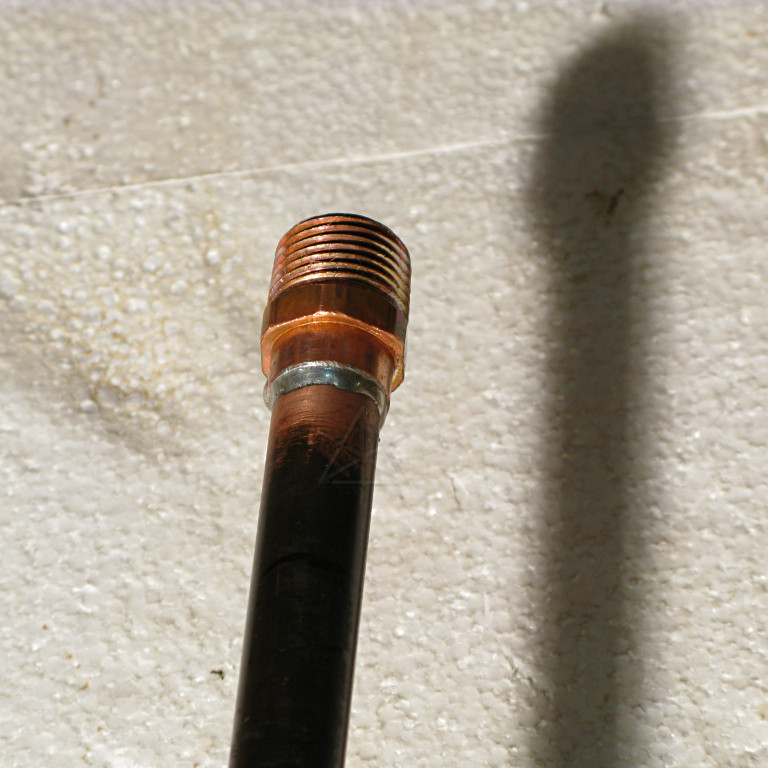
| As with the water heater adapters, I wanted to make sure the end faces would mate tightly with the flex-hose gaskets, and this time around took the time to document the difference. Here's the fitting as it came from the Box -- typical cheapass Chinese casting job. Did I mention outsourcing? |
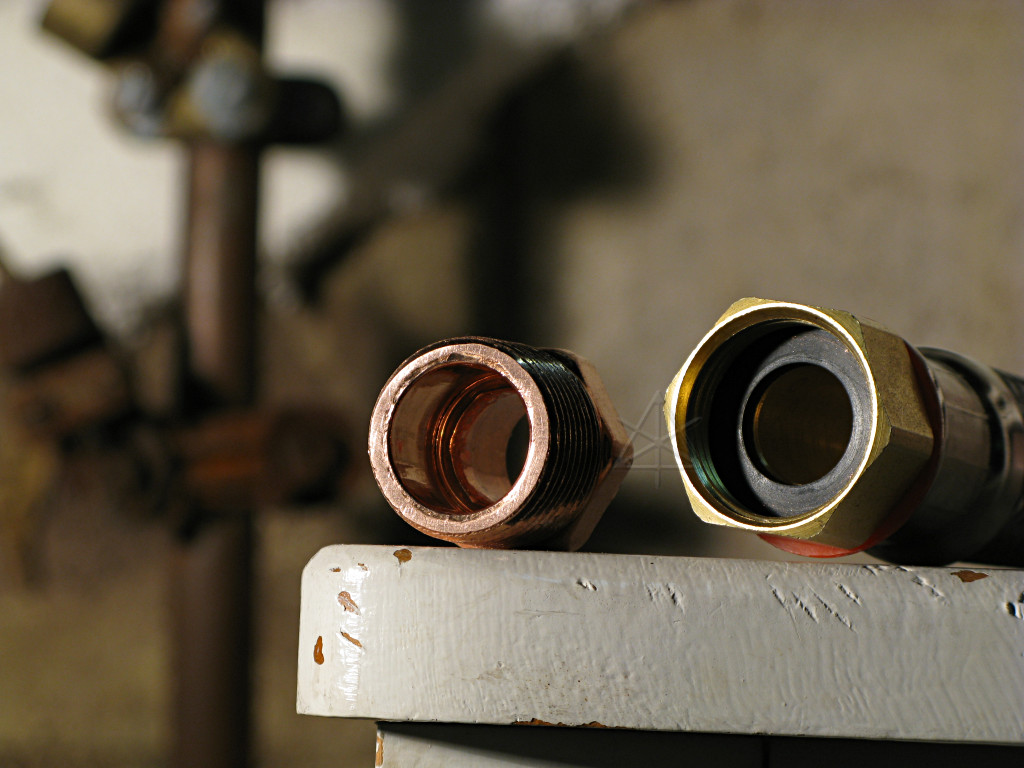
| By swirling around on emery paper long enough, a nice smooth flat surface was achieved -- it didn't have to be flat all the way across, just enough to present a solid ring of contact all the way around. I'm sure plenty of flex-hose installations are done every day without any attention paid to this sort of subtlety, and upon having the crap tightened out of them likely don't leak, but why knowingly leave a gasket in there mangled more than necessary especially when one might want to temporarily take this apart again some years from now? It made me feel better about it, anyway. |

| Confidence or no, I had some moments of "I can't believe I'm standing here cutting the MAIN FEED to my house". Here was another point of no return -- if this didn't work, I'd have no water until it was fixed. |
| Good thing that when I was shopping for tubing cutters, I got the little tiny one, huh? The larger one I bought later would have never fit up against the wall like this. The small downside of this one without guide rollers is that it tends to walk along the pipe sometimes unless the wheel is sort of re-aimed against the tightening direction. Once the groove is cut a little, it's fine. |
|
Three cuts later, the whole section including the tee to the sillcock was
out and the main feed just sort of hanging in space. And the downstream leg
across the basement ceiling was pissing a surprising amount of water at me.
It is really scary to think just how fast the utility could deliver water into my basement if those ball valves were opened. Or if any of that old piping broke... |
| I took the opportunity to fashion a better hanger block for the feed continuing to the rest of the house -- it had been basically just hanging off the sillcock "T" and a nearby joist X-brace all those years. This would bring the new endpoint into perfect position for the flex hose. |

| A small drain cap on the side of the second ball valve [yellow handle] ordinarily should have allowed emptying the upper section of 1/2" pipe, but it appeared to be plugged or something. I didn't try to fight it too much, preferring it to reliably close again and stay that way. A piece of thin tube and the ol' reliable wet-vac handily pulled the remaining water right out once my hand clamped around the combination. |
| Ah, the magic of capillary action! Sweating this joint involved solder flowing *upward*, which it appeared to do quite handily once the parts were hot enough. I still find this amazing. |
|
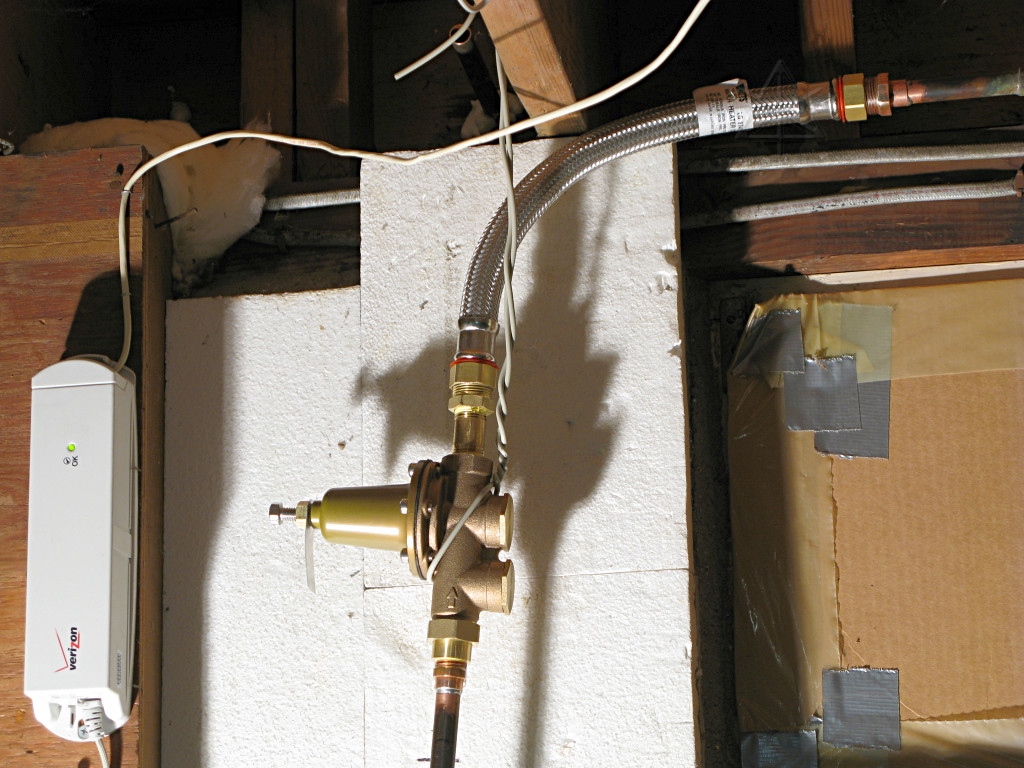
All together except the final connection. Everything was sort of hanging in
space at this point, including the regulator gently bobbing back and forth
on top of the long pipe.
Hmm... if the supplement spammers could see the shadow on the wall, maybe they'd stop sending me all those ads. |
|
Done. Or so I thought.
Close examination of the big pic reveals a small drop hanging off one of the nuts above the regulator, that appeared a short time after opening things up. Ironically, that wasn't from the flex fitting, or any of my sweated-over sweated joints. A couple of the plain ole pipe-threaded joints were weeping very slowly, and needed a bit of tightening. It's possible that I didn't use quite enough teflon tape in there. Fortunately, between the flex fitting and the union at the bottom of the regulator, the whole thing is easy to disassemble once the system is drained down, so if further evidence of leaking shows up I can just pull it apart again and fix it. There was a convenient nail in the joist above, so I slung a piece of wire around the regulator and used it to take up a little of the weight off the feed pipe below. As far as I can tell between that and the new pipe hanger there's very little static stress on any part of this. |
|
I refilled the system and checked the pressure gauge. Right up to the
factory-preset 50 PSI, and over the next week it never went above that. All
the fixtures in the house work so much more *smoothly* now, since they're
now holding back about half the pressure they once were, but at the same time
there's no loss in reasonable flow capacity. Much less turbulence. When the
regulator is doing its thing it emits a quiet hiss, as the disk valve inside
undoubtedly makes a narrow slit for the water to flow through and all the
high-pressure turbulence happens in there instead.
And I haven't heard anything from the toilet since. The regulator also more or less acts as a check valve, preventing backflow into the utility, bringing the immediate concern about thermal expansion pressure. As of the completion of this, there were three means of pressure relief in the system with varying capacities and thresholds:
|