Avalanche splitter

Snow pack relative to the stack Protecting the stink pipe

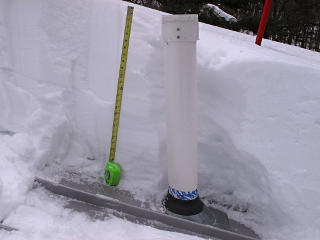
In thinking about a large snow pack sitting above the toilet vent, it's obvious that if the entire pack slid down against the pipe it could be a huge lever arm relative to the base and easily bend the whole thing over.  There are numerous tales of this happening on metal roofs with penetrations, extreme enough in some cases to take out entire chimneys.  What I nominally need is two more S-5! type clamps and a short piece of snow-rail or the like to bridge across the two roof seams just uphill of the vent stack.  But maybe something a little taller and more clever would give better protection.
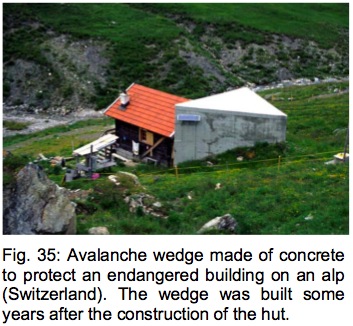

[Links to external PDF] The Swiss have been doing this for years, protecting buildings and even entire towns from the avalanches that thunder down on them every spring.
Swiss avalanche splitter

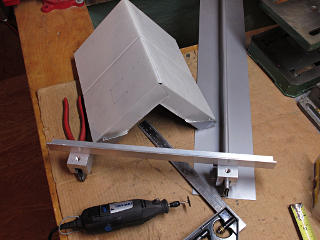
Progress of snow-splitter design So it seems that something to split the snow *around* the pipe in addition to blocking its downward slide would be better, and a bit of hunting around turns up some appropriate parts -- one of which is a spare section of roof panel.  Here's the hack in progress; next step here is to dremel out the two little mounting tabs [cut lines marked on the white surface].  The flanges get pop-riveted together where they cross, to give nice rigidity to the top and bottom. 

The clamps get ordered from Alpine Snowguards, and if they look suspiciously similar to the S-5! clamps used for the main snow rail it's because Alpine used to be an S-5! dealer but decided to produce their own "improved" version.  No idea what the lawyers had to say about that...


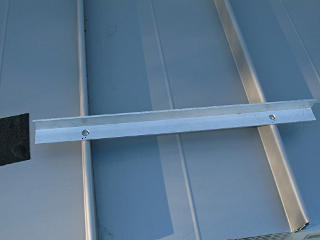
Test fitting the bar on the HVAC rooflet Rather than mess around with slotted holes or sliding joints, it's easier to just match the mounting points to the known 11-and-one-sixth inch rib spacing.  Having the HVAC rooflet at ground level makes for convenient fit testing without having to go topside.

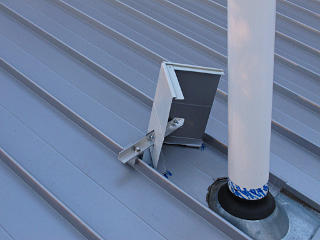
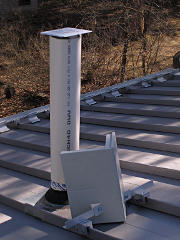
Splitter finished and installed A nicely integrated design, with several engineering subtleties worked in.  The piece is sized to just fit between the panel ribs, and mounted at a height that leaves a small open slot for water [and thus snow-melt] to pass underneath.  The little bent-under feet on the bottom corners are formed from what remains of the original panel rib of the cut piece, and rest lightly on the roof panel.  If the wedge receives a load that would try to tip it back, the feet bear more heavily to help brace the whole thing against that force.  That way the clamps and attachment ears won't have to withstand all of the pivoting stress, they simply transfer it to the rest of the wedge.

And the thing doesn't have to be as tall as the pipe.  Sliding snow-pack on top of the one panel will meet this at the bottom first and likely just stop, and then slowly work its way around the wedge in the densest layers.  Snow that's high enough to go over the top of the wedge will probably just fall off and land next to the pipe, but not in enough volume to be of concern.


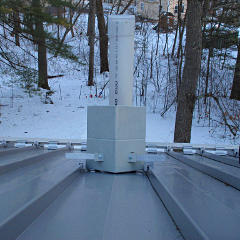
Snows-eye view of the splitter The snowpack's-eye view of the splitter.  Don't be smashin' my stack!  Frankly, just the cross-rail would probably be enough by itself, but this makes the whole thing more fun and delivers improved peace of mind.  In heavy snow years some shoveling will probably still be needed to alleviate total weight, but if enough melt happens with a deep accumulation still present the pipe is far more likely to survive.

As this only gets added toward the end of the 2015 season after some warm days have taken out the rest of the snow, real testing will have to wait until next year.  But having it on now allows observation of any long-term effects from thermal expansion under summer sun, pollen and leaf accumulation, or whatever else Nature chooses to throw at it.


    To cap it off

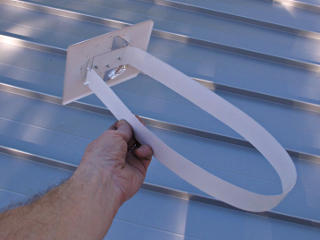
Assembly to drop into top of stink pipe Almost unbelivably, warm weather finally arrives along with the discovery that the CD spindle cover lasted all of about six months under UV exposure -- clearly the wrong material for outdoor use.  Here's the replacement: just a simple rain/detritus cap, with a friction-fit loop to simply drop into the top of the pipe.  Quick and dirty bit of coil metal fab and a couple of screws.  The slight angle and two little stop tabs keep one side tilted up and allow air passage.  A couple of small drip flanges of aluminum tape attach to the underside, to encourage condensation to drop back inside instead of possibly dribbling down the outside of the pipe.


Various protective measures for vent stack So now here's the whole "vent stack protection ensemble" in place.

_H*   150319 and later