
I had also finally figured out a shade for the side door's window, too. Here it's in the "open" position where the entire thing simply hangs on the bottom half.
Compare and contrast
|
Back toward the beginning of October I made time to participate in very
cool event which I had missed the previous year -- the NESEA
Green Buildings open house,
in which a bunch of home and business owners who have done energy-efficient
new construction or retrofits open up their properties to visitors and
tour them around explaining the design and features. Various renewable
power generation facilities also give tours. While a single day
doesn't give nearly enough time to explore what's available, I looked at
the website and made a short list of sites I'd like to see and hit the
road early in the morning. My first stop was in Sudbury, to see
another retrofit
that Synergy and the same crew of subs had been playing a large part in --
the guys working on my project kept referring to it as it was in their
recent memory and they kept finding aspects they could compare. That job,
not yet complete although the owners were living in it, was a deeper retrofit
than mine with major structural changes added and had
brought in external HVAC engineers and even Building Science Corporation
to consult on layout and materials and integration. Their HVAC planner and
a couple of other knowledgeable folks were at the site and my visit there
was a wonderfully geeky experience, occupying most of the morning while we
poked around and came up with lots of questions.
I recognized the style of many construction features, particularly around
window sealing, and got a good idea about various compromises made on
that project which were different from types I had made but made sense
in the context of that house.
Next I stopped in at the still-unoccupied future "real home" of some friends who were having the *other* green builder I'd talked to do their retrofit, which let me really compare styles, approaches, and attention to detail between Synergy and the supposed competition. It became a little more clear that a certain amount of guesswork goes into these projects and even the "experts" miss a lot of stuff or expend more work and materials than might be warranted in some areas. For example, walls getting dense-filled with cellulose just because "everybody else does that" with less thought given to its effect on the overall assembly. Or six inches of sprayfoam all over a basement wall with cold air howling in past a poorly sealed duct penetration right there in the middle of it. Being able to spot some of these failures or diminishing-returns jobs was quite instructive, and a chance to apply some of my newfound wisdom to ask the right hard questions. There's a lot out there to be cynical about, but we need to keep pushing the industry in the right directions. My last stop that day was the Medford home of the lead guy *of* said green-building competitor, who was still retrofitting his own two-family house and also regarded it as an experimental platform in which to try different things. It was near the end of the day and I figured he'd be done with visitors, but he recognized me and remembered our good discussions in the past and welcomed me in. He's taken a couple of novel approaches to problems, for example building a small superinsulated room inside a large cold mostly-unconditioned basement to contain a bunch of HVAC stuff so its space becomes coupled to the conditioned floors above. There's also a substantial PV array on the roof, and a whole variety of energy-efficient window brands installed around the place just to see how they perform. Another good geek-fest, and I headed home really pleased with how the day had turned out even though I'd only gotten through about half my site list. Well, there would be next year but by then perhaps *I* should probably be hosting at my own place as a candidate site to show off. I can rant about this stuff all day now. |
Monsters!
[Click any image for a larger version.]
|
|
Major disposal on the job was now over, and
Green Monster finally came to grab the last dumpster. It had been here for
a long time; with it went a lot of the fallen pine needles I would have
otherwise had to rake away. The ground underneath wasn't too badly ripped
up; I gave it a quick pass with the rake and kicked a little dirt into the
deeper gouges and figured some snow sitting on it for a while would make
it all good as new.
I had also finally figured out a shade for the side door's window, too. Here it's in the "open" position where the entire thing simply hangs on the bottom half. |
| More toward the late-middle of October I set house projects aside long enough to handle my part of our local haunt event and tried to get this writeup a little more organized in between, but soon found myself glancing back at the to-do list and picking some of the minor things to tidy up. One of which was to get some urethane on the fairly raw-wood-feeling edge of the new side door, now that I had the storm up which could keep bugs or chilly air out in the meantime. Without really thinking about it I completely picked the *wrong* day to tackle this. |

|
It was October 31, getting on toward late afternoon, and I set up some
additional lighting and pulled the side door off the hinges to lay it down
in the kitchen and start treating the exposed wood core around the
periphery, e.g. the part that's not fiberglass.
So here I was with lots of light a-blazin' and a big glass viewport to the outside clearly visible from the street, and only after I had plenty of wet urethane on the door did it strike me what night it was. Halloween, and with fairly nice weather. Which in a typical suburban neighborhood means visitors with an entirely different notion of "treating", and I was completely unprepared. Sure enough, around dusk there came some, uh, little monsters up to the doorstep. It was actually the neighbor's grandkids, so they more or less knew me. But all I had to offer them was a few power bars and granola snacks -- "nourishing treats!" I called them, but they seemed delighted to have them. Apparently this is becoming more common nowadays. |
| Having pretty much finished appying the urethane anyway, I killed the lights and let the door continue drying in the dark, presenting the protocol that says "not home" or "not participating". A few more groups went on the street over the course of the evening but nobody came to call, and later I quietly re-hung the door and called it a night. Go ahead, call me a curmudgeon. | |

|
The yew-bush stumps were still prominent in the front yard and I started
researching ways to hasten their decay, finding a fairly common product
called
Stump-Out
which is supposed to break down wood fiber in a really
accelerated way. The recommended application method is to drill holes
in the stump and drop some of the powder into each one along with some
water to get things started, and then wait a couple of months. And then
soak the whole thing in kerosene and *burn* it, but that seems a bit over
the top. If I could just soften the things up a bit and then mangle them
down to ground level, that would be enough.
When I started drilling, a whole variety of different vividly colored wood shavings came out depending on where I was in the trunk cross-section. |

|
That was entertaining, but the idea was to get the job done so I peppered
both stumps with holes and tapped a generous salting of product down
each one and flowed enough water over the whole mess to turn each hole
into a little test-tube of Stump-Out solution.
Drilling this many half-inch holes into tough yew wood is about the fastest way to exhaust screw-gun batteries. |
A whole bunch of wrapup
|
With the main contracted parts of the job now done, Synergy wanted to
come back for a final wrap-up meeting and to redo the blower-door test.
I sort of dangled the final payment as an incentive, that instead of
mailing I could hand the check to them in person when they showed up.
They were fine with me having installed the storm door my own way, and were still pretty tolerant that we had limited the context of the whole project to turn what they typically regard as a deep energy retrofit (DER) into a deep-enough energy retrofit (DEER?) for my purposes. Sure, they would have loved to jackhammer up the whole basement slab and foam the whole foundation four inches thick and pump the original walls full of cellulose or something, but knew full well how additionally disruptive [not to mention expensive] that would have been. I wanted to go over the "brutally honest" parts, in both directions -- all the little things I hadn't been happy about, from poor administrative communication down to what little details might have not gotten sealed right, and also wanted to know how *I* had been as a customer. They said my fairly knowledgeable standpoint had me being somewhat picky but overall in a constructive way; they've had far worse, including one homeowner on a past job who kept finding stuff on the internet and *stopping work* because he thought the builders needed to be doing things some different way that he'd read about. At least I'd managed to get ahead of the points in our project where pivotal decisions had to be made, but not without me arguably expending more effort than I should have. They knew they had their share of communication issues, but in a field that's growing and changing as rapidly as this it's easy to lose track of things. I think we agreed that we all had productively learned from this job. |

|
They had gotten their "Ring C" in, so the blower-door got set up again and this time things went much more smoothly. And I had done a few more bits of sealing here and there in the interim. We tested out at 228 CFM50, or about 0.9 ACH for my volume. Not quite passivhaus level, but as they said quite good for a small house especially where we *hadn't* done any cavity-fill. |

|

|
|
There was one more picture I needed to get before they took off -- the
one on the left, with the manometer showing depressurization down to 50
pascals. That's 0.2 inches of water column, and we appear to be right
on the money here. That's not a huge amount of pressure but over a large
surface area, can generate some significant force. They related some
amusing stories of when someone opened a door elsewhere in a house
being tested and the pressure pulse knocked the blower-door rig
right out of the doorway.
To facilitate further leak testing in a more time-leisurely way I had come up with a simple rig for blocking a box-fan into a window, and found that running it flat-out I could get the house down to maybe 20 Pa [picture on right] which was plenty to bring air in through any remaining holes. As the nights continued to get colder I made a few more rounds of leak-hunting on my own, and found several that were interesting and often subtle. This is something any homeowner can do without any expensive equipment, in fact -- close up the house except for one window with a fan in it and any remaining gaps around it blocked up, and go around giving the place the back of your hand. With even a modest temperature delta between in and out, leaks are quite obvious and sometimes they even whistle to call you right to them. Find them, and break out your caulk gun and cans of Great Stuff and go to town! Really, anybody can be their own energy auditor. | |

|
Windows and doors are always a pain, and the vaunted thousand-bucks-a-unit Serious windows were no exception. Laying aside rumors that with the impending sale of the company back to Alpen and recent work-quality having suffered in the process, I found that every window had a small but definite path around the edges of where the sashes meet, roughly following the blue line. [The lower sash is tipped out of this picture, but meets the rail along various mating surfaces and bits of weatherstrip.] It was a fairly convoluted air route and probably hard to fix at the design level, but that wasn't going to stop me from trying something in post. |

|

|
|
A look from the outside showed a potential substantial opening where
the path could start. [Not to mention that the lineals appear to have some
minor cracking in this one, hmmm..] Some caulk had obviously been applied
farther out at the factory, and I thought perhaps it should continue
farther along where these parts meet up but not so as to interfere with
operation of the sash. I gooped up a couple of candidate units and
re-ran the depressurization test.
That didn't really do it, as air was still coming in right at the *edge* of the sash seal near the dark fuzzy stuff where I couldn't really caulk. | |

|

|
|
Okay, how about the other side? The infiltrating air was coming in at a
fairly obvious hole on the inside, which the mating-rail fittings on
the lower sash didn't quite cover even though there were some token bits
of flexible foam attached to the sash near these points. A blob of caulk
carefully shot into there and connected right up to the glass but kept
out of the sash path was the next approach.
That definitely helped, reducing the perceptible flow not quite to zero but substantially less than it had been. And remember that we're talking pretty small holes in the first place, that were unlikely to spend their whole existence under a 50 or even 20 pascal pressure differential. But adding up all the windows between upstairs vs. downstairs could still let some amount of stack-effect flow occur, and it was the work of a few minutes per unit to stop it. | |

|
While checking the side door I felt cold air coming from somewhere, but realized it was coming out of the return duct next to it. Pulling the grille and feeling around revealed a substantial leak coming from under the door unit itself, but sideways through the wall and into the stud bay forming the return. Something about the air-sealing around the sill pan hadn't been handled right, and this is where I started suspecting the channel under where the pan membrane gets pushed into corners. Not much I could do about that now, but foaming down all the corners of the return and squirting a bunch in toward the door through the largest hole I could feel seemed to pretty much fix it. There was still a little air coming out the power outlet on the other side of the door where the fridge plugs in, so it was clear that the whole under-door area hadn't gotten sufficiently sealed. |
|
I had found this one before the Synergy guys came for the wrapup and left
the return grille off to show them on the second blower test, and they said
that while they always caulk framing corners under where pans get laid down
their subcontractors might not be remembering to sometimes, and agreed that
it was either that or something else involving the sill and framing in that
hard-to-reach area under the side stoop. Before doing this bit here I
squeezed back into that little cave behind the stoop outside and caulked up
all the gaps I could find around the metal and the wall, which might have
stopped a little of the flow but not as much as this final foam-up. Still
worth doing for the sake of ant-proofing.
The main plus was that we couldn't find *any* substantial leaks in the basement or attic, so the traditional major causes of stack-effect driven infiltration/exfiltration flow would simply not be an issue anymore. I went around a few more times and hit more minor discoveries with caulk and foam but for the most part, it was time to stop polishing turds and start enjoying the results of what overall was arguably a pretty good job all around. | |
Hazy shade of winter

|
And soon enough came the first light snow of the season, making the house look like what someone likened to one those miniature frosted houses we see in various holiday displays. C'mon, this is where a house "wearing a hat" with a generously overhung roof looks completely appropriate. Think ski chalet and pass the shovel. |

|
The distribution of snowfall across the hutch was sort of entertaining
too, and the top of the condenser cabinet was totally DRY. Did I mention
the concept of "protection"?? The rear overhang was also clearly doing
its job as the whole back wall and the dirt next to it was pretty much
dry too.
This also shows where I had meta-wrapped the whole lineset in a layer of duct fiberglass and some of the same silver cladding, partially for more insulation on the exterior run and partially for more UV protection. |

|
It was chilly and rather humid that day, and while the heat pump wasn't running that often it frosted the coil up pretty quickly when it did. Air-source systems obviously have to run colder than ambient which easily gets below exterior dew-point *and* below freezing, and if there's a lot of water in the air the whole coil can get plugged up in short order. Mid-range temps are actually the worst, as the air can hold a lot of moisture but the coil has to run sub-freezing to do its job. But the colder it gets outside the less water the air can hold in the first place, and later I observed that icing up took quite a bit longer when the air started at 20F instead of maybe 40F as it was here. So overall cold-weather heat pump performance is helped by the simple fact that it doesn't have to defrost quite as often. |
|
Watching a defrost cycle is rather fascinating; once the loop reverses
and the coil starts warming up the visible melting is almost instantaneous
and lots of water dribbles out the bottom for a while. Then the brief
whoosh of steam out the front as the fan restarts is kind of impressive.
Yeah, that and the continuous crankcase heat are all trying to warm the
outdoors a little bit but that's just one of those small necessary parts
of having far greater net efficiency.
Even in the most efficient types of unit, defrost cycles are still determined by a fairly dumb algorithm based mostly on time and maybe outdoor ambient temps. Not from actual running conditions at the outdoor coil, even with this Daikin as far as I can tell. I watched it do various stupid things with regard to defrost -- either thrash the fan ineffectually against a heavily-iced coil for far longer than it should have on a humid day, or run through an entire defrost dance on cold dry days when it was completely unnecessary. While a fairly accurate determination as to what's really going on could probably be derived from measured evaporation superheat and compressor capacity and outdoor ambient temp, Why don't manufacturers at a minimum just put airflow sensors on the outdoor coils?? That could also be useful to warn homeowners about obstructions from leaves, snow, etc and even shut down to not try and run against adverse conditions. One guy down south got disgusted enough with "dumb" defrost cycles that he ripped into his own Carrier system and engineered a completely different homebuilt controller, including instrumenting it with an airflow sensor to tell it exactly when defrost was needed or not. He found that he was defrosting far less than the factory algorithm would have, thus saving energy from not heating the outdoors so much and not bringing *cold* refrigerant into his house. He's written a great project description about this with lots of performance charts. While I'm not anticipating getting into the Daikin quite that far, it's obvious that there is significant room for improvement. | |

|
I finally got tired of looking at the open framing where the kitchen window used to be, and had already decided to continue the "whiteboard" theme and had a piece cut ready for the hole. A little bit of edge trimming and straightening was needed, because this was going to be a simple flush filler without being able to hide mismatches under a trim piece. I needed a stable guide to run a utility knife along and shave down the surrounding masonite a little. [That's what whiteboard really is, masonite with a glossy coating...] |

|
Here's about the only place I would use fiberglass batt insulation anywhere in the house -- here basically as a little sound deadener, as its insulation value would be largely irrelevant. This was actually leftovers from some of the flex-duct that got ripped apart, whose "R-8" insulation is actually just 2" of fiberglass wrapped around inside. The space also needed the 3/8" ply crosspieces to match the plane of the old drywall around the window opening and bring my piece flush. |

|
A few trim-nails later, done! A little white caulk filled in the small
edge gap, and while it still remains obvious that something got filled in
here it's much more aesthetic and useful than the open hole.
The lines where the old window-plastic tape got pulled away are there to stay on the paneling, at least until the entire wall covering gets redone [if ever]. |

|
The last item of project support to be taken away was the port-a-john,
although for the last few weeks the guy had finally given up on trying
to come service the completely unused unit every Friday.
Our little bit of snow had melted away; we weren't quite ready to head into the arctic blast yet but it was getting reasonably cold on the overnights. |

|
I was still offering scraps of polyiso foam to any and all takers, and the guy next door loaded some up to take and insulate his shed up in Maine or something. Even after that I *still* had quite a bit left, and later on experimented with laying a bunch of it down on the basement floor to see if I could maintain a delta above the slab's 55 degrees that would productively limit heat loss. Inconclusive results so far. |

|

|
|
It was clear as cold weather set in that the basement *walls* were trying
to be quite cold, though. This stands to reason, as concrete cinderblocks
not only have very low R-value but nice columns of vertical air channels
through them that allows air chilled at the above-grade part
to tumble right down to the footing and bring the whole wall colder
via convection loops.
So not only was the previous owner's styrofoam job helping lessen losses
from that, there were several areas still missing foam and since I had a
lot of miscellaneous 1" pieces of stuff kicking around, why not use it to
fill in. I think it helped, further reducing the area of highly conductive
surface. Shooting the styro with the IR gun on a cold
night showed maybe 54 degrees, but anywhere concrete was still showing was
down to 45F or less. And the slab temp definitely ran a little lower
around the edges than in the middle, clearly showing the seasonal
damping effect of the earth under the house.
Insulating a basement floor carries mixed blessings. One one hand it allows the basement to be warmer without a lot of energy loss, but on the other it reduces the potential for passive freeze-down protection. An exposed slab with a tight insulated envelope above it would make it hard for a house to get totally down to subfreezing inside, especially around the basement where most of the plumbing is. For me this made one more reason to not go to extremes on retrofitting down here -- the existing insulation and the spray-foam sealing were good treatment for the above-grade parts and down along the walls, but the rest was fine even if it represented a slight delta away from where I'd normally heat the rest of the house to. The worst part would be that thinking about the effects of this would make the heat-loss calculations that much more difficult. | |

|
Research into the types of gutter leaf-guards and leaf-resistant systems turned up *hundreds* of offerings claiming to be the "ultimate solution", never clean your gutters again, etc etc. None of them are perfect, and much depends on the type of crud that falls on the roof. Most of the systems have the basic leaf dealt with just fine; where things like pine needles and shingle grit and those little maple-seed twirly things get involved is where it all breaks down and filters crud into the gutters anyway. But while surveying the field I'd read about these insertable gutter sponges, and since the Despot had some in stock I decided to substitute in a couple of sections of it instead of the screens the gutter installer had provided and check back in a year or so. Again, basically triangular chunks of open-cell scotch-brite type stuff, designed to squish into a K-section and leave a large channel underneath for flow. |
|
I already had a good example of failure: quite a few oak leaves had gotten
firmly stuck on top of the stock-issue screens as they went stem-first into
the holes, and would then form a water bridge from the roof right over the
edge of the gutter. A bad design? Not necessarily, just that no single
mechanism of this sort can deal with everything nature throws at it.
Frankly, the only way to never clean your gutters again is to not have any. | |

|
Whatever one's chosen gutter-guard solution is, some smaller items
will invariably get through it and come down the downspouts and in my case
would filter down into the rock pits and start filling them back up with
organic muck over years to come. An easy way to avoid some of that would be
removable/dumpable screens to catch the obvious stuff. A small piece of
mesh held down with a rock began proving its worth in a couple of days.
Pollen season would probably want pieces of filter fabric over the pits for a week or so; I'd solve that one later, together with the HRV intake problem. |
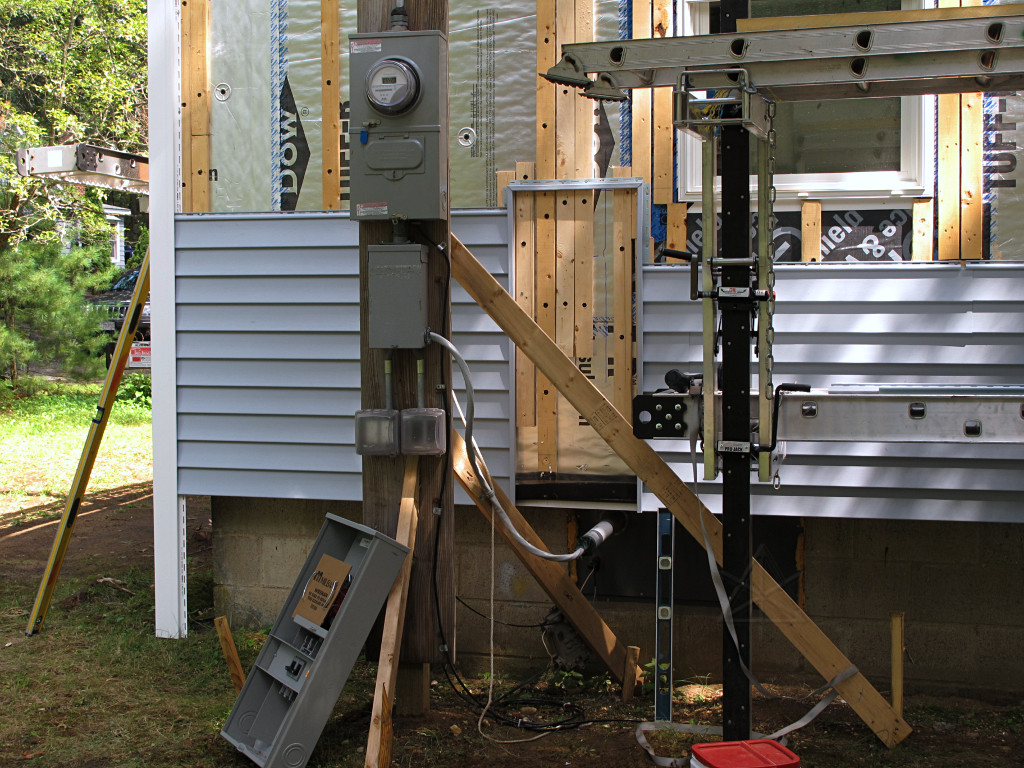
Fat wires
|
There was still one remaining piece for external workmen to finish -- the
finalization of the electric hookup, which had been quietly sitting
on its temporary pole far longer than the six-month permit period.
The electrician had run into some unexpected family stuff and it had
thrown his whole schedule off, but while I wasn't in any huge hurry on
this it would perhaps be nice to get this wrapped up before the snow
flew in earnest.
In the meantime we'd had some discussion about job specifics -- the typical spec for a 200A residential feed meant a pretty fat cable coming in, and I suggested that perhaps using copper instead aluminum service-entrance wire might make it a little thinner and easier to work with... right? Not so, it turns out; SE cable might be a smaller gauge for the same ampacity but with relatively few strands is actually *stiffer* than aluminum. Anyway, we finally arrived at a day when his guys could come out and finish this up, even if they couldn't schedule the power-company linemen to put in the new street drop at the same time. In other words, continue from where they left off way back in part 04! They could get everything else ready and restore power, again temporarily, until the final house reattachment could be done. |

|
The house got taken dark again, leaving worklights up and running on my collection of UPSes, and the old temporary SE feeder got pulled out. If this looks like a bit of a wrestling match, you ain't seen nuthin' yet. |

|

|
| The PVC pipe got cut to the final length and trimmed up inside and out, with care being taken during hand-sawing to not put too much side stress on it and break the seal to the blockoff. | |

|
They attached a monster right-angle fitting, called an "LB", to my pipe
and then aligned the big meter box right on top of that -- being careful
to not let too much weight sag down onto the pass-through while they
screwed the box down to the Azek block.
I showed them a print of my picture of the strapping behind the Azek panel and marked where the "meat" was or wasn't along the top edge, warning them that it might be a little fiddly to match up the holes in the rear of the box with the most solid layers and to use nothing longer than 2" screws for optimal penetration depth. They didn't seem too concerned that attachment security would be any real problem and the main limiting factor on position was needing to have the knockout right over the LB, but I think they got it on pretty solidly without wrecking my pipe seal in the process. |

|
Next challenge was to wrestle the new SE cable into place. This is three
conductors of 4/0 and a 2/0 ground, and quite stiff. There was just
barely enough room for bends to get up onto the joist from the pipe,
and then down into the panel.
Hard to believe that *thinner* 2/0 copper would be stiffer than this stuff, but I'm used to theatre-style feeder cable that has *much* finer strands. |

|
The cable sheath was stripped back to before the LB so *it* wouldn't have to take the tight bend along with the wires. |

|
The conductors were then separated and bent up and routed into the box, one by one, fighting our poor installer every step of the way. |

|
He prevailed, though, getting everything firmly hooked up. With generous gobs of NoAlox included, of course, even though modern aluminum-wiring alloys are more corrosion-resistant than back in the day. |

|
Next came the run up to the weatherhead, which tucked nicely under the
overhang at a good height for the street drop to come in slightly below
its level and have a nice code-approved drip loop in between.
I had been under the impression that the drop to the meter had to be in hard PVC pipe due to its proximity to the window, but apparently code permits routing plain ol' SE cable through "accessible" locations so we all agreed it was far easier to use this than mess with conduit. What is considered kosher in these situations or not seems to vary wildly over both space and time, as the NFPA keeps changing the rules every so often and local inspection agencies often have their own interpretations. |

|
They brought the ground wire from the rods in the dirt up through an
independent bit of small conduit to tie into the bonding point, attaching
a little connector block outside the big box that's now code-required so
that telco or other service providers have an accessible ground point
for their gear. There was a brief
scare that we'd have to make *another* wall penetration to run the
ground wire through to inside, but the lead guy on the job called in for
a sanity check and decided it was okay to run that through the existing
pass-through pipe next to the SE. The electrical inspector who came
by later was perfectly happy with it, but evidently some jurisdictions
won't let separate ground wires run along with the power feed like that.
The NEC really needs to make up its freakin' mind about the whole
grounding/bonding nightmare and which is which because it kicks
everybody's ass all the time.
After all that was in, dirt got filled back in over all the ground-wire routing and in theory we'd never have to look at any of that again. |

|
They also installed the attachment point that the street-drop messenger
would eventually tie to: the little ceramic widget screwed in through
the rake. I had the guy goop in a little of his sealing putty behind it
before bringing the screw all the way home. After they'd left I determined
that the soffit and siding didn't need to be open any more, and put all
that back together.
The guy made a bit of a botch out of attaching the weatherhead, as the strapping apparently ended a bit lower than where he wanted the fastener through the top tab. I heard him complaining about not being able to find anything to go into and suggested that instead of peppering my new siding full of useless holes that he just double-clamp right under the thing where we knew strapping still ran, as the SE wire was stiff enough to just hold up the weatherhead on its own. It's kind of a crappy weatherhead anyway, rather undersized for the purpose when using 4/0 cable. Guess where it's made... |
| Everyone insisted that to hold up the street drop, this one lag-screw fitting through the 2x6 was plenty for the purpose -- I kept thinking of engineering a much stronger attachment, but was warned away from doing so because then a tree landing on the drop could tear big pieces of assembly off the house rather than just popping out the attachment fitting and letting it "zip" the SE out of the the clamps which, while undesireable, is far easier to repair. These guys had seen and fixed enough storm damage that I ultimately trusted their judgement on this. In other words, we actually wanted a somewhat controlled breakaway element here. As I discovered when up here moving the phone and fiber around, the tension on the power drop really isn't all that much so it doesn't need massive anchoring. | |

|
So at the end of all this, since the power-company linemen weren't available today, the drop still ran to the temp pole and down through its meter box and feed fitting ... and now back *up* to the new weatherhead and down again through the new meter box. The lead guy had to fashion some meter bypass clips out of junk laying around in the truck and slap those and a plastic cover into my socket, just to get the house live again. |
Static air
|
And that is how things stood as I packed up and headed out for my
usual southern holiday trip, bringing the overall duration of project
activities large and small to just about one full year. It had certainly
been a long trail since those first sadly-lame contractor proposals
and the chat with the ground-source heat pump outfit, and it was hard
to wrap my head around the thought that it was almost done. *Almost*.
I really thought
the electrician was going to coordinate with the linemen and get the
street-drop done a few days after I headed out of town -- it was all
outside work, which they could certainly finish up in my absence, and
I even told them where to find extra fill dirt for the post hole. But
that didn't happen, and I returned later on to behold the temporary
post *still* in place with snow on the ground around it, and resigned
myself to the realization that this little leftover unfinished bit might
hang on all the way to spring.
Preparation for the extended absence was interesting. I had been heating in a fairly normal way up to about a week before leaving, keeping track of kilowatt-hours used day to day, and intended to put the heat down to a low setback for while the place was unoccupied. I've always done that, and was generally pleased with how much oil I *didn't* burn by having the lower indoor/outdoor delta. But now everything was different, and a glance at my psychrometric chart said that if I just dropped the heating setpoint down to 55 or less and closed up the house and left, any humidity kicking around inside would probably condense right out and keep parts of the interior wet the whole time. I wasn't intending to run the ventilation at all while gone, and avoid its minor air-exchange heat losses -- this would also be a bit of an experiment, to see what would happen in a mostly static air mass trapped inside over three weeks or so. But I wanted to start with temperatures already down close to where they'd be that whole time but with humidity also under control, so a few days before departing I set the 'stat down far lower and returned to my old "hunker in a cold house" methodology for the remaining time. I kept the HRV on its low intermittent run setting to have a modicum of fresh air for me while still there, which would continue removing excess moisture from inside as the place cooled down and the interior air would be able to hold less water. [For the curious, that's about 0.1 ACH on average, keeps the CO2 well under 1000 ppm, and is entirely adequate for a single occupant who doesn't cook a whole lot of pasta. ASHRAE, take note.] The Daikin controller only lets the heating setpoint go down to 60F, and I wanted far lower than that. It turns out that one has to invoke the confusingly-described "setback" mode to run at low temperatures. First, availability of setback operation at all has to be enabled by a field setting. Then the mode has to be enabled for use at the controller, the instructions for which are almost completely unfindable but is done by holding down the right or left arrow on the menu disc for four seconds. In manuals for earlier controllers and some of the non-US versions, it is referred to as "home leave" and is similarly subtle to toggle. With setback now available, the user simply sets the system to "off" but still in heating mode -- nonintuitive and scary, as the last thing you want to do is leave a house with the heat shut off in the winter. But if setback is enabled, it automatically brings the system back to "on" once the lower setpoint is reached, long enough to supply heat up to a configurable "recovery" delta, and turns back off by itself. Using the mode opens up the effective heating setpoint range down to something like 40F. Why they couldn't just widen the normal setpoint ranges instead of messing around with all these secret modes and chicken-dance button presses, I cannot imagine. The manual for the controller goes out its way to insult the owner's intelligence, saying only "The [setback] function must be enabled by the system installer." Do they think nobody ever wants to go away for a while in the winter and leave a house in minimal-life-support mode? Whoever comes up with this bullshit needs to find a different job. But at least I had my low-temp run mode ready to go. Just before heading out I killed the HRV and sealed up its intake duct. The place was down to maybe 57F and still slowly dropping and humidity seemed reasonable, so that felt like safe enough conditions to leave while gone. The house never reached my low setpoint while I was still there; some combination of the steady 55F or so from the basement slab and the plug-loads inside continued warming it a little, not to mention that the working thermal mass had been increased significantly by putting the *entire* old structure within the thermal boundary. I would get much more rigorous about studying these factors later in the winter, but right now I didn't have time as I needed to get on the road. ... time passes ... Upon returning I took a careful survey all around the house before changing anything. Relative humidity was still under 60% or so, which was a relief. Temperatures around the place showed quite a small variance, right around 55 everywhere and maybe a little cooler in the isolated second-floor kneewall spaces which basically never receive air circulation and would always be a little colder. The main thing that hit me upon walking in was that the whole place smelled like polyiso foam. Not likely from the insulation job, but because I had a whole mess of leftover pieces laid out in the basement! That slight outgassing had spread all over, but it's pretty benign and another a day and a half of heating and running the ventilation removed all traces of it. I was specifically pleased that nowhere around the place could I smell any *mold*, a major difference from a year ago. The HVAC meter showed that the system had used about 130 kwh total while I was gone. About two kwh per day of that always gets thrown away *outside* to keep the compressor warm, which is the slightly unfortunate overhead of a heat-pump system. But even with that *and* taking the old furnace's lousy efficiency into account, it was the equivalent of maybe 5 or 6 gallons of heating oil. As all the energy-efficiency studies point out, there is *huge* merit in the simplicity of a lowered heating setpoint. We've known this for years, of course -- Jimmy Carter would have totally agreed back in the day. Cold? Put on a sweater! You've gotta love how so much of the advertising for "comfort systems" shows people rolling around half-naked on the floor with their kids while a major snowstorm rages on outside gigantic windows. Sure, you can run your house at 78 in the dead of a northeast winter but you'll pay the price for that no matter what your insulation looks like. With these fairly happy early figures noted and logged, I then asked the system for a nice comfortable 66F and plenty of fresh air, which it provided with quiet aplomb even if a bit more slowly than the old furnace would have. I could *never* have done that in prior years, especially over the whole house without having the upstairs closed off, and not wonder what I'd have to hock to pay for the next tank of oil. My recently-become-Floridian parents would still think that's frigid. |

|
Regardless of where the setpoint happened to be, I noted one possible downside of my Reflectix shades. A flat impermeable surface hanging near the window glass and frame, however well-insulated the window itself might be, still trapped a little slice of air that would become cold. That was clearly setting up little convective loops past each window, and I could feel cooled air streaming out near the bottom corners -- not an actual air leak anymore after all the hole-caulking, but clearly a little self-pumping local circulation path carrying my warm air in around the top and ejecting it, evidently sans some of its water content, out the bottom. The obvious result on a couple of colder nights was more condensation on the glass and lower frames than without the shades in place. On the upside this meant the shade was letting the whole window assembly go colder than it might otherwise have, meaning the overall heat loss was probably less, but I'd have to keep an eye on this to make sure the wood underneath wasn't getting wet. |
|
Shade in place or not, the IR gun revealed that the coldest parts of the
new windows were the frames, particularly around the bottom. Here's the
clear downside of "outie" windows: their flanges attach to those big 2x6
wood bucks on the *outside* of the foam, so much of the frame is connected
right to the outdoors. Even the visible open-foam thermal break in the
frame isn't enough to stop all the conduction into the inside part, so the
inside part of the frame is going to get cold no matter what. This was
proven by observing little lower corners of condensation on the unshaded
windows too but not nearly as much as on the ones behind the Reflectix.
So here I was keeping those parts even colder but letting some indoor air
circulate right past them, with obvious results.
Okay, so a window quilt it ain't. That sort of thing would involve a lot more design and structure. As this only seemed to be happening during the very coldest outdoor temps, it was probably tolerable from a long-term moisture standpoint but was also clearly one of my more prominent heat-loss paths. Of course the only real way to stop this would be to live in a windowless igloo, or get even more ridiculous with superinsulating the window units and maybe mount them as innies instead. Some of the "passivhaus" grade European offerings like Schuco or Intus have gotten as high as R-10, but window U-values are often optimistically given measured at the center of the glass assembly where conductive loss is the *least*. Like Joe says, windows have to embody all four control layers at once and that's not an easy job. | |

|
I arrived back home chasing the tail of a snowstorm that had just
rolled through the northeast, and there was maybe a 6 inch layer sitting
on everything. Well, except the driveway. Some mystery local benefactor
had actually shoveled it, completely unasked, and it was nice to not have
to fight my way in after ten hours on the road! Bright sun started a bit
of melting over the next few days, and I could now get to watch the
dynamics of how the roof would handle a snow pack.
It was pretty obvious that this load really *wanted* to slide off as a large unit and ka-whumph! into the front yard, but was getting hung up on the edge of the gutter just enough to hold it back. |

|
Segments of the pack were divided by the standing seam and creeping
slowly over the edge, like a bunch of little parallel glaciers. Every
so often a fully-formed cornice would break off and fall, usually
right at the moment the gutter, strained slightly outward by all
this, slipped back underneath it. So the sound inside was sort of
a sharp thump from somewhere near the front of the house followed
by a softer thump as the chunk hit the ground.
Presumably snow-guards near the edge of the roof would retain all this farther up, and ones that simply stick onto the panels and don't involve penetrations are available. But what would they do with leaves and organic muck? Probably turn into a mess. For now, the gutter was probably a good enough snow-retainer. |

|
On the rear with the lower pitch roof, the line of the panels actually clears the lip of the gutter by a little so the snow could actually slide more freely over the edge. But it didn't dump in one big go here either; the pack did a slightly different curl over the edge that was far more entertaining. Chunks of this would then drop off when they got too heavy, going splat onto the ground and basement bulkhead. |

|
Not to mention the HVAC hutch, which was handily doing the other half
of its job by keeping the snow from thudding down onto the condenser.
The most pleasing observation was that all this melt and slide was entirely from daytime sun on the pack, not any escaping internal heat. In other words, no ice dams or huge batches of icicles forming off the edges. As the sun went down and things got cold again, this slow flow simply ceased moving and did nothing else until the sun came out the next day. Right there is one of the best benefits of good insulation. |
_H* 130103