LED Headlight experiment

  With LED automotive lighting rapidly taking over the mainstream, it seems silly that a car would still have haolgen-lamp headlights, especially a car geared toward overall energy efficiency.  Factory LED headlights are offered in the Kona's higher trim levels but not in the SEL for some reason.  Nonetheless, why burn 2 x 55 watts when we could be using a quarter of that?  Regardless of the fact that it's down in the noise relative to the energy it takes to push the vehicle around, we have principles, and options to explore.  LED output and packaging has reached a point that there are now numerous offerings of modules that can fit into stock headlamp assemblies, emulate something close to a bulb filament, and deliver similar or even better light to the road.  In the mad rush to market, however, many seem to carry disfavorable reviews, describing how hard they were to fit and install, bad beam patterns, running too hot with premature failure, and numerous other problems.

One type seemed to come out near the top, and was also favorably described in the Kona forums -- a supposedly plug-n-play offering from LASFIT.  I decided to take a plunge and give this one a try.  A nicely packaged pair of modules arrived from Amazon a few days later.  They clearly incorporated the two major design hallmarks emphasized by the Headlight Revolution folks -- fairly small emitter areas in the right position, and fan-cooled.


[Small images link to larger-detail versions.]
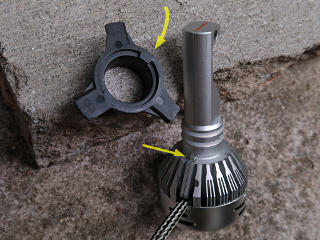
The two critical positioning nubs The black adapter takes the place of the bayonet-mount H7 lamp flange, and the LED module inserts through that, held in place only by friction of the two pale grey O-rings.  There are two alignment nubs [arrows] which are critical to proper installation and orientation.

The two LED chips themselves are hidden under the aluminum flange in this and the next shot, but are visible later.


Aligning the adapter tab With the nubs aligned thusly, rotating the LED assembly clockwise will turn the adapter and lock it into place in the headlight housing.  But to remove it again using the LED module as the "wrench", the nub on the module has to be moved to the other side of the ring's nub to push it counterclockwise.  It's strange to have an arrangement that will let the module sit at about any other angle, which could put in the completely wrong alignment.

The adapter ring in by itself This is the adapter ring in place without the module.  I installed that first to check fit, before worrying about how to deal with the wiring.  The adapter inserts past three notches, and bayonets into place under three small spring elements that hold the arms firmly in place.

Opening the small flap in the plastic fender-liner behind each low beam access cover is essential to working on any of this.  The sealing gaskets on the dust-covers can also use a gentle touch of silicone lube, to let the rubber better slide along where it contacts the housing.


Top view of wiring juggle Here's a view from the top, showing how the module plugs into the original socket for the halogen lamp.  Polarity matters!  The module plug has small + and - markings, and the black/green wire is the positive.  Test for proper functionality before installing the rest of the way.

Connector stuffed into housing The connector and module plug together make a somewhat bulky assembly, but it *does* all fit back into the housing under the lampholder and must be stuffed in there before the module itself goes in.  This may take a bit of juggling, with somewhat limited access for hands from the top and through the access flap. 

LED unit installed Here's the module installed: the feed wire comes off the very top, with the module/ring nubs aligned in the "clockwise push" direction.  The metal piece carrying the LED chips should sit exactly vertically, forming a "T" with the LED mounting flange and the wider spread of metal on the top side.

Near projection pattern with halogen Near projection pattern with LED
  Halogen near beam   LED near beam
Here's a comparison of beam patterns from the original halogen bulbs vs. the LED output, on a piece of paper held right in front of the car.  The LED has a bit less of a center "hot spot" but also a mysterious dark wedge at the bottom, likely the shadow from its own heatsink.  We can see the basics from this, but it's not really possible to determine what the throw at a proper distance will look like.

Rotating the LED module slightly during this view makes it obvious that rotational alignment is critical -- the dark triangle quickly moves to one side, the top cut-line goes all weird, and overall beam output drops quite a bit.  It still seems odd that the only thing holding the module in place is O-ring friction against the adapter.


  So I needed to go find a wall with clear area in front of it, where I could park a good distance away and aim the car straight toward it.  For this test I installed ONE of the modules and left the other side with its original halogen, to compare the two throws at a distance, and went tooling off into the gathering evening to find a suitable test spot.  This took a bit of searching around, as many buildings have obstructions between their surrounding pavement or are built on a bit of a rise above parking-lot level.  What I found wasn't totally optimal -- the side of some industrial warehouse with a surrounding lawn I could pull a short way onto, but it would do for a first approximation. 

Different beams before alignment optimizing The cooler-temperature LED output is on the right, and so far looks fairly anemic compared to the halogen.  The "hot spot" of the halogen is also quite obvious, and probably helps deceive the camera's notion of overall light level.  But now it's time to play with position some more.

Different beams with some half-ass alignment I ultimately found that pulling the module rearward just a tiny bit helps, and puts a little more light lower down as well as increasing overall output.  More light lower down is fine, even with the cutoff I don't want to be dazzling oncoming drivers.  The movement is just a couple of millimeters' worth -- in fact the distance is severely limited by the dust cap, which when reinstalled will push the module forward again if it's back any farther than that.  Basically the back of the module's fan housing winds up in contact with the inside of the dust cap.  It's a good thing that the fan housing has a big outward dimple, or that would completely block off the intake holes for the fan.
This round of testing didn't last long, as the mosquitoes were rapidly winning the evening and I needed to get out of there.  Minor tweaks happened later, but while I eventually got both modules aligned satisfactorily it all felt like a bit of a compromise.  It's still unclear if lumen output is any greater than the halogens, but it is definitely wider and a little more even without that high hot-spot straight down the road.  Over the next few runs of nighttime driving I didn't seem to get any flashed "complaints" from oncoming drivers thinking my high beams were on, so I'll declare the swap a tentative success and hope for better longevity and overall cooler running than OEM.

The high beams in the Kona come on in addition to the lows, so the result now is a blast of multi-color-temperature light down the road that's kind of amusing.  It's odd that there seem to be no solutions to change the high beam lamps to LED yet, especially as there's no critical cutoff alignment for those and it should be an easier thing to design.  What also seems absent from any setup these days is a one-side bias of output toward the side of the road rather than straight ahead, like we had with old-skool sealed-beam headlights, with reflectors and lens shapes tailored right or left for whichever country we're driving in.  That made for even less spill toward opposing traffic, along with a larger-diameter source that's less dazzling, and now those very sensible design aspects seem to have been simply lost.  It feels like all the fancy modern "projector lamp" stuff is just defeating the fundamental purpose while incurring higher costs and complexity.


  [ Up to EV index ]

_H*   200910