In search of a real spare wheel

  I had the fortunate presence of mind to order a compact spare tire to replace the lame-ass "mobility kit" at the time of acquiring the car, but the process of assembling a genuinely useful rescue kit turned into a much more elaborate adventure.  The Hyundai-supplied spare was only half a solution, which I might have been able to run on regardless, but I wanted more workable options.

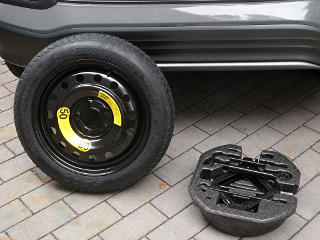
Donut spare kit from Hyundai The OEM "donut kit" seems simple enough, and comes with everything a driver might need to change a wheel at roadside.  I already had a second scissor jack and lug wrench so I didn't really need that part, but there's no harm in having extra lifting capacity around and the little styrofoam tool-holder nests nicely inside the spare and prevents stuff from rattling around.

It fits on the front wheel... Proceeding again into what most vehicle owners never try until necessity dictates, I tried the fit on the front wheel.  Brake caliper clearance was close but non-interfering, and taking the wheel for a quick road run with some hard turns didn't produce any untoward symptoms.

The lug nut on the ground here is placed for a precise purpose.


Less hub offset than stock With the stock tire in place before removal, I put the nut on the ground exactly under its centerline.  Now I could see where the centerline of the spare sat by comparison -- a bit off, but not super-bad.  It would still place a bit of uneven stress on the wheel bearing when rolling under load, which is part of what rim "offset" is all about.  Ideally, any wheel should align its centerline stress in the middle of the wheel bearing assembly in the hub and load its two sides evenly.  Wrong offset is okay for short distances in an emergency, but you don't really want to run with it non-centered all the time.  I know, some people do anyway when they want a particular look for their wheels or to fit wider rims and tires under the fenderwells.

I dismissed the nut lining up with the green paint stripe on the tire as coincidental, but noted it as possibly having some significance.


Oops, donut does NOT fit around rear caliper Next, I tried it on the rear.  FAIL -- these brake calipers are gratuitously large, possibly to accomodate that idiotic electric parking brake, and the slide pin bumps stick out just too far for the rim to go around.

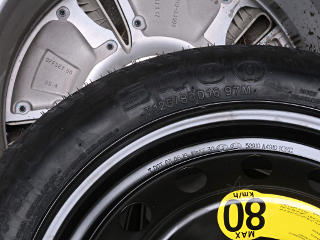
Donut is a 16 rim, stock is 17 Here's why: the spare kit is actually a 16" rim, where the OEM wheel is 17".  Read the numbers here.  As I researched a little more I realized that the dealer had probably ordered a kit that said it was "for the Kona", likely this one, but which in fact specifically says it's *not* for the Kona EV.  Evidently the gasser Kona uses 16" rims instead.

  Well, dammit.  I now had half a solution for a roadside flat, and the only workaround option for a rear tire puncture would be to carry two jacks and go through a cumbersome process -- lift one entire side of the car, swap a front wheel to the back, and put the donut on the front.  Definitely suboptimal, which drove an ongoing effort to find a better setup.

Rear floormat cut down to fit lower storage well In the meantime I had to figure out a way to package what I had for storage.  The car came with an extra double-sided piece of rubberized carpet for the "boot" floorboard, and seemed the obvious thing to use to pad the now-empty rear well that used to carry the goop-kit and granny-charger.  The floorboard itself is carpeted so there's really no point in the extra mat, so I sliced it up for a better purpose.

Donut kit resting in rear, fits under floorboard The rear well is only a little more than half-round, because the butt of the car is so short.  The donut kit could drop in at an angle, and its resting points at the front governed how the carpet-mat got cut.  It actually fit in fairly well, leaving plenty of space to stash the extra jack underneath and my various charging gubbins and accessories around it, and the floorboard could fit back in properly flat.  My air pump usually lives in the rear seat footwell so it's handy for top-ups.

    Time passes ...

  The parts guys at the dealership seemed concerned that they hadn't really gotten me a satisfactory kit, and made a token effort to find me one with a real 17" rim, but evidently such was simply not to be had in a steel-rim compact spare type.  Another option would be to simply carry a fifth full-size wheel around, which I used to do years ago in the Trooper, either taking up space inside or mounted on the external rear door bracket when needed.  That would be a pain in the ass with this car, so no.  More looking around suggested that the Kona EV variant sold in India might have a real "emergency spare tyre", but good luck finding one of those in the US.  Some of the people on various forums suggested that a Honda wheel with a 17" rim and the same bolt pattern might fit, but at 6.5 inches wide would likely not come close to fitting in the storage well.  There had to be *some* option for a thin-profile tire that could fit on a 17" rim, and/or basically put something together from parts.

In the meantime I had my klunky solution on deck, along with a string-plug kit which I bought a couple of after seeing how easily the guy at the tire shop fixed my screw problem with one.  I figured that if I could "plug and go" for a minor puncture it might be the fastest solution, even if it still meant taking a wheel off for a few minutes to facilitate the operation, and evidence supports that a properly vulcanized string plug is more "permanent" than many people believe.

A few months later, the "aha" moment finally arrived.

In cruising more online wheel-and-tire lore I happened to run across a company called "Modern Spare", whose mission seems to be providing real spare tires for the many newer cars that don't come with their own, particularly Teslas.  They make their own custom rims and fit them with narrow but robust tires that hold up better that typical donuts over some distance if necessary.  While their compatibility list didn't include the Kona EV, it seemed possible that they if anyone would be able to put together something workable on a rim that would fit both ends of the car, so I contacted them to discuss.  It turned out that they had just been researching the Kona and other Hyundai/Kia vehicles, and ironically, a slight modification of their Model 3 kit was the starting baseline.  They instructed me how to enter an order and make sure to specify that it was for a Kona and not a Tesla, and I went for it.

A few days later the wheel showed up, and it was time to do the whole fitment dance over again.  I promised to document the whole process for them carefully, as it would help them refine the offering.


Comparing stock vs. ModernSpare wheels Comparing: the Modern Spare is on the right, and definitely thinner than the stock tire but larger diameter than the donut.  The embossing says "spare tyre", leading one to wonder if perhaps this tire might be the one to show up in those Indian kits.

Stock rim center bore Modern Spare rim center bore, much bigger
The center bore helps center the wheel on the hub, and should be closely matched to go around the hub flange.  The stock tire fits quite precisely in that regard, floating the rim so that all the lugs line up centered in their holes.  The spare bore is much bigger, though, rendering center bore alignment irrelevant and leaving it up to the conical lug-nut surfaces to pull the wheel to centered.  As I understand it, the juries are still out on the merits of "hub-centric" vs "lug-centric" as regards actual load carrying.

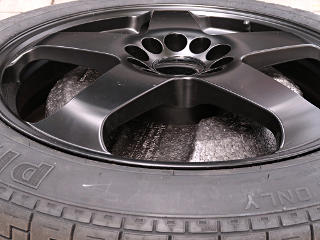
The Modern rim has ten holes, to fit a couple of typical 5-bolt patterns.


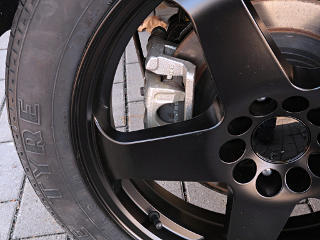
Plenty of caliper clearance now A quick test fit showed *plenty* of caliper clearance under this fairly open-spoke design.

Modern Spare offset is even worse, maybe 0 This rim is apparently *zero* offset or very little, thus placing the bearing centerline at 50mm away from that of the wheel.  Despite the wheel's greater robustness over a donut, I would still hesitate to run this too far for the sake of the bearings.  On the other hand, ordinary cornering forces are probably far greater than what an offset problem would produce, but also more temporary unless you're out at Track Day.  On asking the Modern Spare folks about that, I got some reassurance that I simply shouldn't worry about it:
... Consulting engineers indicate that a shift in wheel offset is a concern over long term use of thousands of miles and when the offset is extreme.  For a temp use spare it is not an issue.
They also very competently answered a bunch of other geeky questions I came up with.
Interestingly, the paint line on this one also lined up with the nut, leading me to wonder if there's some standard for this having to do with expected offsets.  I learned later [also from MS] that it was completely coincidental on both my spares; temporary paint stripes are applied to help warehouses identify tires in stacks.

Deep spark-plug socket into lug wells These lug wells are *deep*
The lugnut wells are *very* narrow and deep, and the appropriate limb of my bulky old cross-wrench doesn't come close to fitting down in there.  For the initial test I found that my 13/16" spark plug wrench would do, but frankly I wouldn't want to put lug-nut levels of appropriate torque on this or the 3/8" socket drive.  I did get the wheel on and tight enough for a quick test run.

Spare came with plenty of pressure inside The spare came with plenty of pressure inside, well over the 60 PSI rating, so I didn't have to give it any more air.  Probably to compensate for minor leakage in storage and still be around the correct pressure when shipped. 

Spare is slightly taller than stock The spare is if anything slightly taller than stock, although may compress down a bit more under load for the same effective rolling radius.  That would improve overall handling and make for less differential gear movement at the drive end while running in a straight line.

At this juncture I also discovered that the single-ended lug wrench that came with the Hyundai kit would fit down the lug wells -- fortunately the larger ones matching my bolt pattern, whereas the alternate holes are still too small.


Spare sorta fits in back Now came the fun part: how to fit the new wheel into storage.  It could drop into the rear well, still tilted, and fit adequately behind the seat backs.  My extra jack could still fit underneath, wrapped in a towel.  There was possibly room for the Hyundai tool-holder insert to go inside, but with a large hub surface and no offset a bit of work would be needed to make it nest better.

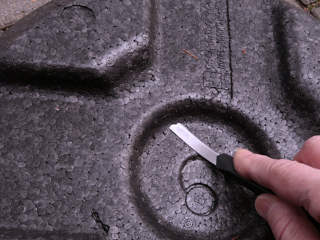
Preparing to cut styrofoam tool holder The hub surface looked to completely fill in between the bumps in the foam, so a good bit of material would need to be removed but not so much as to puncture through the carrier.

Cheap utility knives can cut around corners The nice thing about those cheapo utility knives is that the blades can bend, allowing fairly easy cutting flush to a flat surface.  Cutting the inner lip back didn't take long.

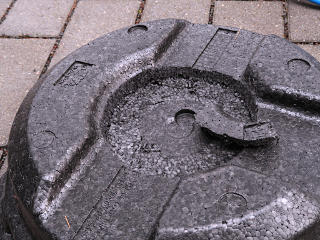
Larger accomodation for spare hub surface The cut needed to go all the way to the outer bumps, even a bit farther out than shown here, and then the Modern rim hub face could sink into this an extra inch or so.

Still sits a little too high Floorboard piece is on, but cocked up
That and a little creative cutting at one edge of the tool-holder side let the carrier and wheel fit in, but in the tilted position the front end was still a bit too high for the floorboard.  The hinged front part of it wound up cocked into the air a bit, fortunately *just* able to still fit behind the seatbacks.  This was almost acceptable, but there had to be something to improve it.

Spacing solution: a chunk of 4x4 wood There was, and the solution had been kicking around under my shop bench for years: a chunk of generic 4x4 lumber, and I didn't even have to cut it.  A slight dip in the grain on one side let it bridge a slight hump and sit very solidly at the back of the well, and with a little padding on top was able to raise the back end of the wheel to an almost level position. 

Raised position gives more room underneath Floorboard can sit flat
This fixed the tilt problem; the wheel and tool carrier *just* fit under the floorboard and it can now slide into its notches the right way completely flat.  Now the granny-charger and a couple of other items can safely go underneath the wheel, yielding more ancillary storage around the outside.  It all stays put quite nicely from gravity, and doesn't rattle around.

I'll still carry the plug kit, as being able to recover from a problem and continue on the stock wheels still has its appeal.  But all this is here for the many plausible situations where plugging wouldn't be an option.  I was *not* going to become one of those horror stories where people waited hours for "roadside assistance" to show up if ever, or limped into a shop with a tire and expensive TPMS valvestem hopelessly foamed up inside and basically ruined.  I totally agree with Modern's philosophy here: it is fundamental madness that the manufacturers have gone that route, trying to strip yet more self-sufficiency away from the public at large.


  [ Up to EV index ]

_H*   200219